SF4401 DataBase
Overview
Application Scenarios
- Industrial Automation: In scenarios such as production line monitoring, equipment status monitoring, and fault diagnosis, PLC can effectively cooperate with databases.
- Predictive Maintenance: Through the analysis of historical data, predictive maintenance of equipment can be realized, reducing downtime.
Main Functions and Product Components
DataBase enables interaction between PLC variables and databases through PLC programming (currently supports interaction with MySQL databases, and other types of databases will be supported later). The supported interaction functions include: creating tables, reading data from tables, appending data, updating data in tables, and retaining the last several rows in tables. Other commonly used database functions will be gradually supported later, such as: deleting specific rows in tables, inserting data, querying table names, querying table structures, deleting tables, etc.
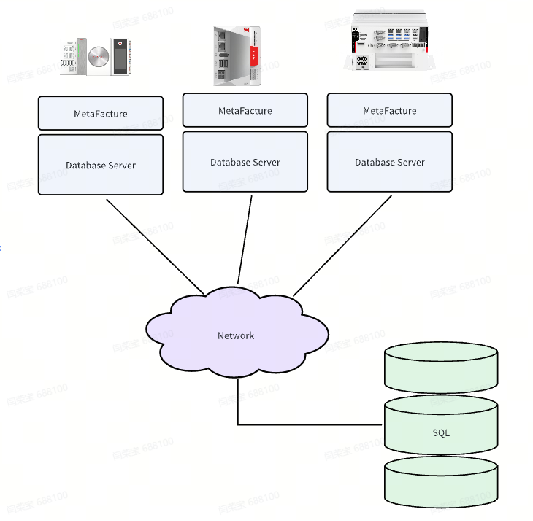
Overall Architecture
Operation and Usage Tutorial
Download: 🧷**DataBase Operation Manual.zip**
All software installers, sample projects, and other contents mentioned in this article can be obtained from the official website/resource download section of Sinsegye.
You can watch the operation demonstration teaching video through the following link. You can see the most detailed explanation and operation by product engineers, which will help you master and learn to use this product faster.
Installation and Uninstallation
The DataBase product has three components, so to use DataBase, you need to start by installing these three components. The following is a detailed introduction:
- Install the database RTE component on the iComputer side
- Upload the deb package to the /home/sinsegye directory in the Linux environment of the iComputer. For the upload method, refer to the appendix.
- After the upload is completed, execute the command on the iComputer to install (refer to the screenshot below. If the module file name changes, modify the file name in the command line accordingly)
sudo dpkg -i sf4401db_0.0.1-rc.4_amd64.deb

- Modify the RTE configuration file, add sf4401db under the ComponentManger module, and remove SE4100 at the same time.
sudo vim /usr/local/etc/SinsegyeRTE/SinsegyeRTE.cfg
ComponentManager
Component.0=retainDeamon
Component.1=CmpCanBusUtils
Component.2=CmpSinsegyeLibs
Component.3=SinsegyeCmp
Component.4=sf4401db
- Restart the RTE service so that the newly added sf4401db is called
sudo systemctl restart sinsegyerte.service
- Deploy the database background service component on the iComputer side
First, you need to deploy .Net SDK 6.0.0. Execute the following commands under the condition of internet access
wget https://packages.microsoft.com/config/ubuntu/22.04/packages-microsoft-prod.deb -O packages-microsoft-prod.deb
#If the iComputer system is not 22.04, replace 22.04 in the first command with the corresponding version
sudo dpkg -i packages-microsoft-prod.deb
sudo rm -rf packages-microsoft-prod.deb
sudo apt-get update
sudo apt-get install -y dotnet-sdk-6.0
sudo apt-get install -y aspnetcore-runtime-6.0
sudo apt-get install -y dotnet-runtime-6.0
sudo cp -r /usr/lib/dotnet/host/ /usr/share/dotnet/ #May not be needed for non-22.04 versions
sudo cp -r /usr/lib/dotnet/shared/ /usr/share/dotnet/ #May not be needed for non-22.04 versions
dotnet --info #Check net service information. No error indicates successful installation
Upload the database background service package to the /home/sinsegye directory of the iComputer (refer to the appendix for the upload method), then unzip it
sudo unzip dbservice.zip
Upload the dbservice.service file to /lib/systemd/system/ (refer to the appendix for the upload method), then execute the following commands
sudo systemctl daemon-reload
sudo systemctl status dbservice.service
sudo systemctl start dbservice.service
sudo systemctl enable dbservice.service
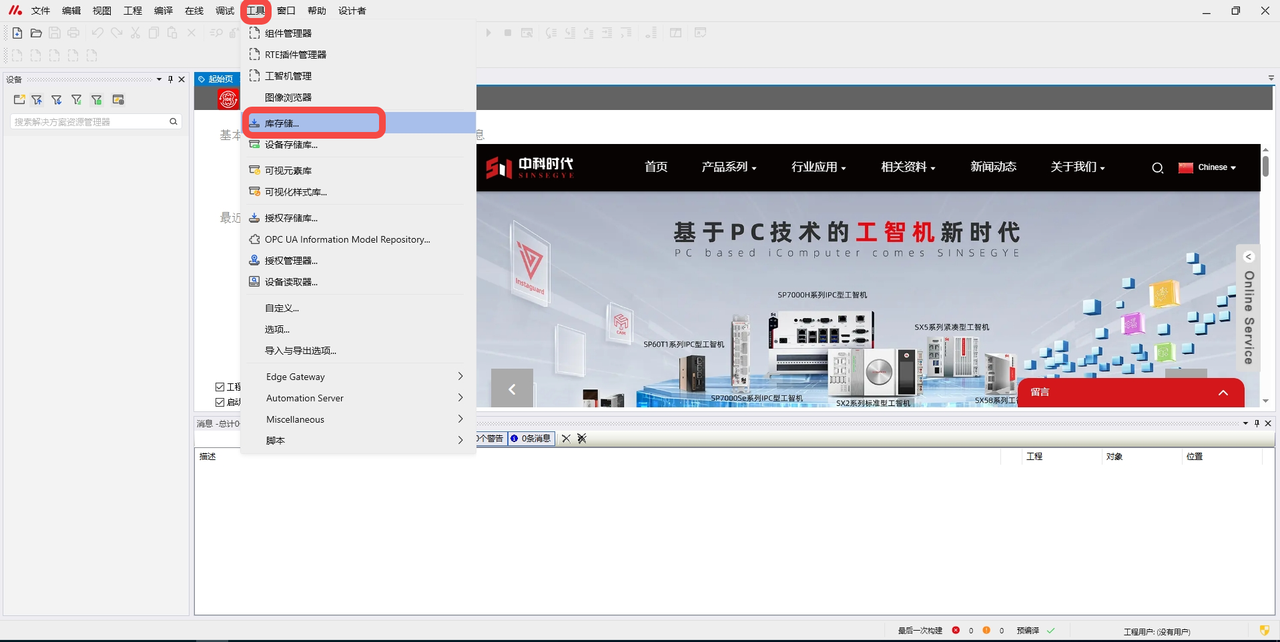
- Deploy the DataBase library on the IDE side
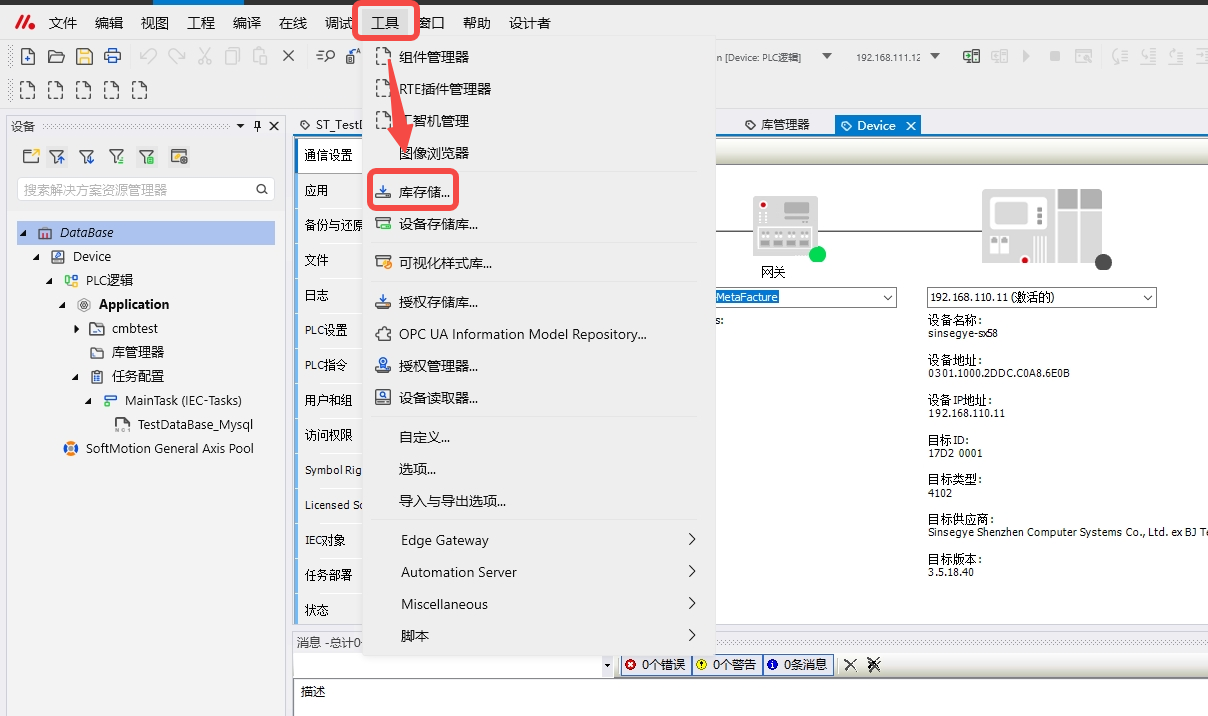
In MetaFacture, click the top menu bar "Tools" -- "Library Storage";
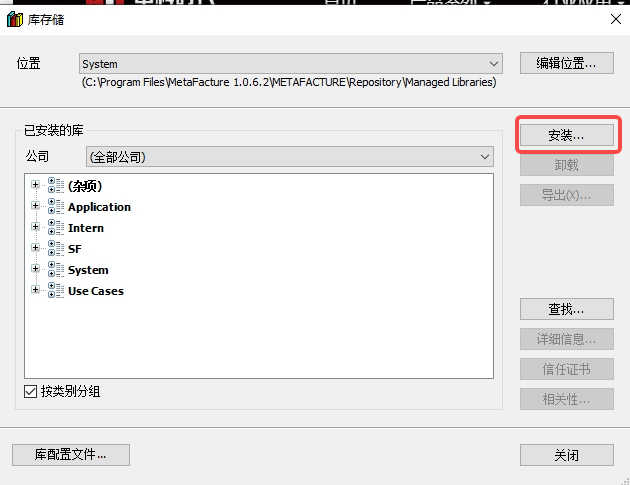
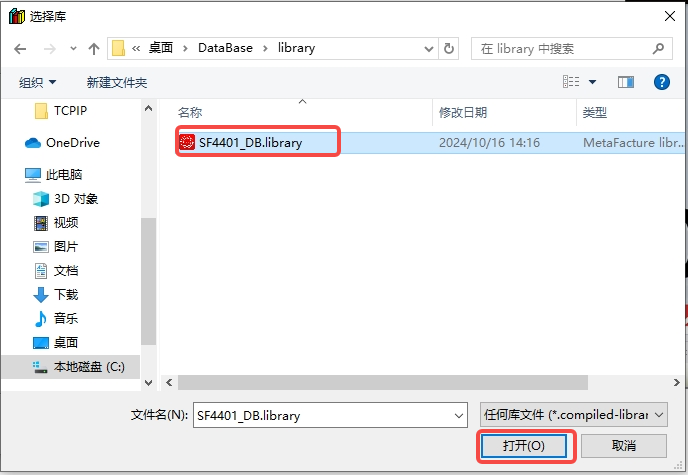
In the pop-up dialog box, click "Install" -- select SF4401_DB.library -- click "Open";
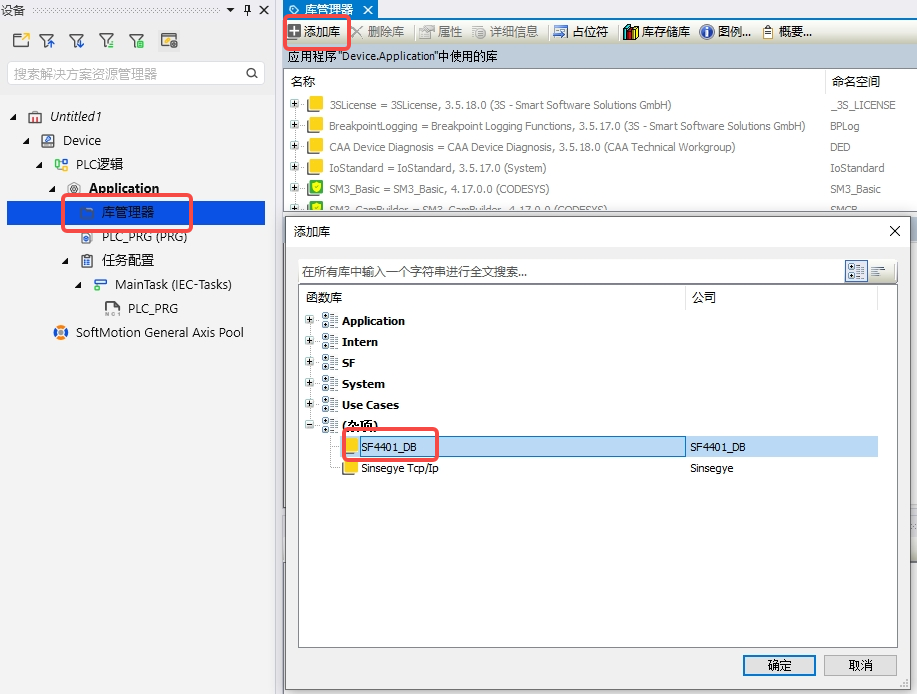
Double-click "Library Manager" in the project -- "Add Library" -- double-click "SF4401_DB" to complete loading the library;

Update Installation
- Upgrade the iComputer database RTE component
- Upload the upgraded deb package to the /home/sinsegye directory in the Linux environment of the iComputer. For the upload method, refer to the appendix.
- After the upload is completed, execute the command on the iComputer to install (refer to the screenshot below. If the module file name changes, modify the file name in the command line accordingly)
sudo dpkg -i sf4401db_0.0.1-rc.4_amd64.deb
Restart the RTE service so that the newly upgraded sf4401db is called
sudo systemctl restart sinsegyerte.service
- Upgrade the iComputer database background service
Upload the database background service upgrade package to the /home/sinsegye directory of the iComputer (refer to the appendix for the upload method), then unzip it
sudo unzip dbservice.zip
Upload the new dbservice.service file to /lib/systemd/system/ (refer to the appendix for the upload method), then execute the following commands
sudo systemctl daemon-reload
sudo systemctl status dbservice.service
sudo systemctl start dbservice.service
sudo systemctl enable dbservice.service
- Upgrade the DataBase library on the IDE side
In MetaFacture, click the top menu bar "Tools" -- "Library Storage";

In the pop-up dialog box, click "Install" -- select the new version of SF4401_DB.library -- click "Open";


Double-click "Library Manager" in the project -- "Add Library" -- double-click the newly installed "SF4401_DB" to complete loading the library;
Uninstallation Process
- Uninstall the iComputer database RTE module
Execute the command on the iComputer to uninstall
sudo dpkg -r sf4401db
Modify the RTE configuration file, remove sf4401_db under the ComponentManger module
sudo vim /usr/local/etc/SinsegyeRTE/SinsegyeRTE.cfg
- Uninstall the database background service on the iComputer side
Execute the following commands on the iComputer
sudo systemctl stop dbservice.service
sudo systemctl disable dbservice.service
sudo rm -rf /lib/systemd/system/dbservice.service
sudo systemctl daemon-reload
sudo rm -rf /home/sinsegye/dbservice/
- Uninstall the DataBase library on the IDE side
In the MetaFacture interface, click "Tools" -- "Library Storage"
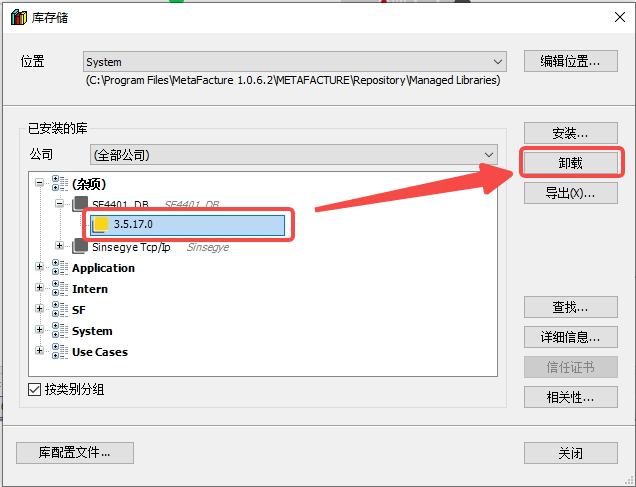
In the dialog box, select the installed sf4401 library and click "Uninstall"
Quick Start
(1) Software and hardware configuration in this example
- Hardware: SX58 iComputer / win10 PC
- Software: MetaFacutre V1.0.6.2
(2) Experimental operation steps in this example
Experimental requirement: Configure the DataBase environment according to the "Installation Process" in the "Installation and Uninstallation" section, and ensure that the test1 database exists in the MySQL database
- The experimental steps to establish a connection with the database are as follows:
Call the function block FB_PLCDBAddConnection of the SF4401_DB library in the POU declaration area
fbCreateCon : SF4401.FB_PLCDBAddConnection;
sdbs : STRING := 'test1'; //Define the database name test1
addcon_execute:bool;
Call fbCreateCon in the POU program area, configure the database's IP and port, name, database username and password
fbCreateCon(sNetID:= '192.168.111.152:3306', //IP and port of the MySQL database
eDBType:= 0, //0 represents the database type MySQL
sDBServer:= sdbs, //Name of the database
sDBUserId:= 'remoteuser',
sDBPassword:= 'password',
bExecute:= addcon_execute,
tTimeout:= T#5S, bBusy=> ,
bError=> ,
sDBID=> DBID,
sMessage=> );
Triggering the rising edge of bExecute will establish a connection with the database
- The experimental steps to obtain the database ID are as follows:
Experimental requirement: Need to first perform Experiment 1 to establish a connection with the MySQL database
Call the function block FB_PLCDBGetConnection of the SF4401_DB library in the POU declaration area
fbGetCon : SF4401.FB_PLCDBGetConnection;
sdbs : STRING := 'test1'; //Define the database name test1
get_execute : Bool;
DBID: STRING:= ''; //Used to store the obtained database ID
Call fbGetCon in the POU program area
fbGetCon(sNetID:= '192.168.111.152:3306',
name:= sdbs,
eDBType:= 0,
bExecute:= get_execute,
tTimeout:= T#5S,
bBusy=> ,
bError=> ,
sDBID=> DBID,
sMessage=>);
Triggering the rising edge of bExecute will obtain the database ID
- The experimental steps to create a table are as follows:
Experimental requirement: Need to first perform Experiment 2 to obtain the database ID
Call the function block FB_PLCDBDeleteConnection of the SF4401_DB library in the POU declaration area, and call ST_ColumnInfo to define the column information of the table
fbCreateTable : SF4401.FB_PLCDBCreateTable;
ColumnInfo : ARRAY0..255 OF SF4401.ST_ColumnInfo;
table_name : STRING := 'test1.dbtest_table1'; //Name of the table to be created
Define the name and attributes of each column of the table in the POU program area, and call fbCreateTable
ColumnInfo0.sName := 'Long_test';ColumnInfo0.eType := SF4401.E_ColumnType.Long; ColumnInfo0.nLength := 8;
ColumnInfo1.sName := 'Int_test';ColumnInfo1.eType := SF4401.E_ColumnType.Integer; ColumnInfo1.nLength := 4;
ColumnInfo2.sName := 'Bool_test';ColumnInfo2.eType := SF4401.E_ColumnType.Bool_; ColumnInfo2.nLength := 1;
ColumnInfo3.sName := 'Long_test2';ColumnInfo3.eType := SF4401.E_ColumnType.Long; ColumnInfo3.nLength := 8;
ColumnInfo4.sName := 'String_Test';ColumnInfo4.eType := SF4401.E_ColumnType.STRING_; ColumnInfo4.nLength := 81;
ColumnInfo5.sName := 'Double_test';ColumnInfo5.eType := SF4401.E_ColumnType.Double; ColumnInfo5.nLength := 8;
ColumnInfo6.sName := 'Double_test2';ColumnInfo6.eType := SF4401.E_ColumnType.Double; ColumnInfo6.nLength := 8;
ColumnInfo7.sName := 'Time_test';ColumnInfo7.eType := SF4401.E_ColumnType.DateTime; ColumnInfo7.nLength := 8;
//Create the defined table
fbCreateTable(sDBID:= DBID, //Database ID obtained in Experiment 2
sTableName:= table_name, //Name of the table
aTableCfg:= ColumnInfo,
cbTableCfg:= 8,
bExecute:= table_execute,
tTimeout:= T#5S,
bBusy=> ,
bError=> ,
sMessage=>);
Triggering the rising edge of bExecute will successfully create the table dbtest_table1 in the database test1
- Write data into the table
Experimental requirement: Need to first perform Experiment 3 to create the table dbtest_table1
Call the function block SF4401.FB_PLCDBWrite of the SF4401_DB library in the POU declaration area; define the column information of the table to be written;
fbWrite : SF4401.FB_PLCDBWrite;
writeColumnNames: ARRAY 0..255 OF STRING(50);
writeStructArr : ARRAY 0..255 OF ST_TestDataBase;
ST_TestDataBase is a defined structure that defines the column names and type information of each column of the table;
TYPE ST_TestDataBase :
STRUCT
Long_test : LINT;
Int_test : DINT;
Bool_test : BOOL;
Long_test2 : LINT;
String_Test : STRING;
Double_test : LREAL;
Double_test2 : LREAL;
Time_test : DATE_AND_TIME;
END_STRUCT
END_TYPE
Set the column name information of the table in the POU program area, then assign values to each column, and then call fbWrite to trigger the write action;
writeColumnNames0 := 'Long_test';
writeColumnNames1 := 'Int_test';
writeColumnNames2 := 'Bool_test';
writeColumnNames3 := 'Long_test2';
writeColumnNames4 := 'String_Test';
writeColumnNames5 := 'Double_test';
writeColumnNames6 := 'Double_test2';
writeColumnNames7 := 'Time_test';writeStructArr0.Long_test := 110;
writeStructArr0.Int_test := 111;
writeStructArr0.Bool_test := FALSE;
writeStructArr0.Long_test2 := 115;
writeStructArr0.String_Test := 'asdsadsada';
writeStructArr0.Double_test := 101.0;
writeStructArr0.Double_test2 := 100.0;
writeStructArr0.Time_Test := DT#2024-10-22-13:10:00;writeStructArr1.Long_test := 216;
writeStructArr1.Int_test := 215;
writeStructArr1.Bool_test := TRUE;
writeStructArr1.Long_test2 := 200;
writeStructArr1.String_Test := 'gggsdfsfdsf';
writeStructArr1.Double_test := 200.0;
writeStructArr1.Double_test2 := 200.0;
writeStructArr1.Time_Test := DT#2024-10-22-13:13:00;writeStructArr2.Long_test := 214;
writeStructArr2.Int_test := 215;
writeStructArr2.Bool_test := TRUE;
writeStructArr2.Long_test2 := 200;
writeStructArr2.String_Test := 'gggsdfsfdsf';
writeStructArr2.Double_test := 200.0;
writeStructArr2.Double_test2 := 200.0;
writeStructArr2.Time_Test := DT#2024-10-21-12:12:12;fbWrite(sDBID:= DBID,
sTableName:= table_name,
sColumnNames:= writeColumnNames,
sOrderByColumn:=writeColumnNames0,
pRecord:= ADR(writeStructArr),
cbRecord:= SIZEOF(ST_TestDataBase),
dataCount:= 3,
eDBWriteMode:= SF4401.E_WriteMode.DB_Append, //Use Append mode
//eDBWriteMode:= SF4401.E_WriteMode.DB_RingBuff_count //Use RingBuff_count mode
nRingBuffParameter:= 10,
bExecute:= write_append_execute,
tTimeout:= T#5S,
bBusy=> ,
bError=> ,
sMessage=>);
Triggering the rising edge of bExecute will write data into the table dbtest_table1
- Read data from the table
Experimental requirement: Need to first perform Experiments 3 and 4 to create the table dbtest_table1 and write data into it
Call the function block FB_PLCDBReadStruct of the SF4401_DB library in the POU declaration area, define the column information ColumnNames of the table to be read, and define the variable myCustomStructArr to save the data;
fbReadStruct : SF4401.FB_PLCDBReadStruct;
ColumnNames: ARRAY 0..255 OF STRING(50);
myCustomStructArr : ARRAY 0..3 OF ST_TestDataBase;
Set the column name information of the table to be read in the POU program area, then call fbReadStruct
ColumnNames0 := 'Long_test';
ColumnNames1 := 'Int_test';
ColumnNames2 := 'Bool_test';
ColumnNames3 := 'Long_test2';
ColumnNames4 := 'String_Test';
ColumnNames5 := 'Double_test';
ColumnNames6 := 'Double_test2';
ColumnNames7 := 'Time_Test';fbReadStruct(
sDBID:= DBID,
sTableName:= table_name,
sColumnNames:= ColumnNames,
sOrderByColumn:= 'id',
eOrderType:= SF4401.E_OrderType.ASC,
nStartIndex:= 1,
nRecordCount:= 2,
pData:= ADR(myCustomStructArr),
cbData:= SIZEOF(ST_TestDataBase),
bExecute:= read_execute,
tTimeout:= T#5S,
bBusy=> ,
bError=> ,
sMessage=>);
Triggering the rising edge of bExecute will read the data from the table dbtest_table1 and save it in myCustomStructArr
- Disconnect from the MySQL database
Experimental requirement: Need to perform Experiment 1 to establish a connection with the database and obtain the database ID information
Call the function block FB_PLCDBDeleteConnection of the SF4401_DB library in the POU declaration area
fbDelCon : SF4401.FB_PLCDBDeleteConnection;
DBID : STRING :='';
delecon_execute : Bool;
Call fbDelCon in the POU program area, input the IP and port of the database and the ID
fbDelCon(
sNetID:= '192.168.111.152:3306',
sDBID:= DBID,
bExecute:= delcon_execute,
tTimeout:= T#5S,
bBusy=> ,
bError=> ,
sMessage=>);