ACP ST
Overview
Clients can read and write variables of industrial control computers with ACP functions installed by using Acp library files and ST language function blocks.
Connection topology diagram:
The following table outlines each product component:
| Product Components | Description |
|---|---|
| DeviceManager_0.0.1.9 | Plugin manager |
| AcpServer.projectarchive | PLC server project archive |
| AcpClient.projectarchive | PLC client project archive |
| SF1000_ACPBaseLibs_1.0.1.0 | PLC library file |
| SF1000_AcpSymbol_1.0.1.1 | PLC library file |
Installation and Uninstallation
Installation Requirements
- The built-in system of Sinsegye's factory-produced icomputer;
- Personal computers must have access to the Internet.
Installation Process
1. Install acpplcaccess.deb component on the server icomputer
-
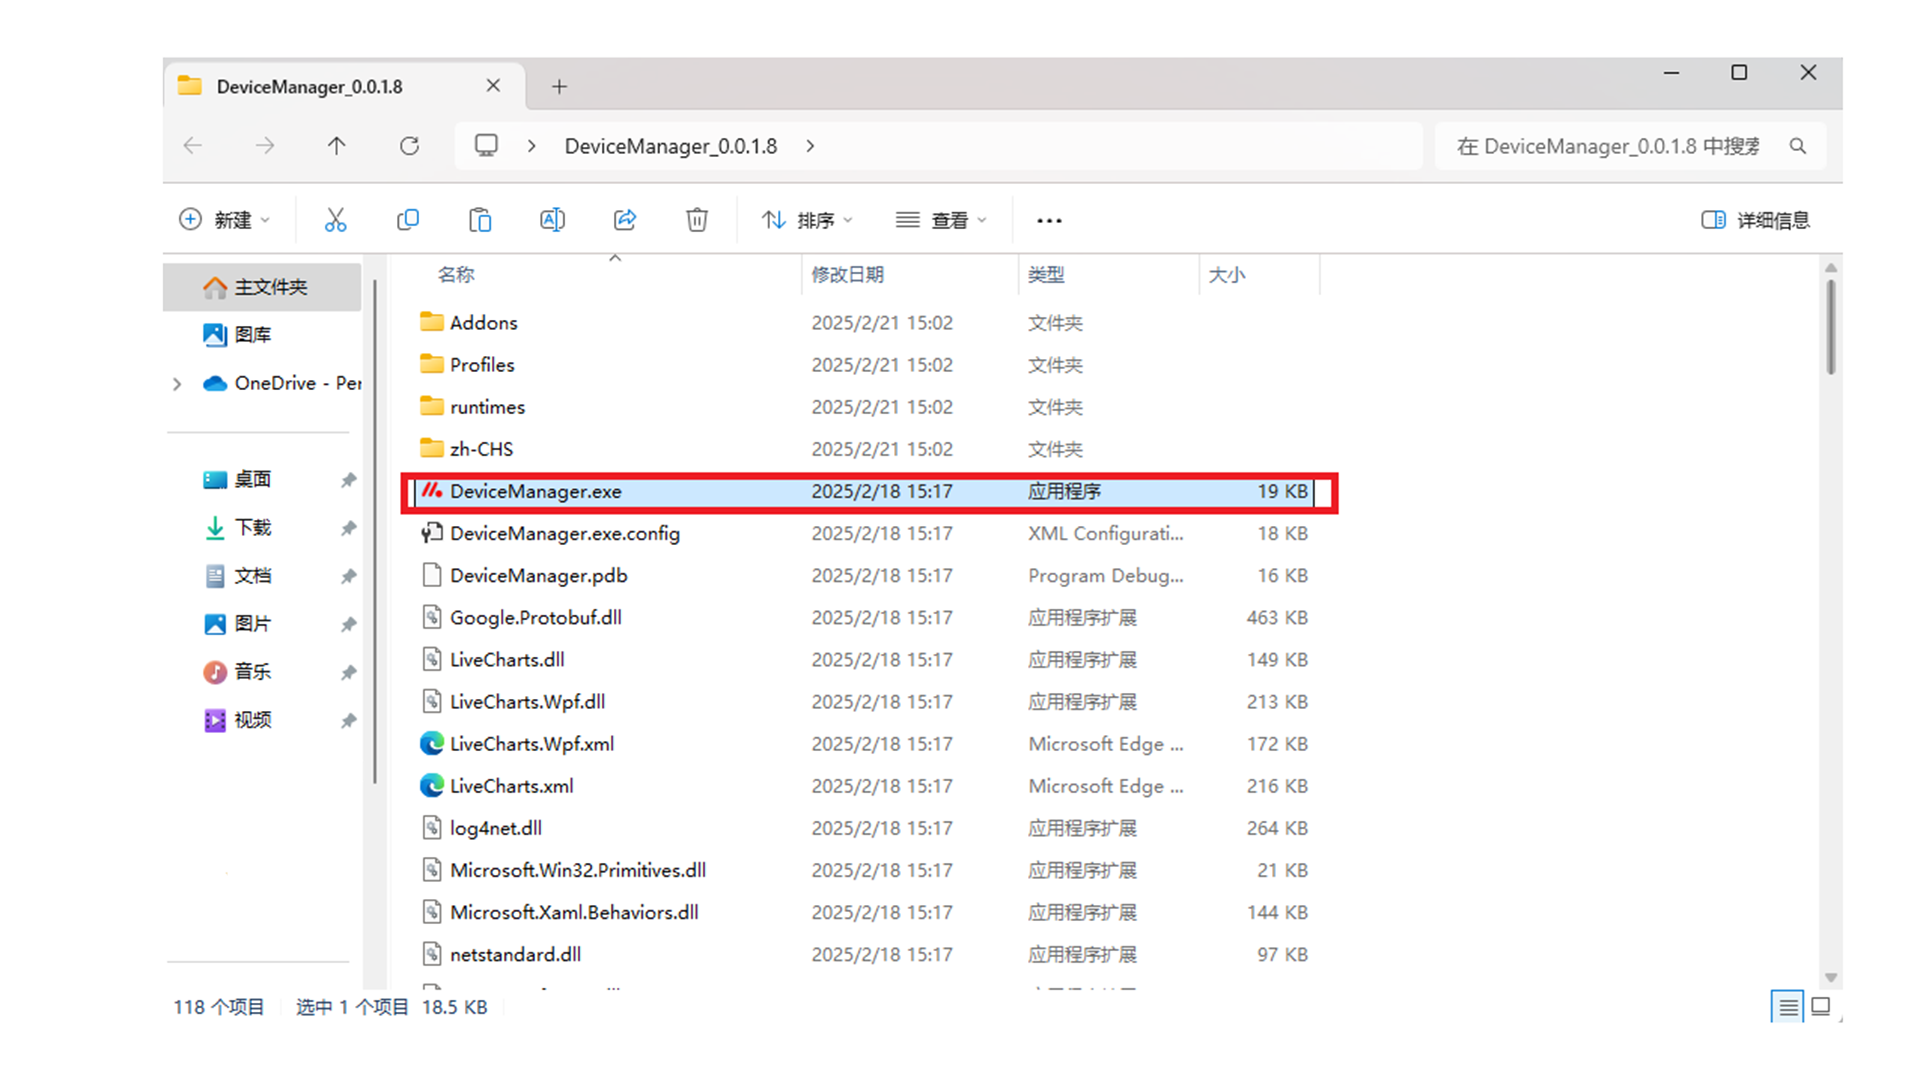
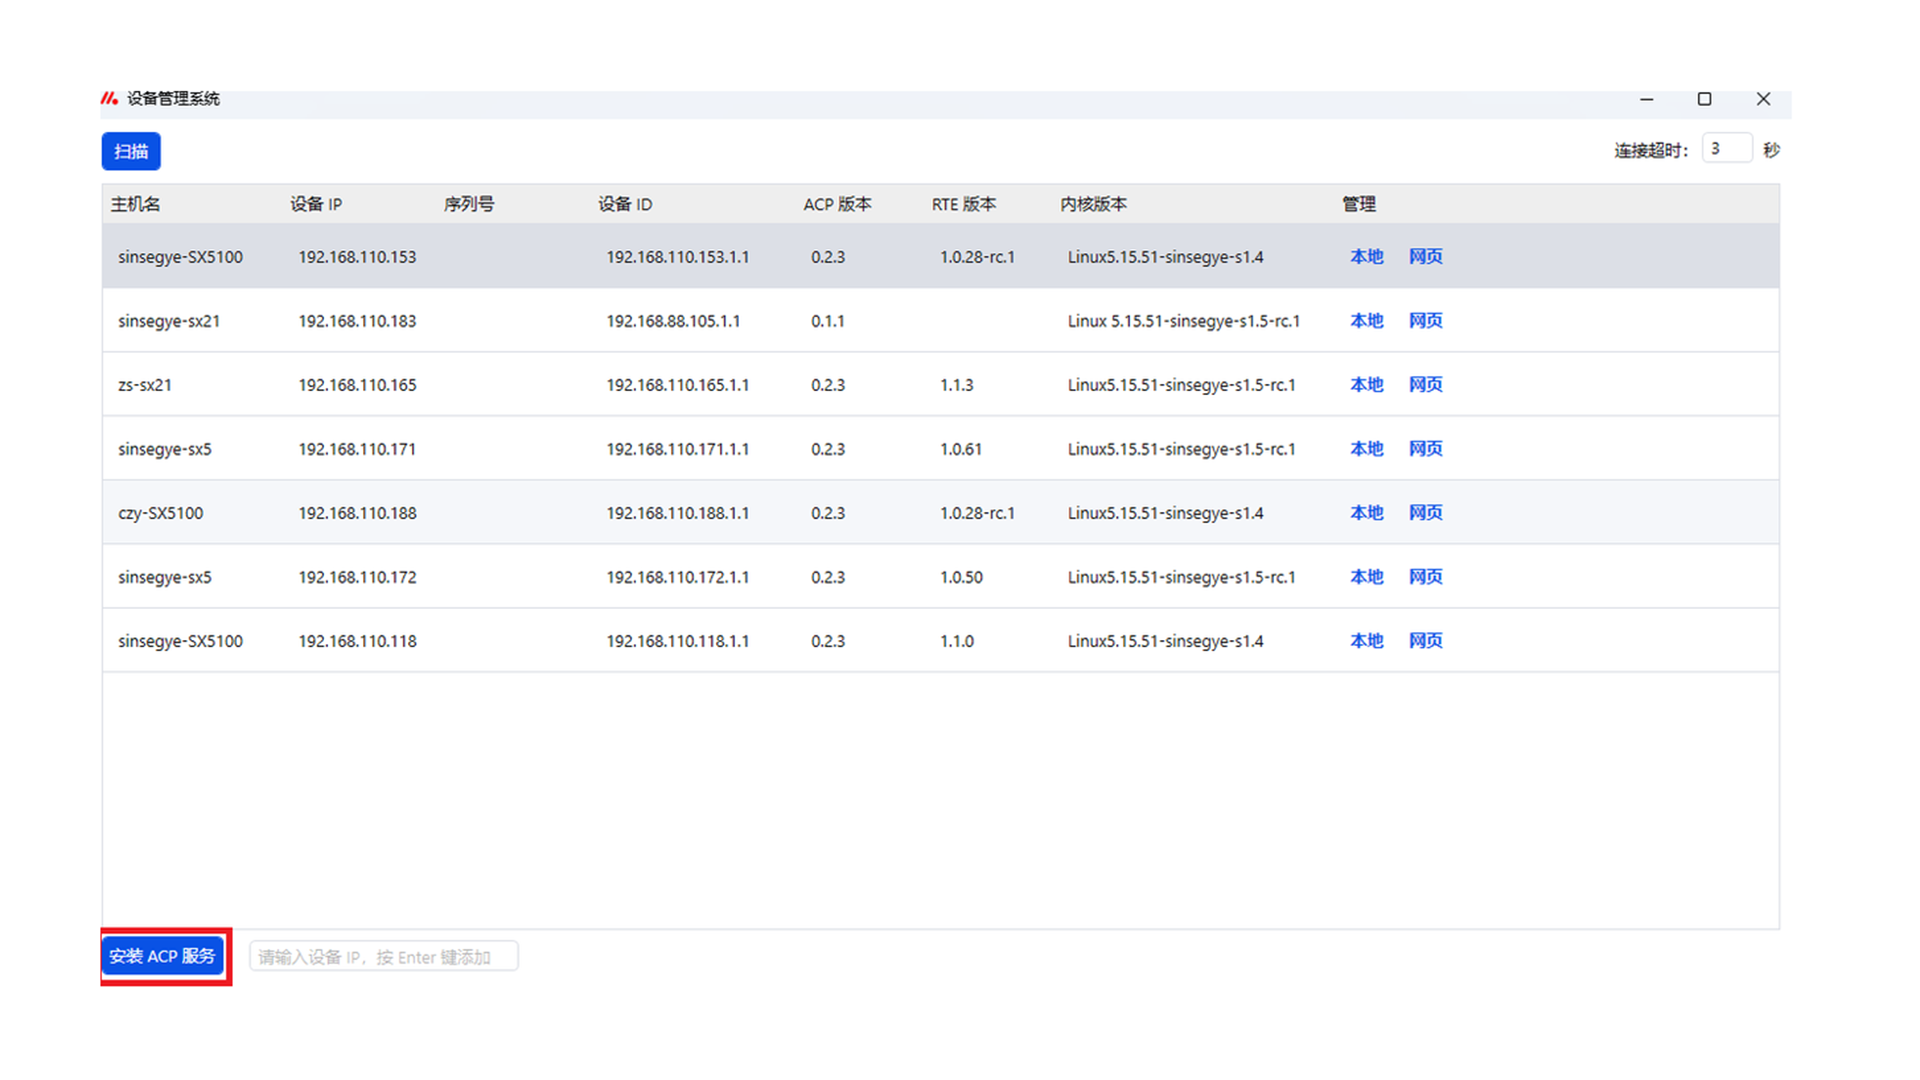
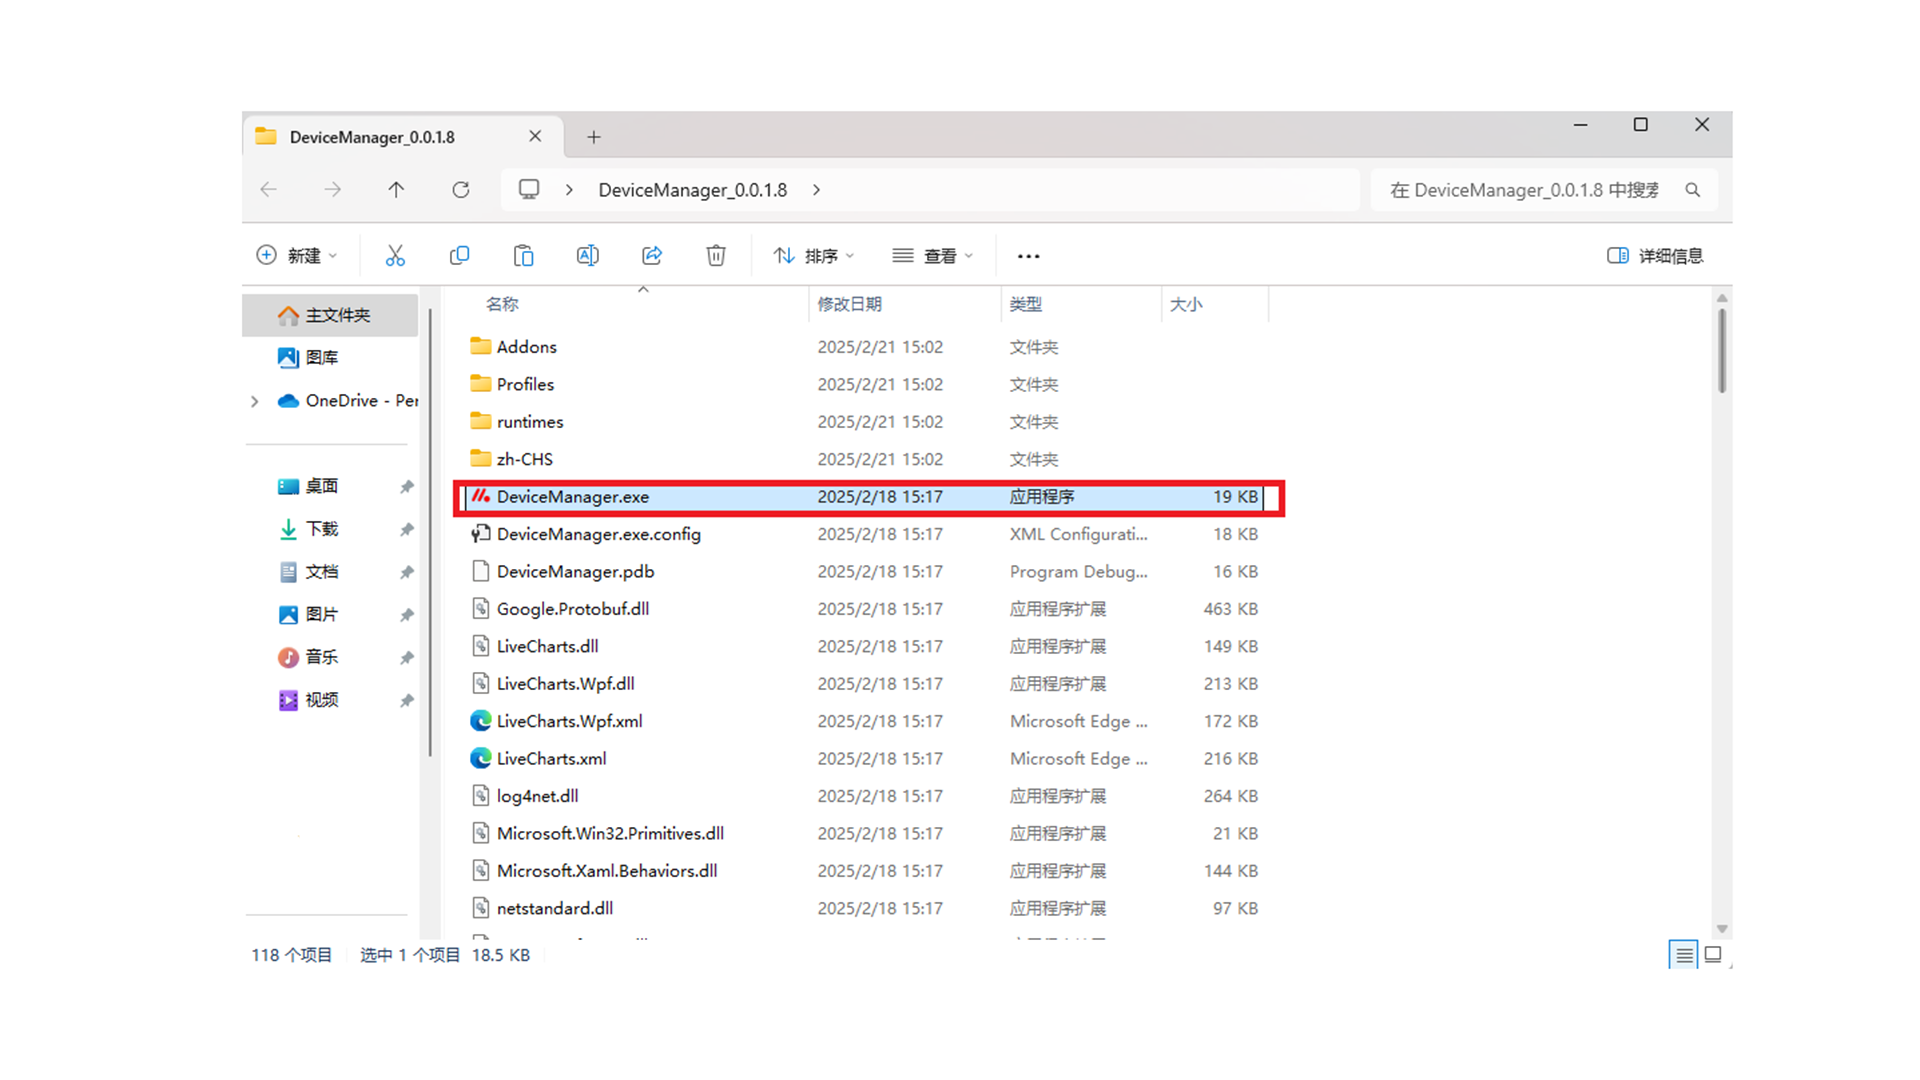
Open the Device Manager software.
-
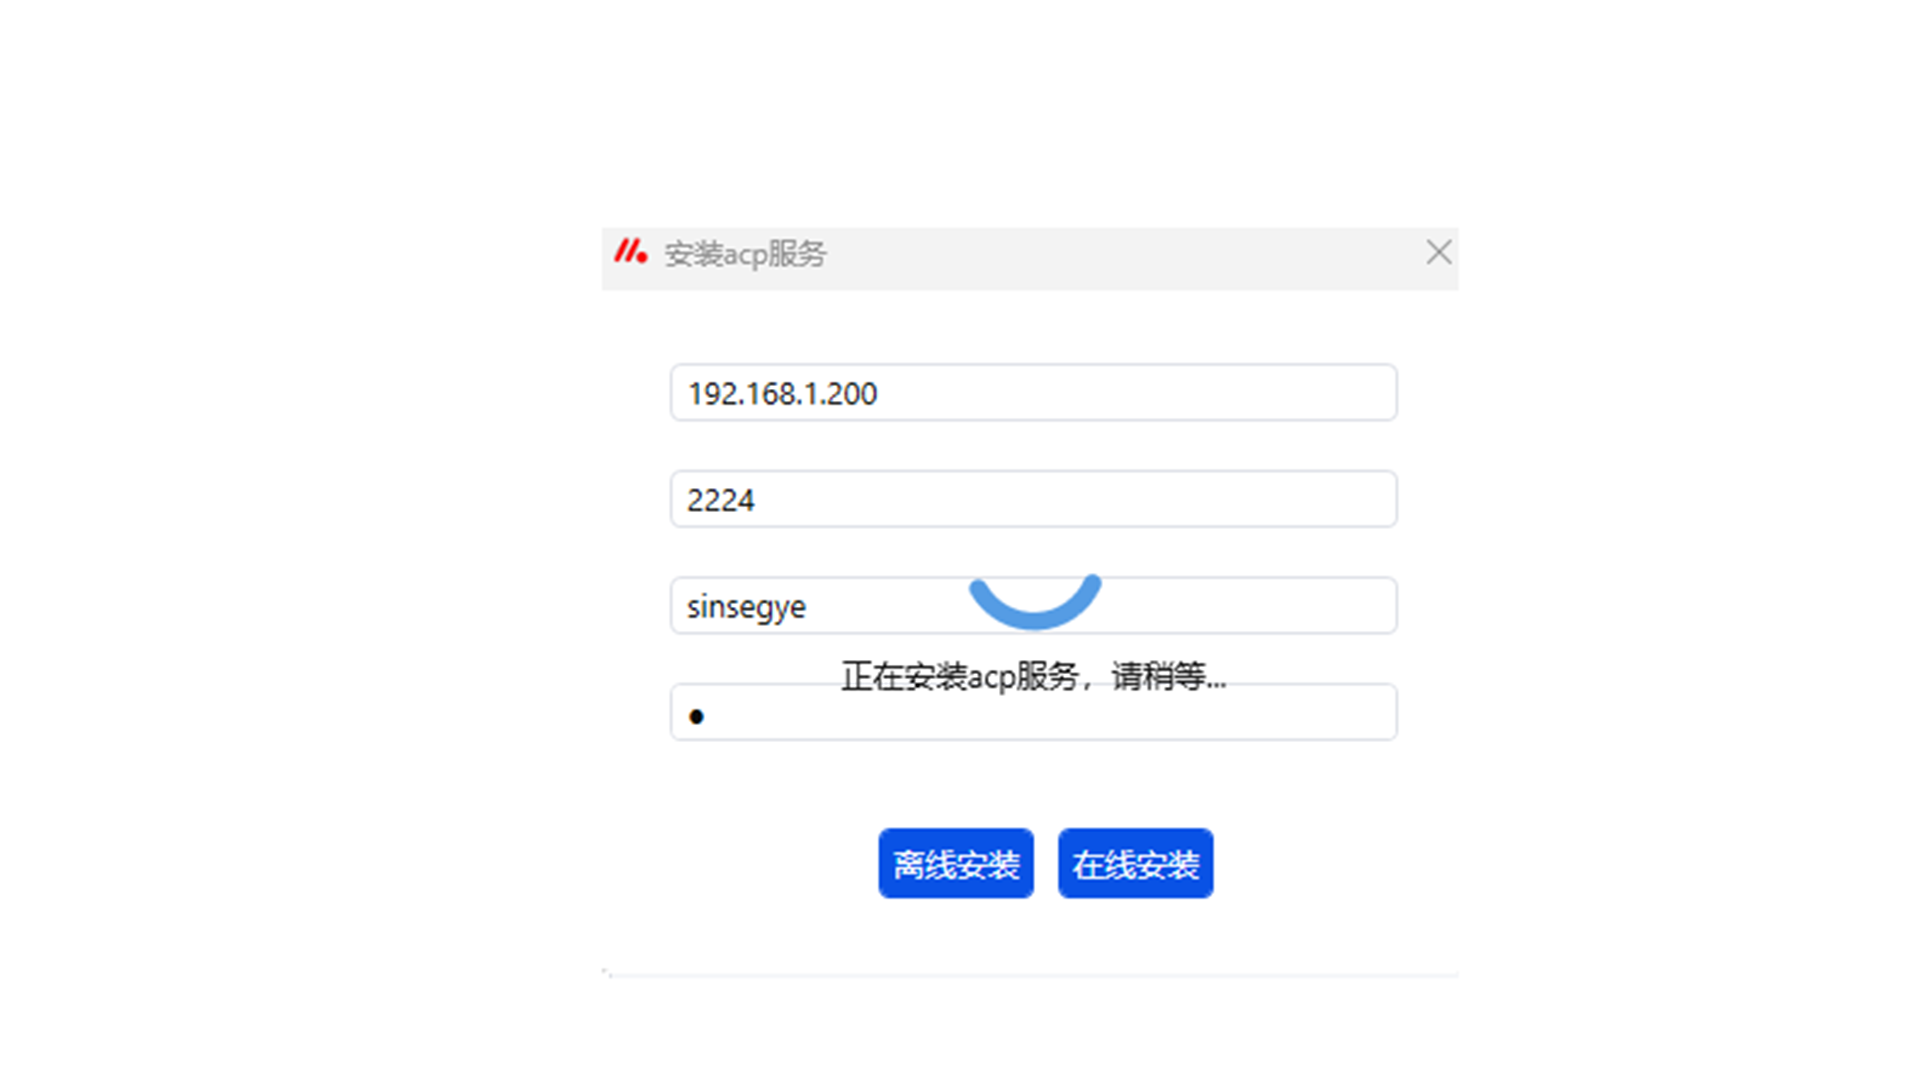
For first-time use, you need to install the ACP communication service. Click "Install ACP Service" at the bottom left.
-
Enter the fixed IP address, port, username, and password of the icomputer, then click "Online Install".
IP Address 192.168.1.200 Port 2224 Username sinsegye Password 1 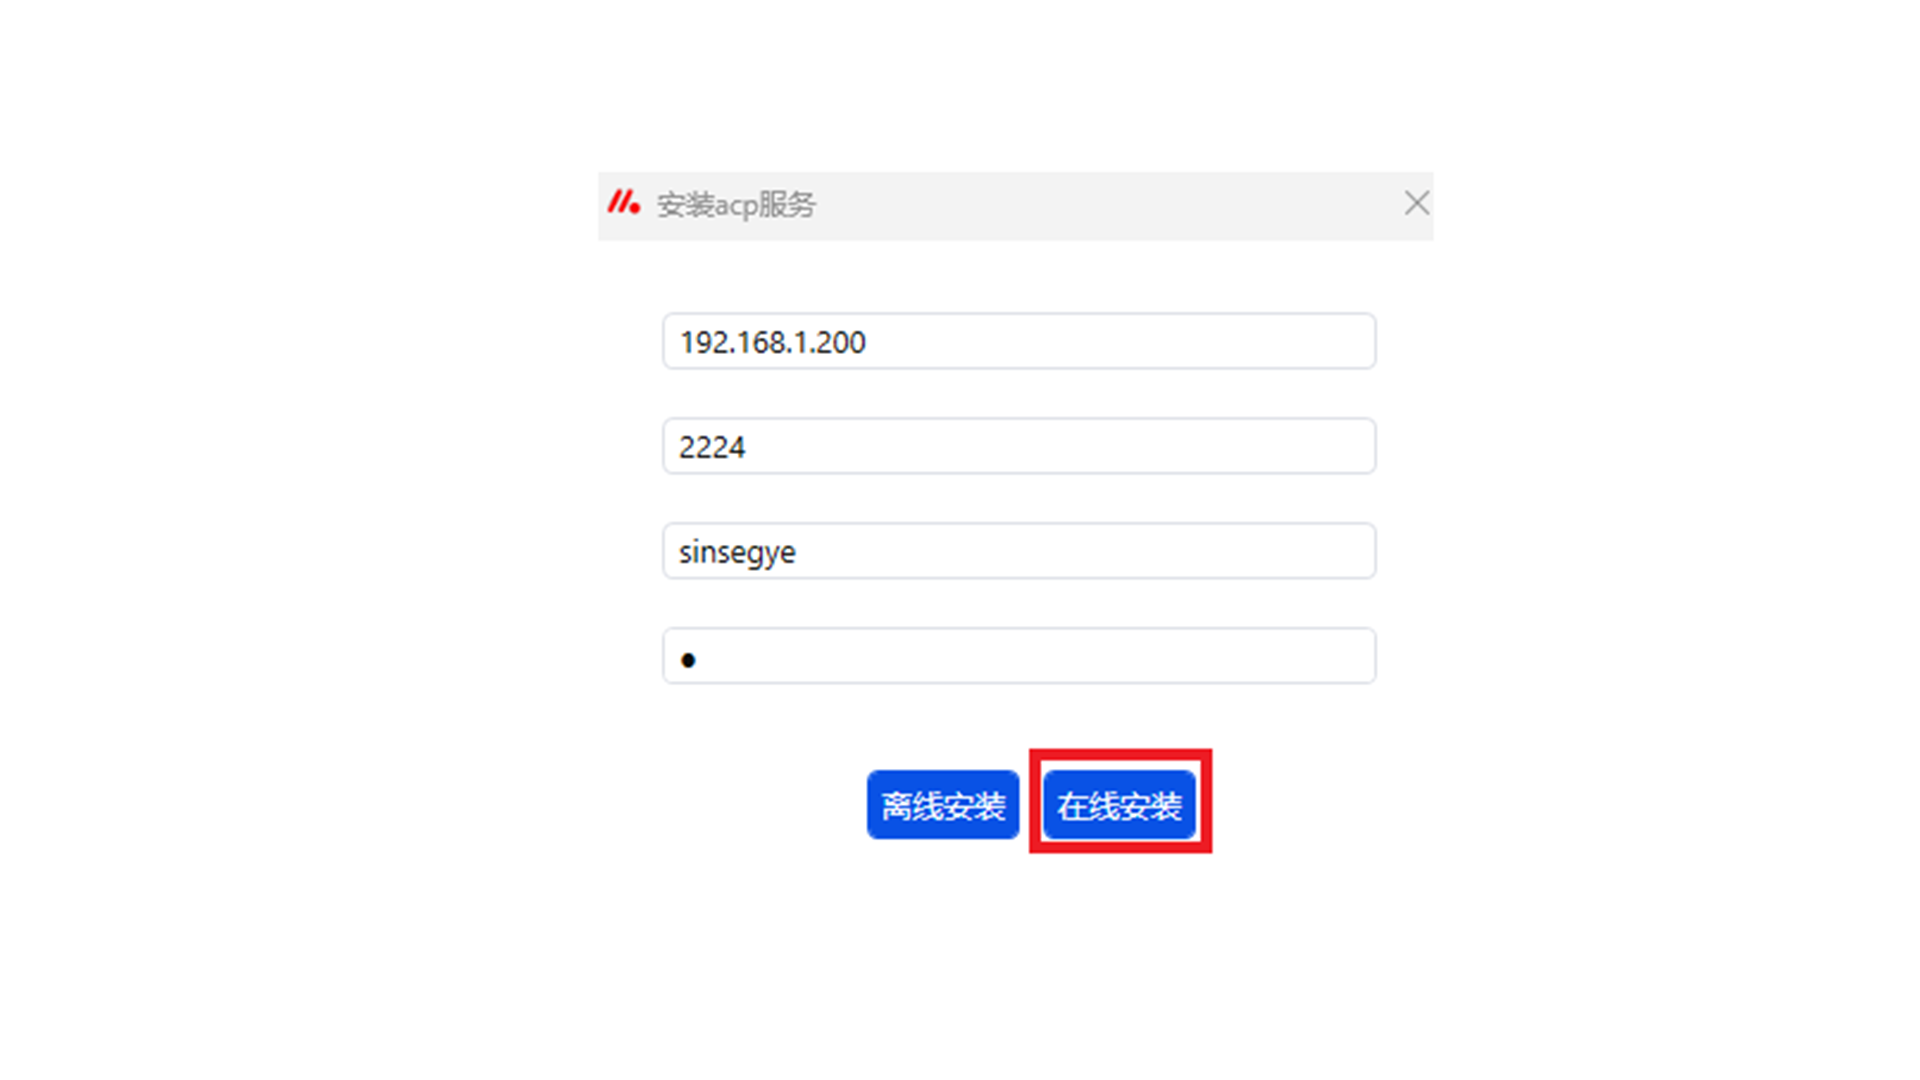
Wait for the installation to complete.
-
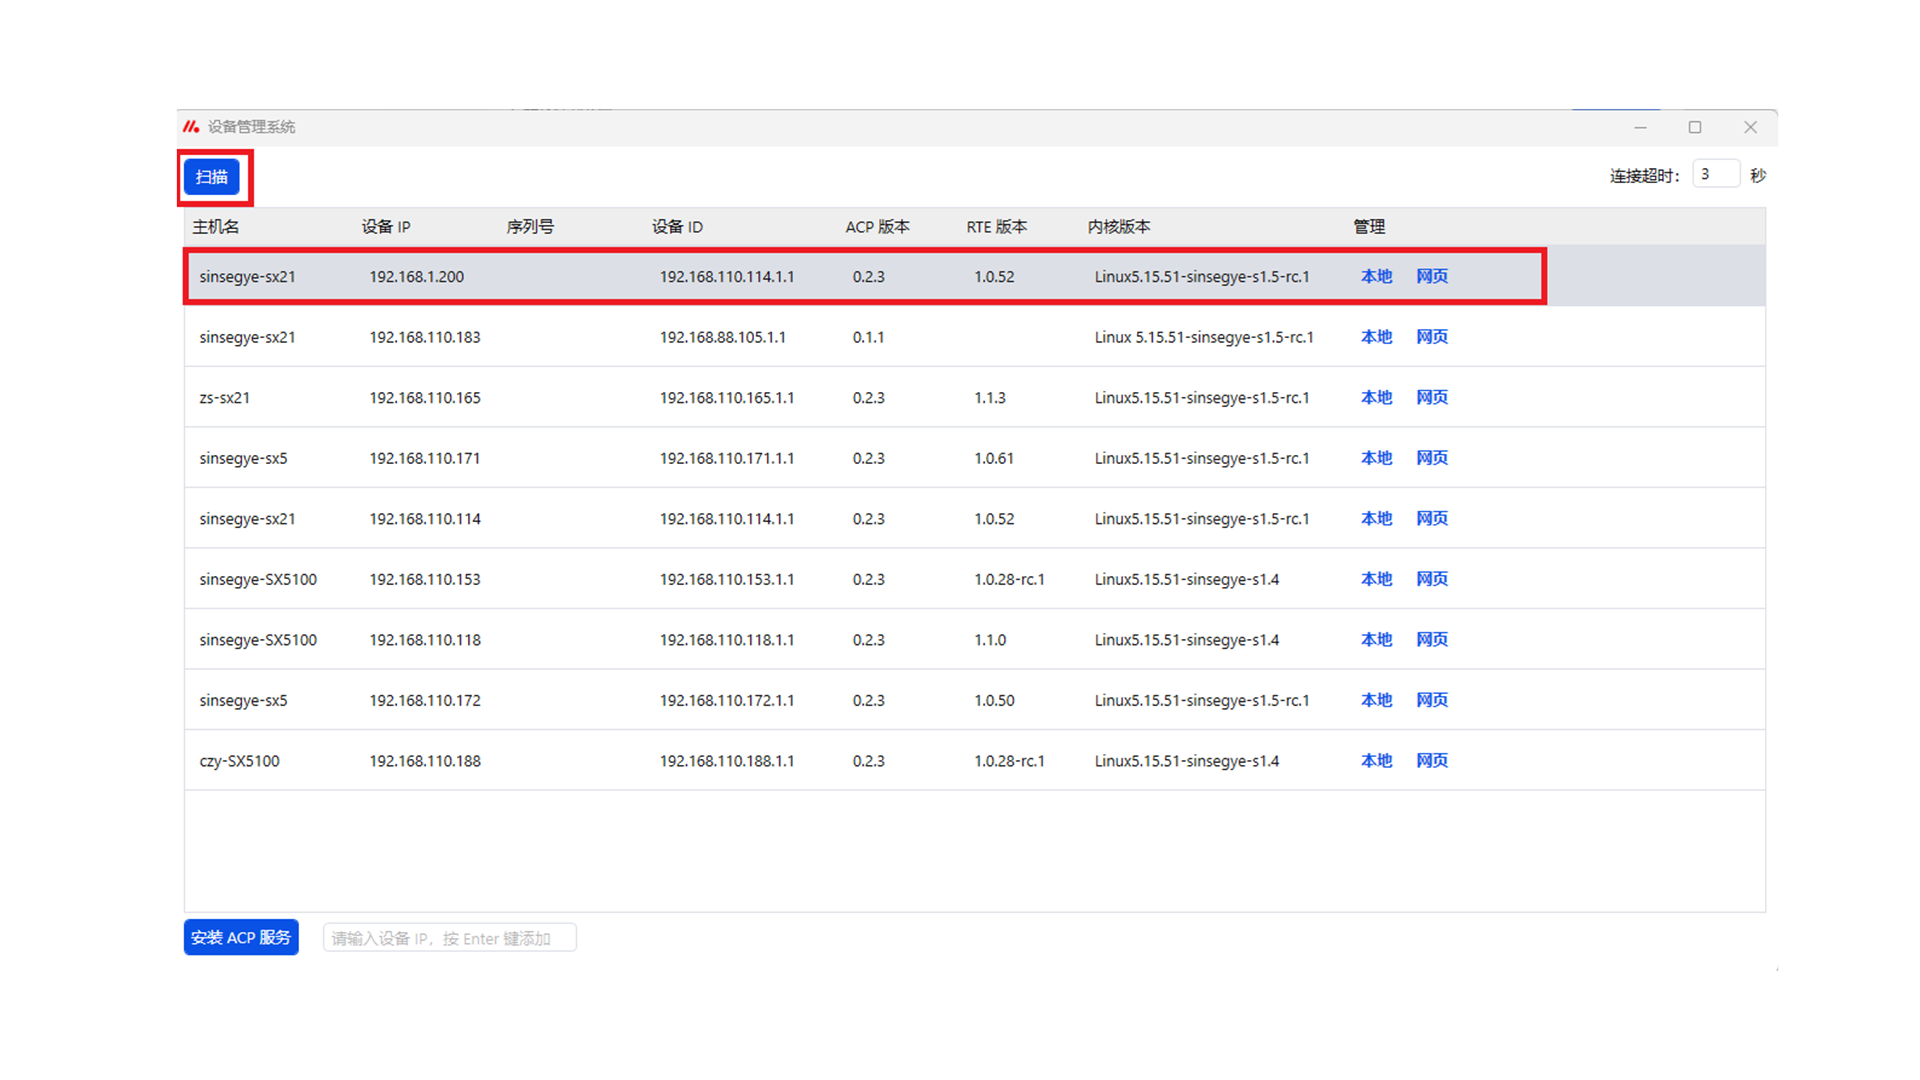
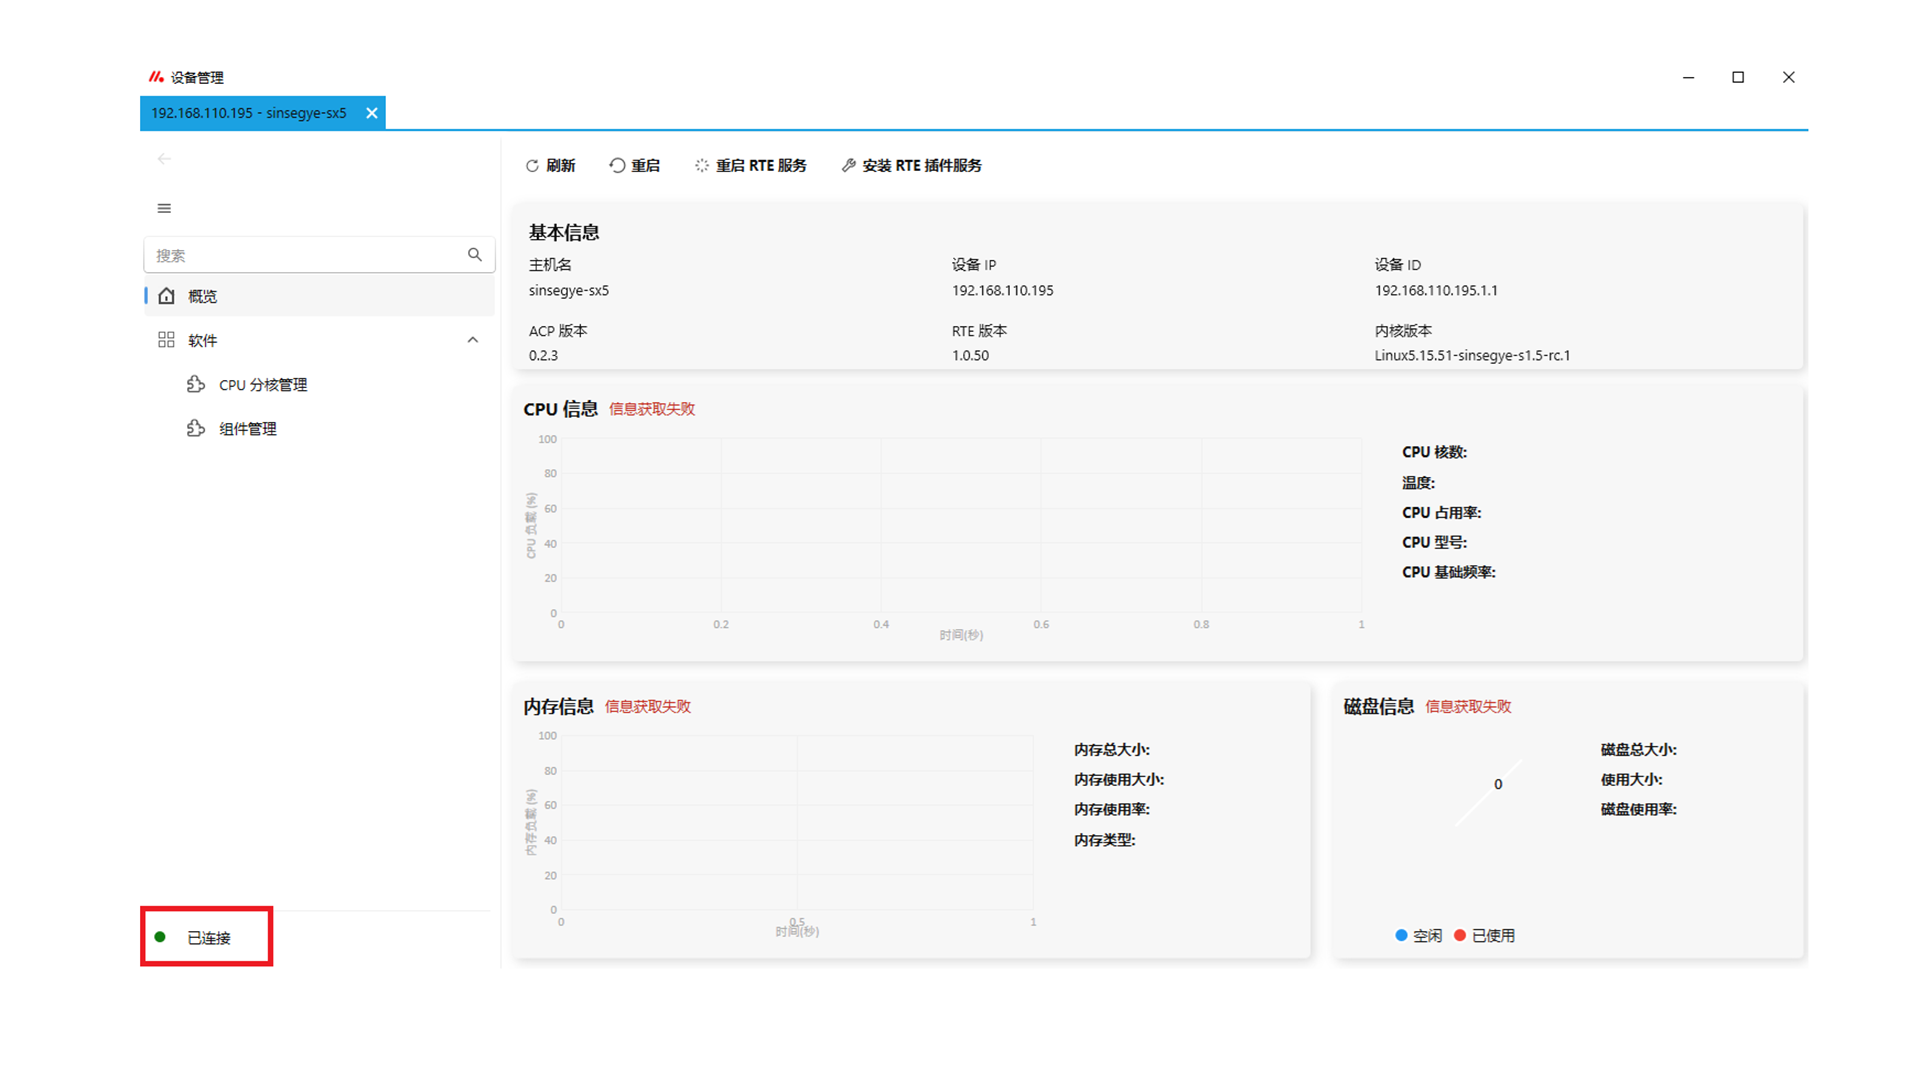
After installation, click "Scan" to detect the icomputer connected via the fixed network port 192.168.1.200.
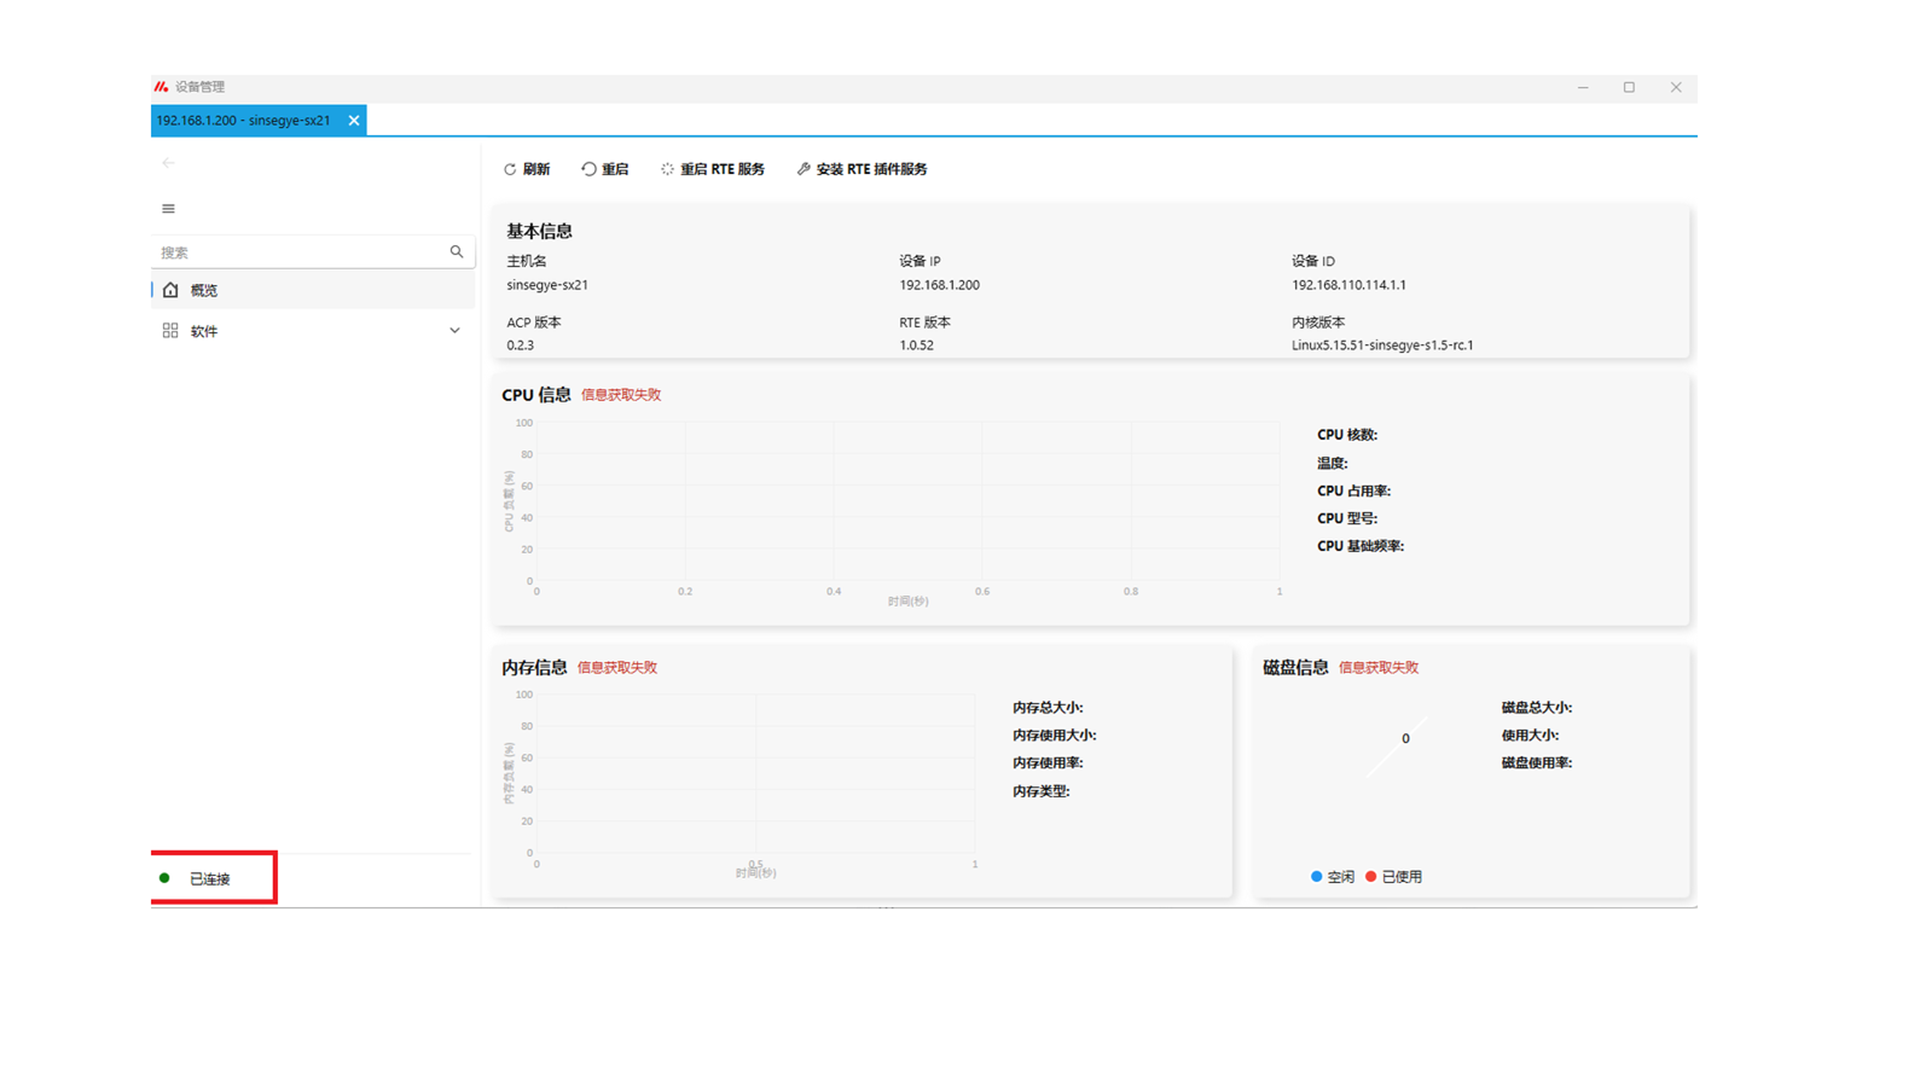
After clicking to enter the icomputer, the status "Connected" will be displayed at the bottom left.
-
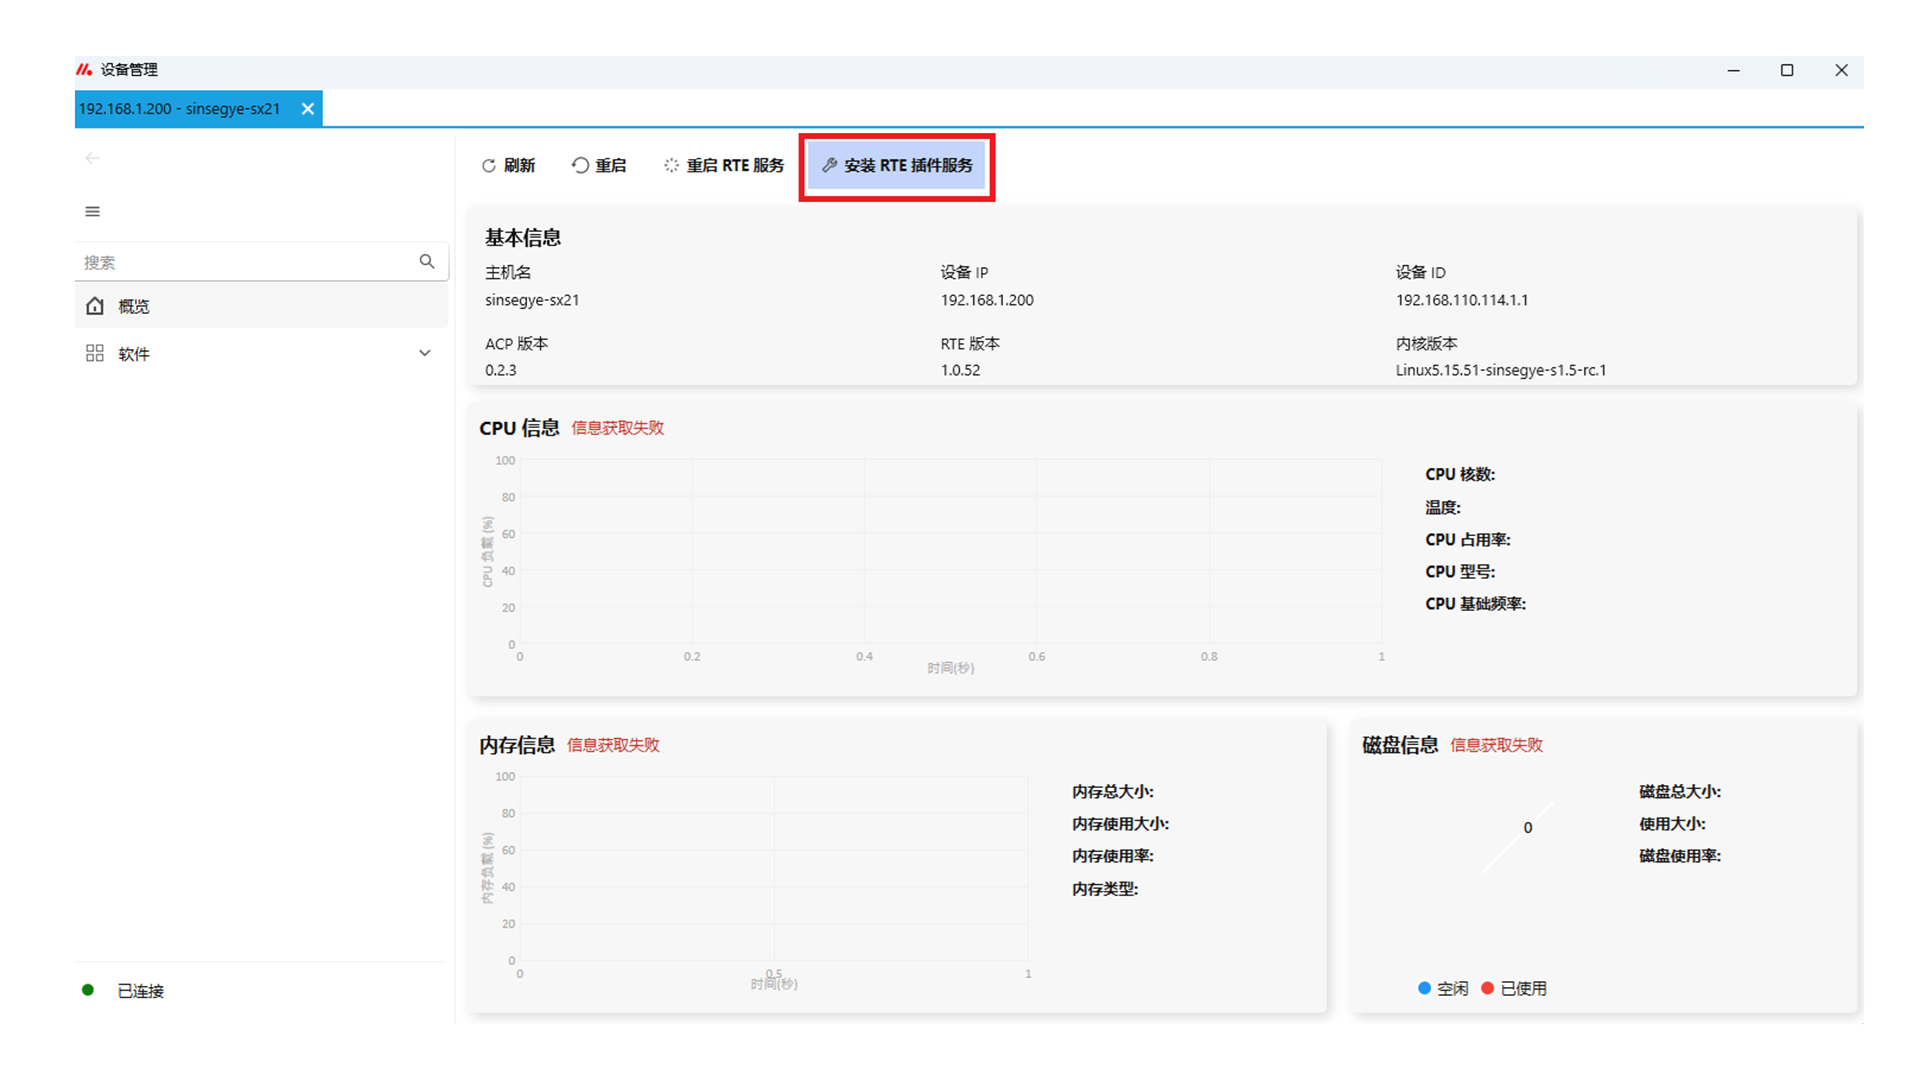
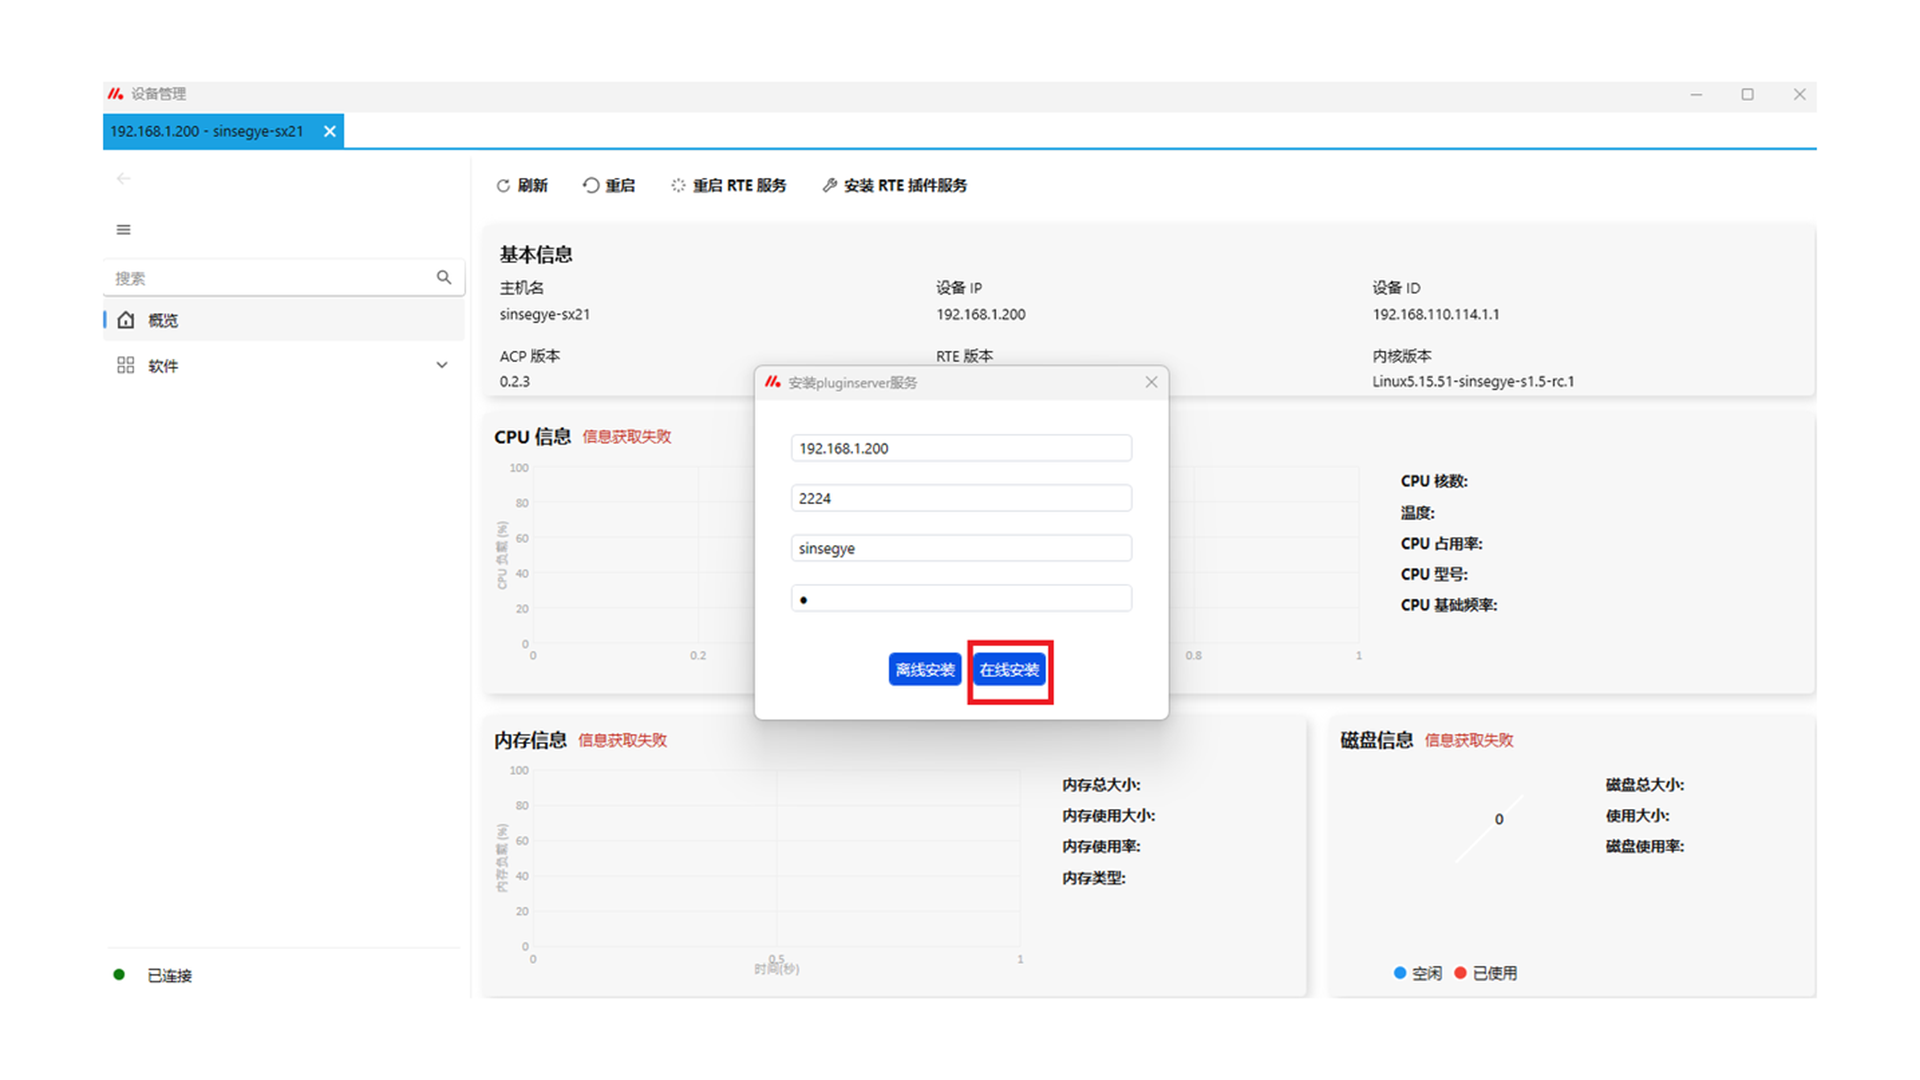
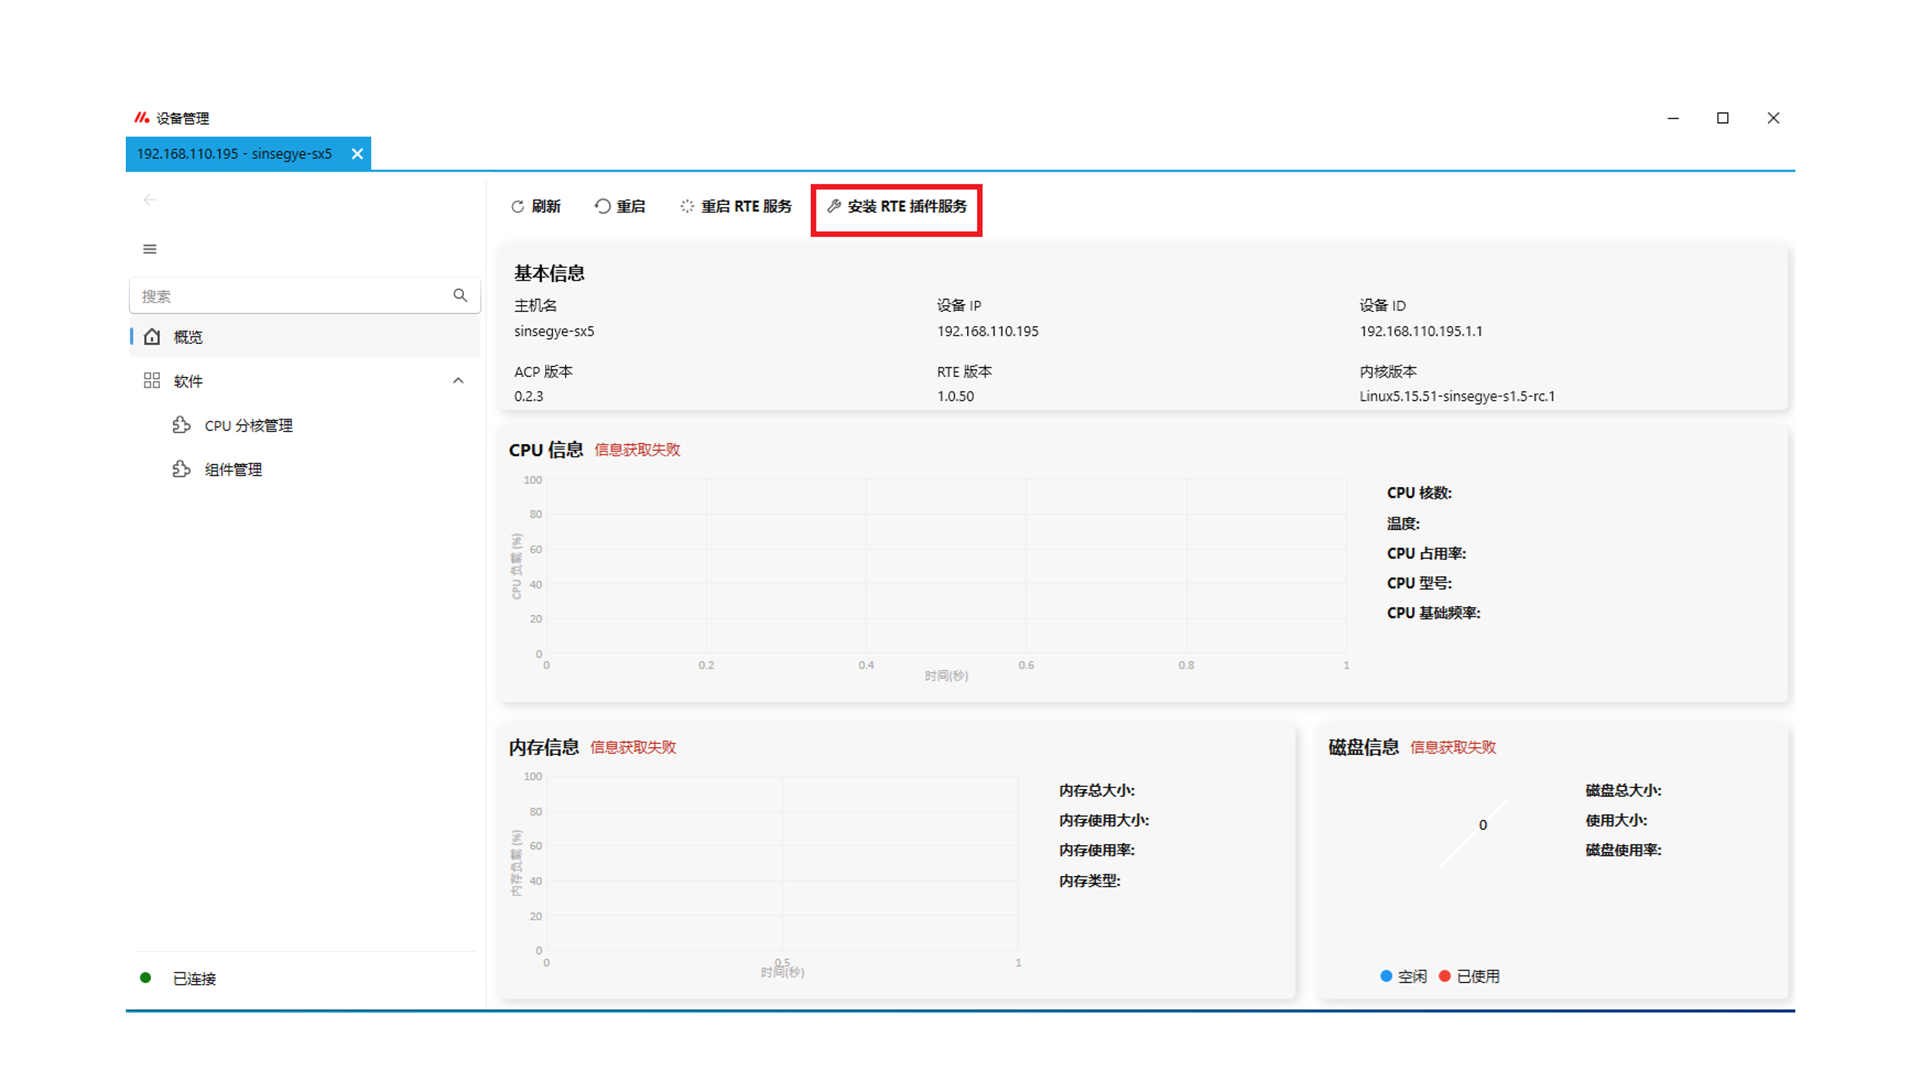
Click "Install RTE Plugin Service".
-
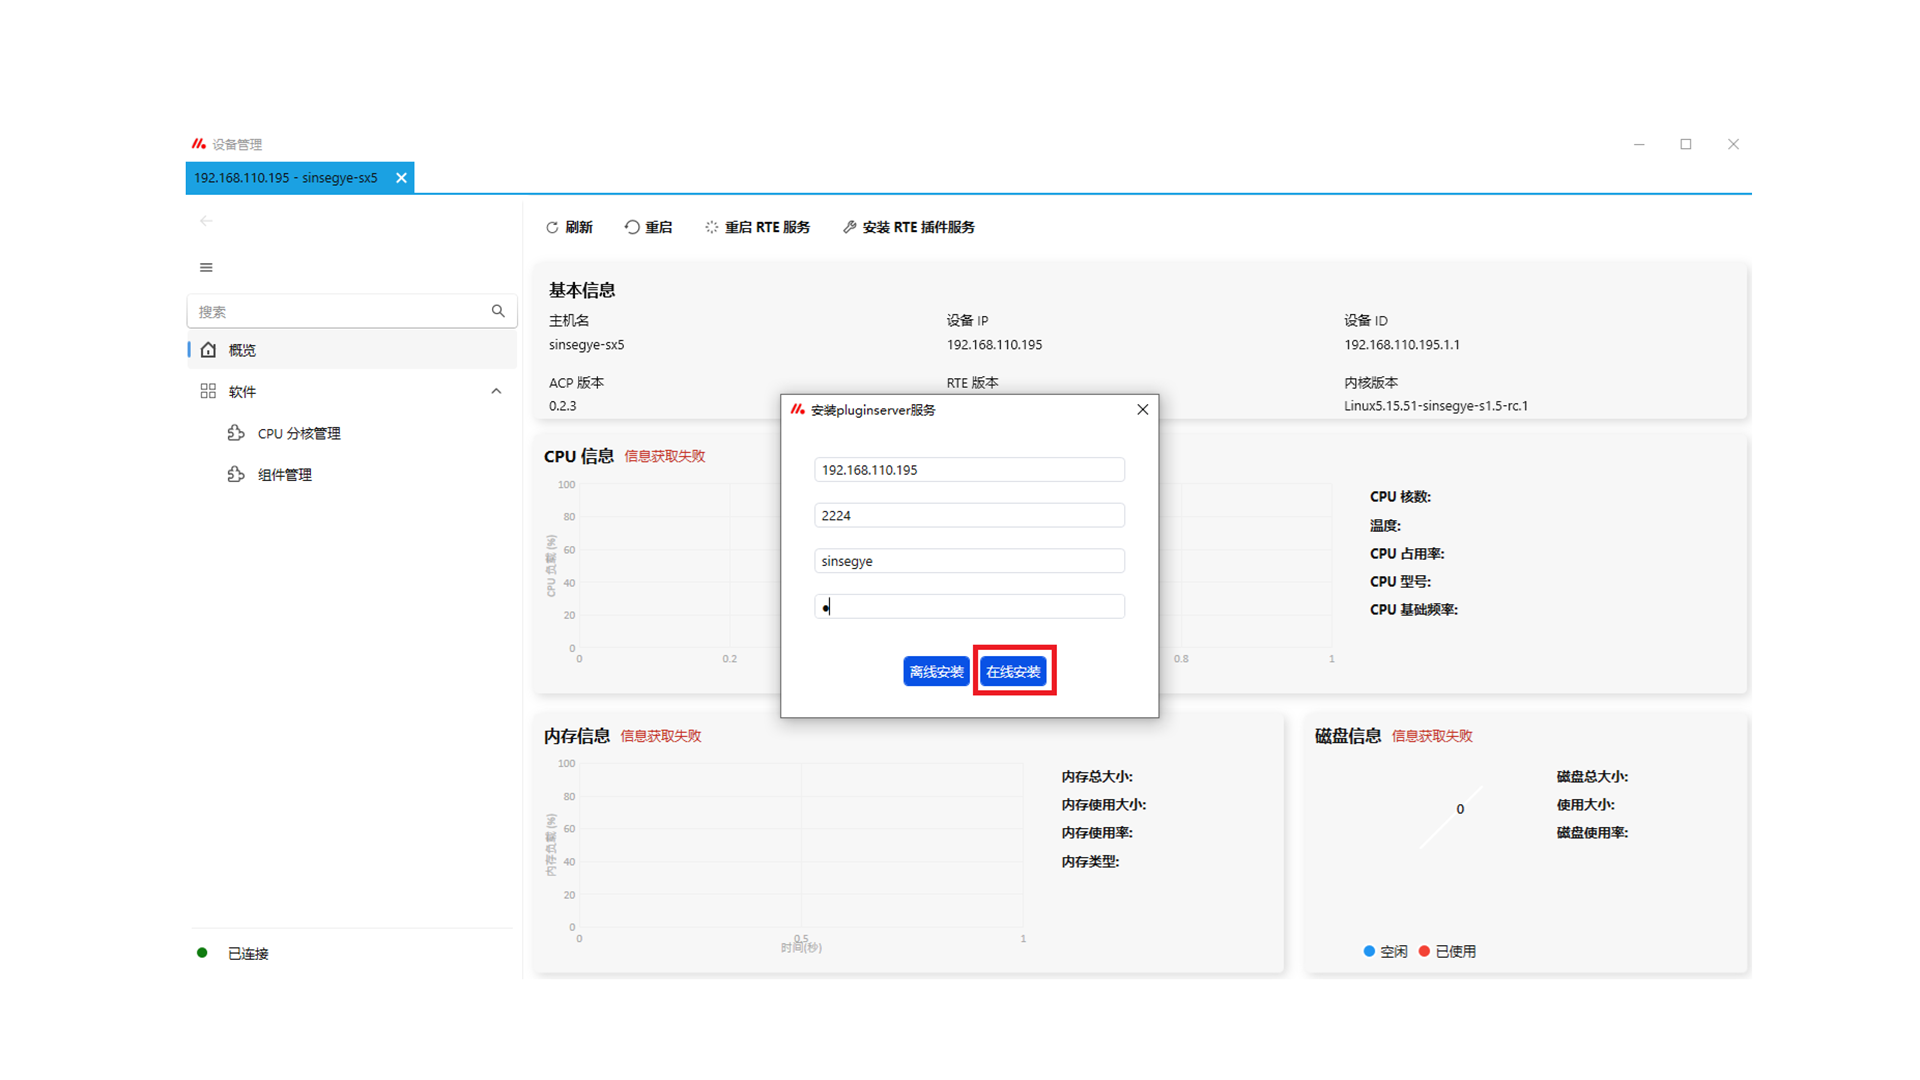
Enter username: sinsegye, password: 1, then click "Online Install".
-
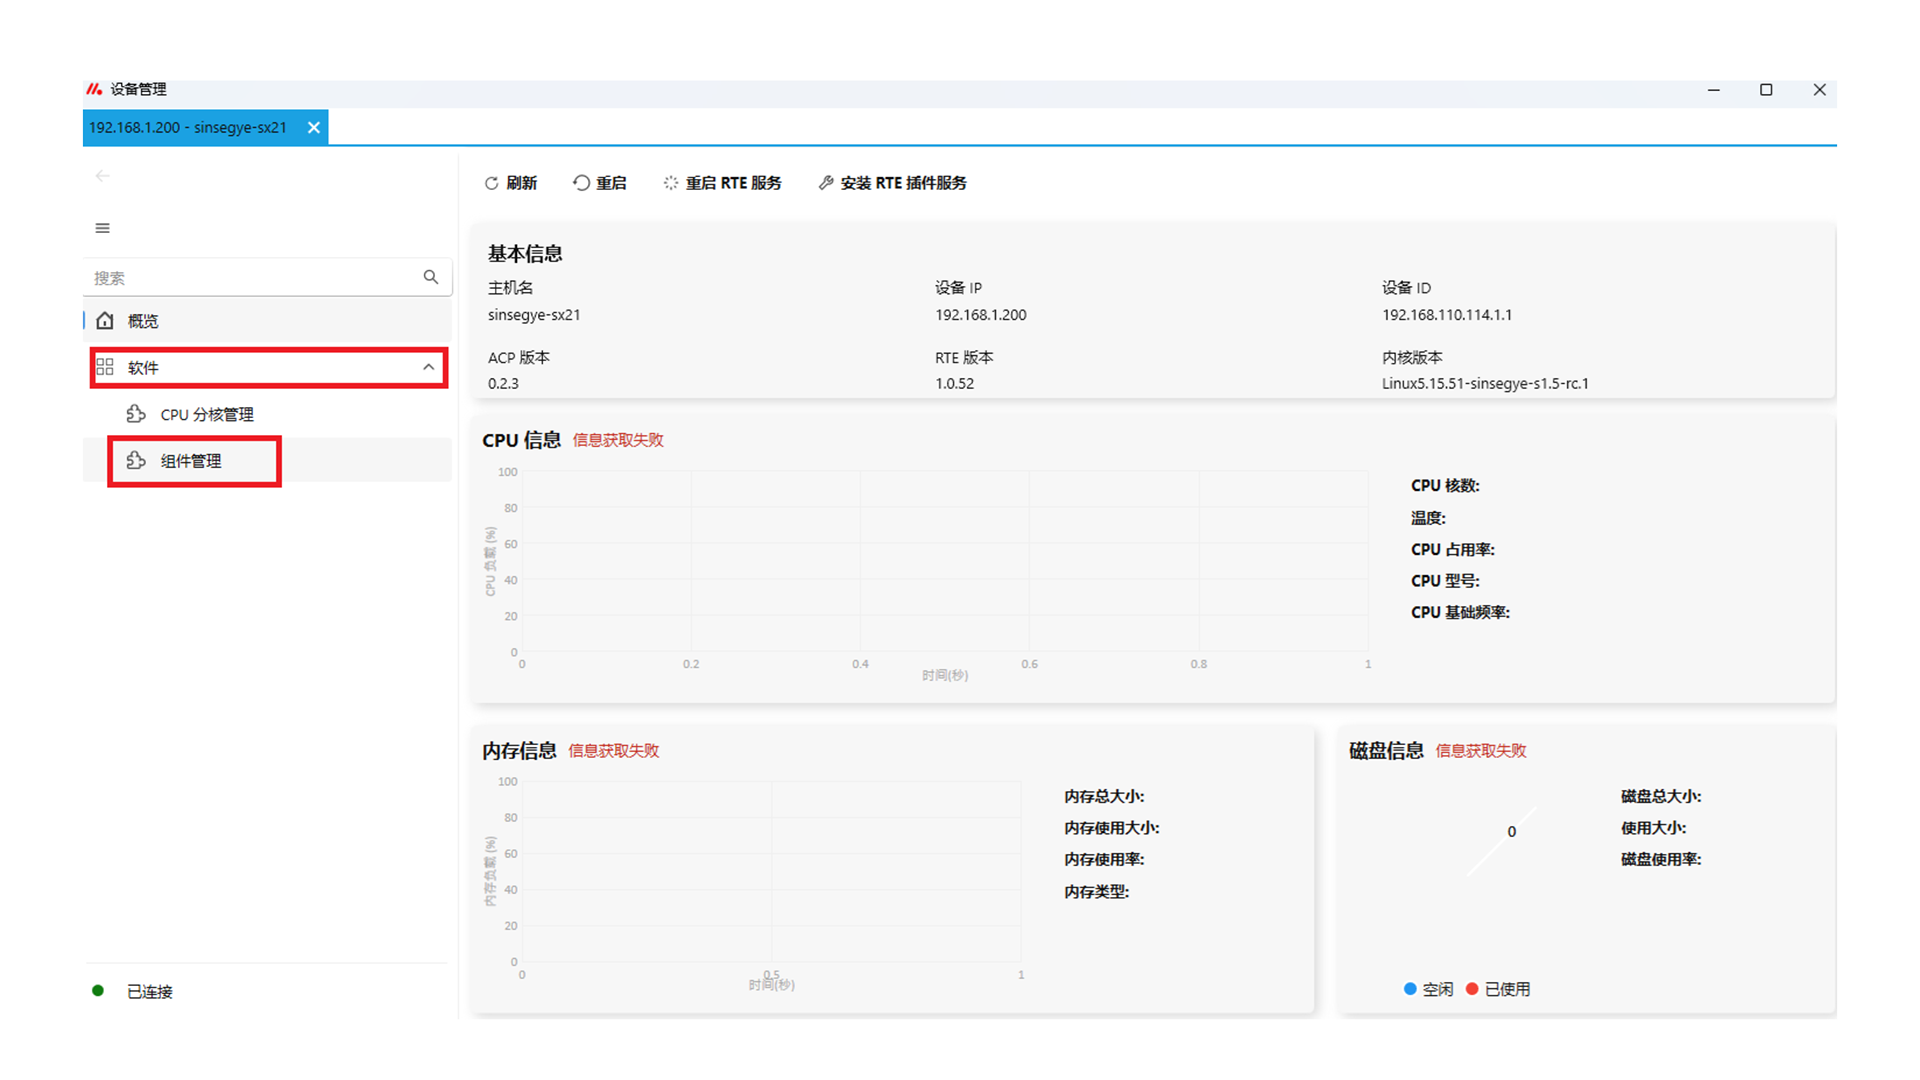
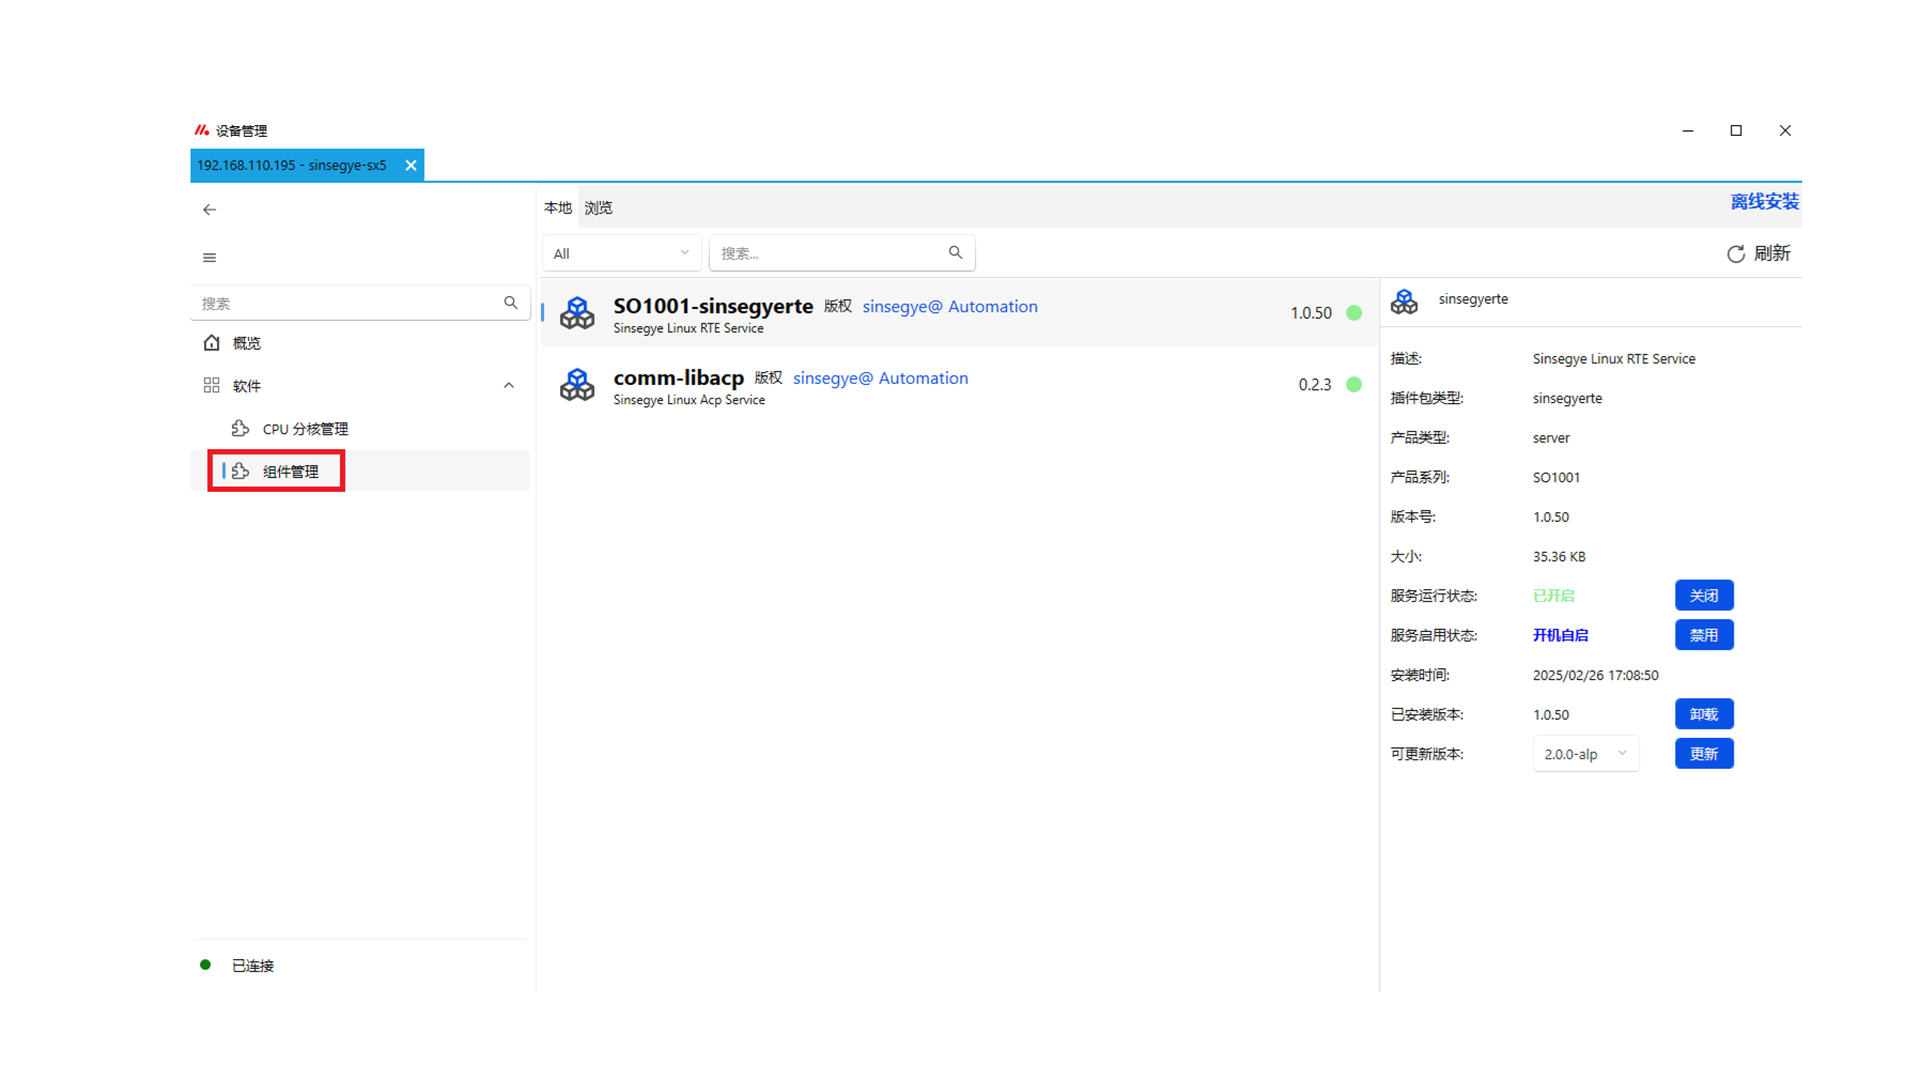
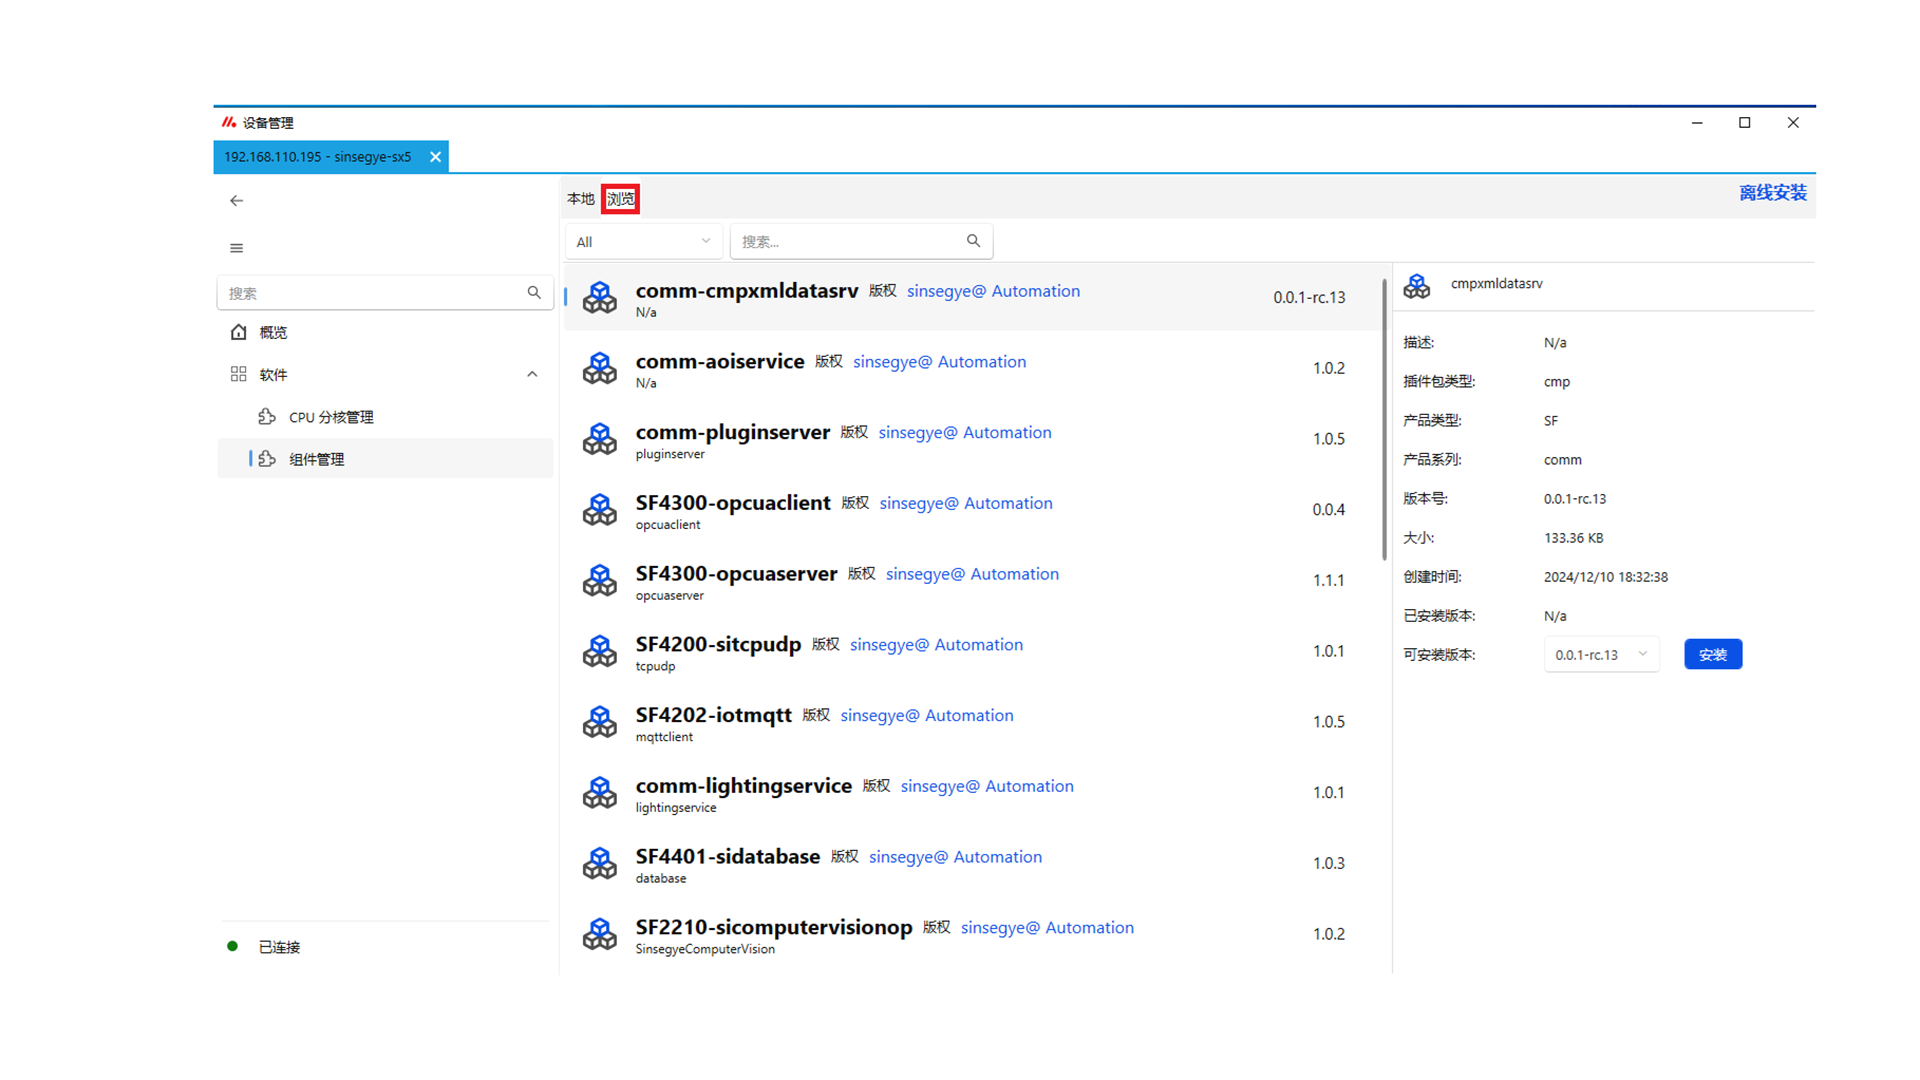
After installation, click "Software" and select "Component Management" from the drop-down menu.
-
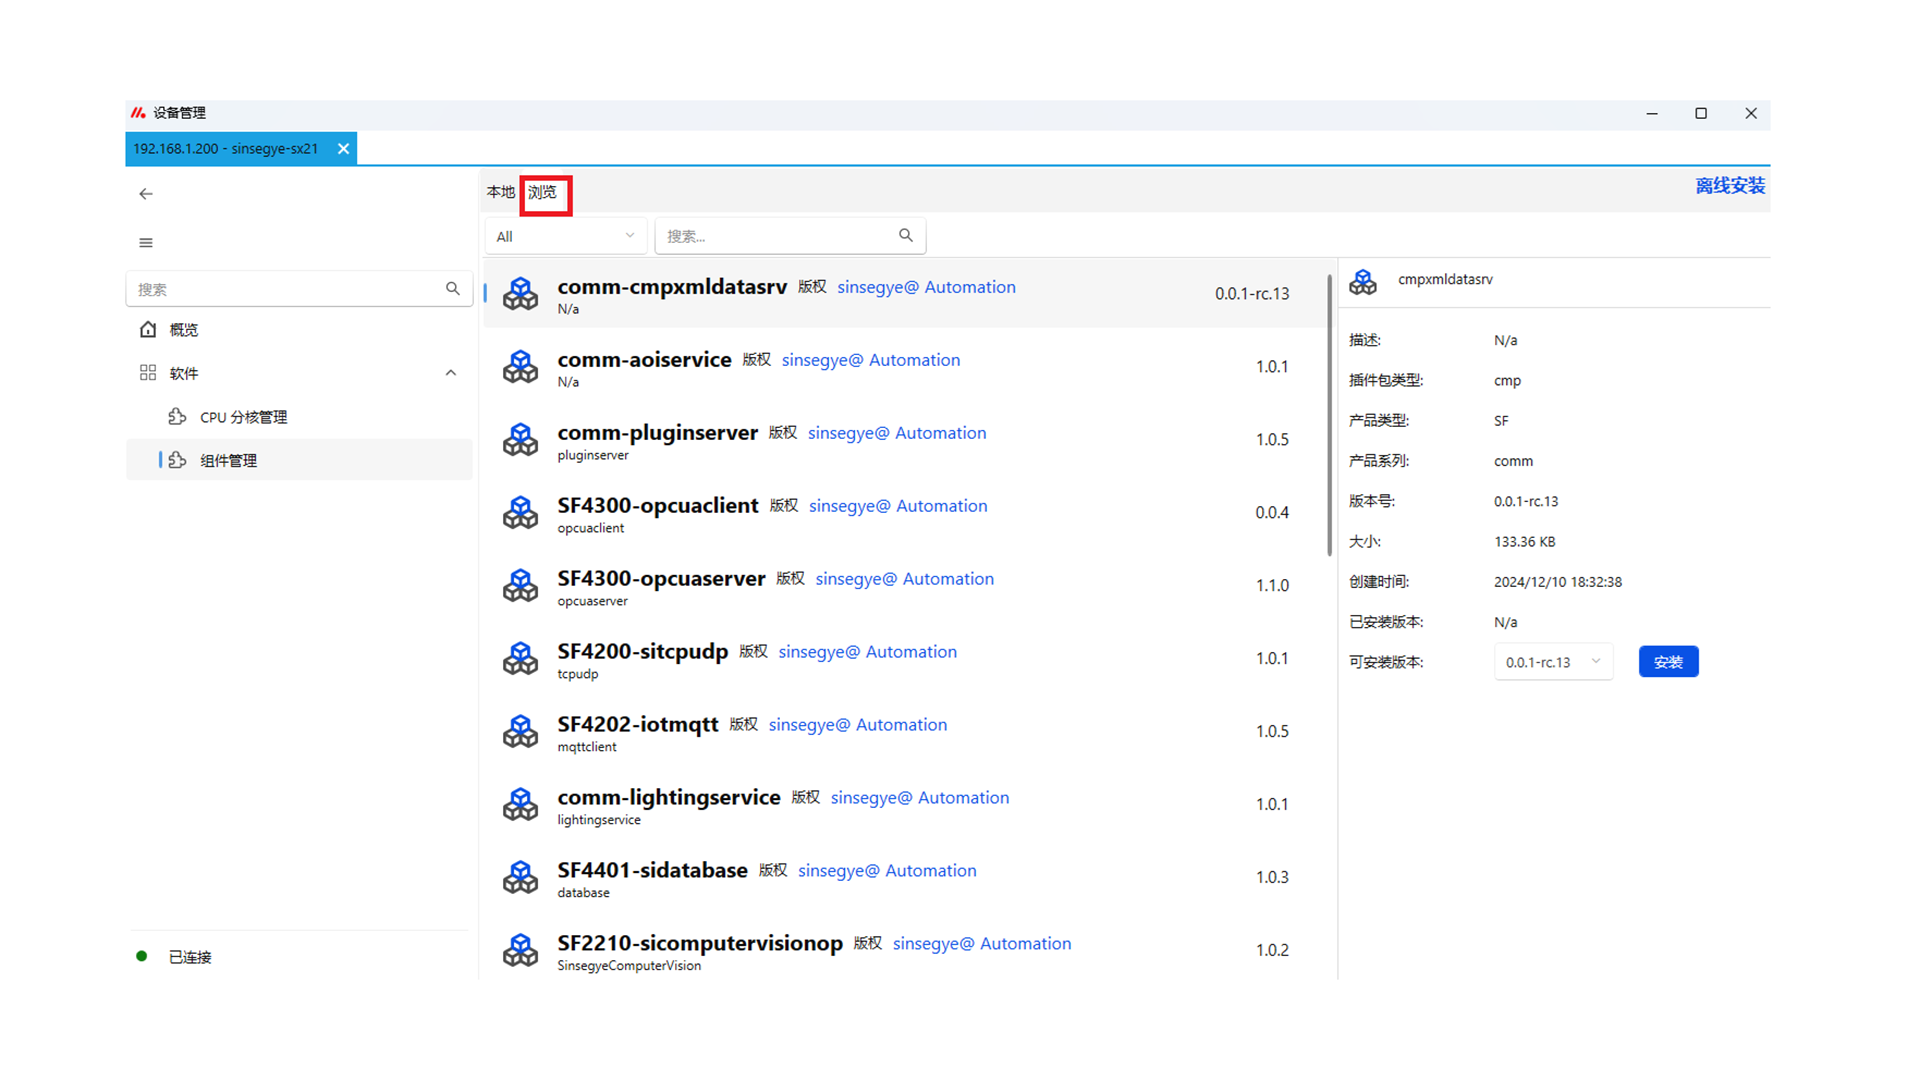
Click "Browse" to view available components online.
-
Find "SF1000-acpplcaccess" in the components and click "Install".
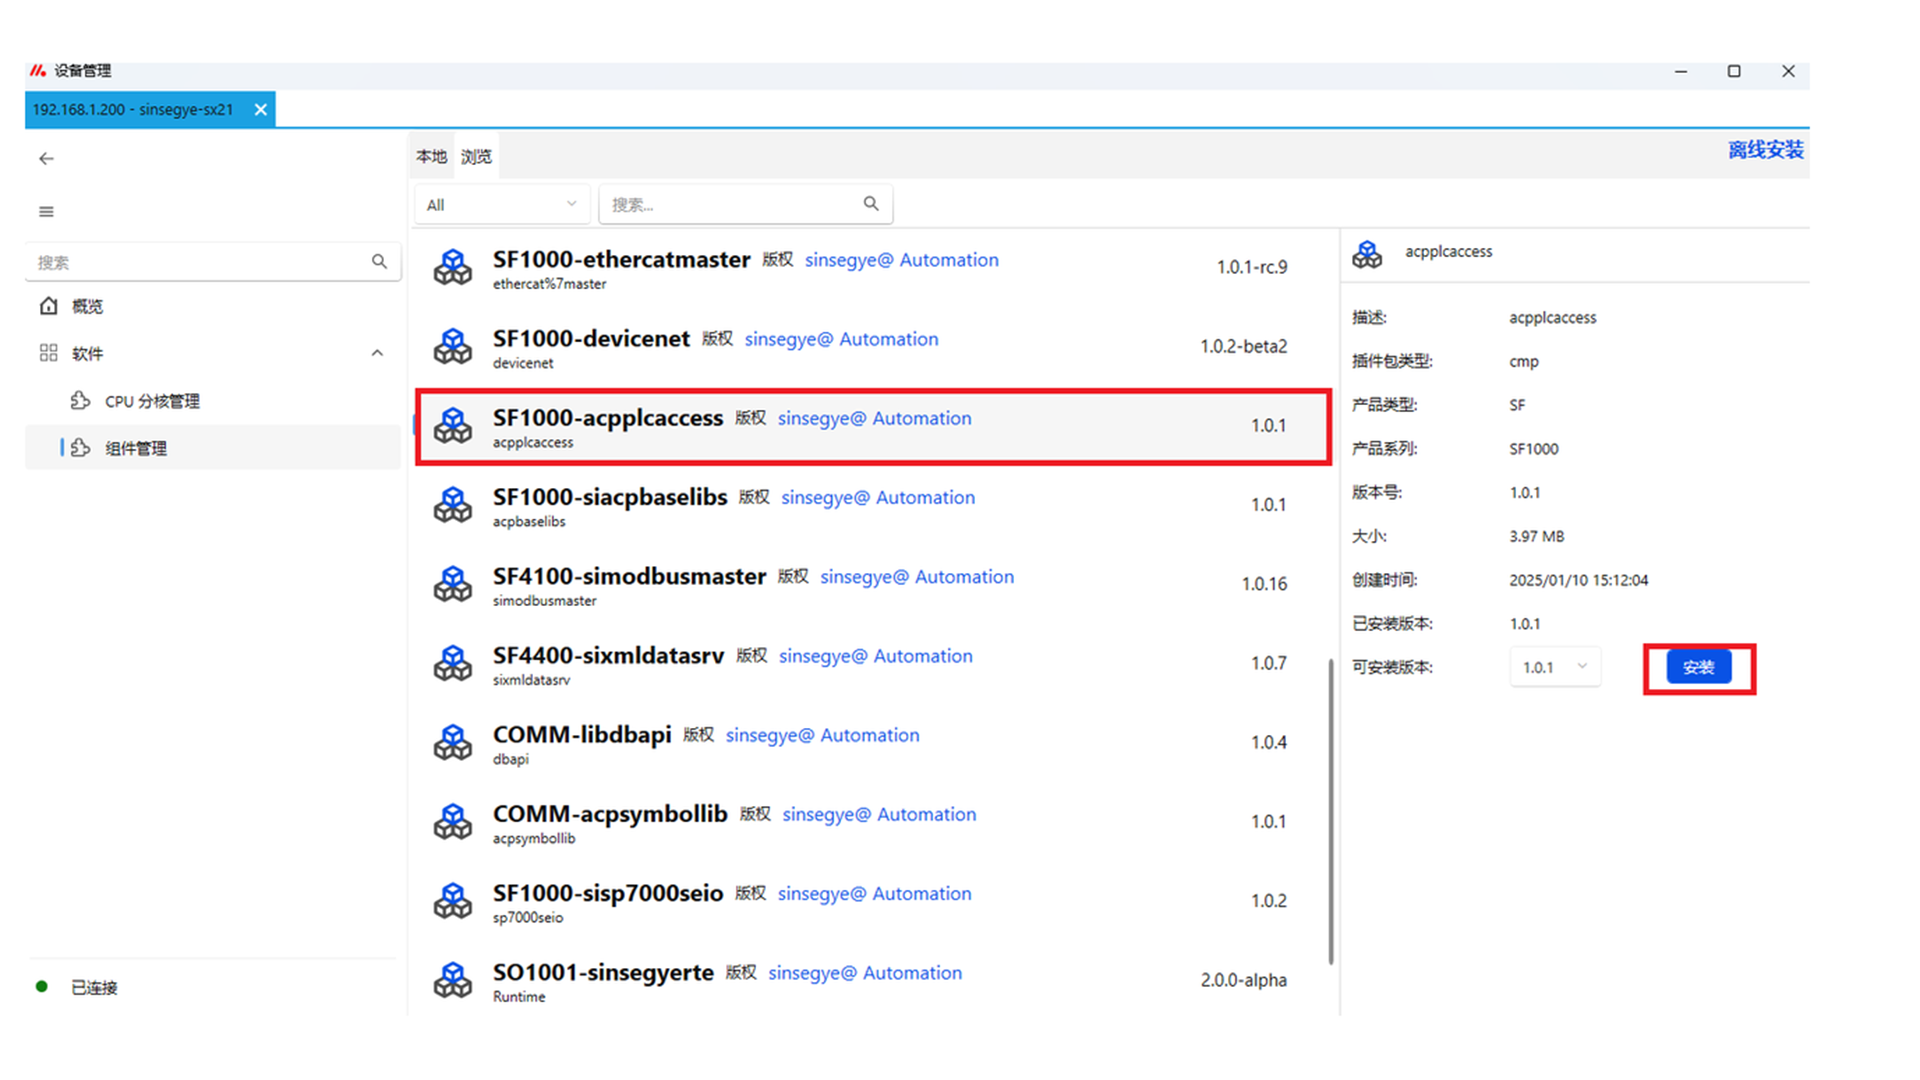
-
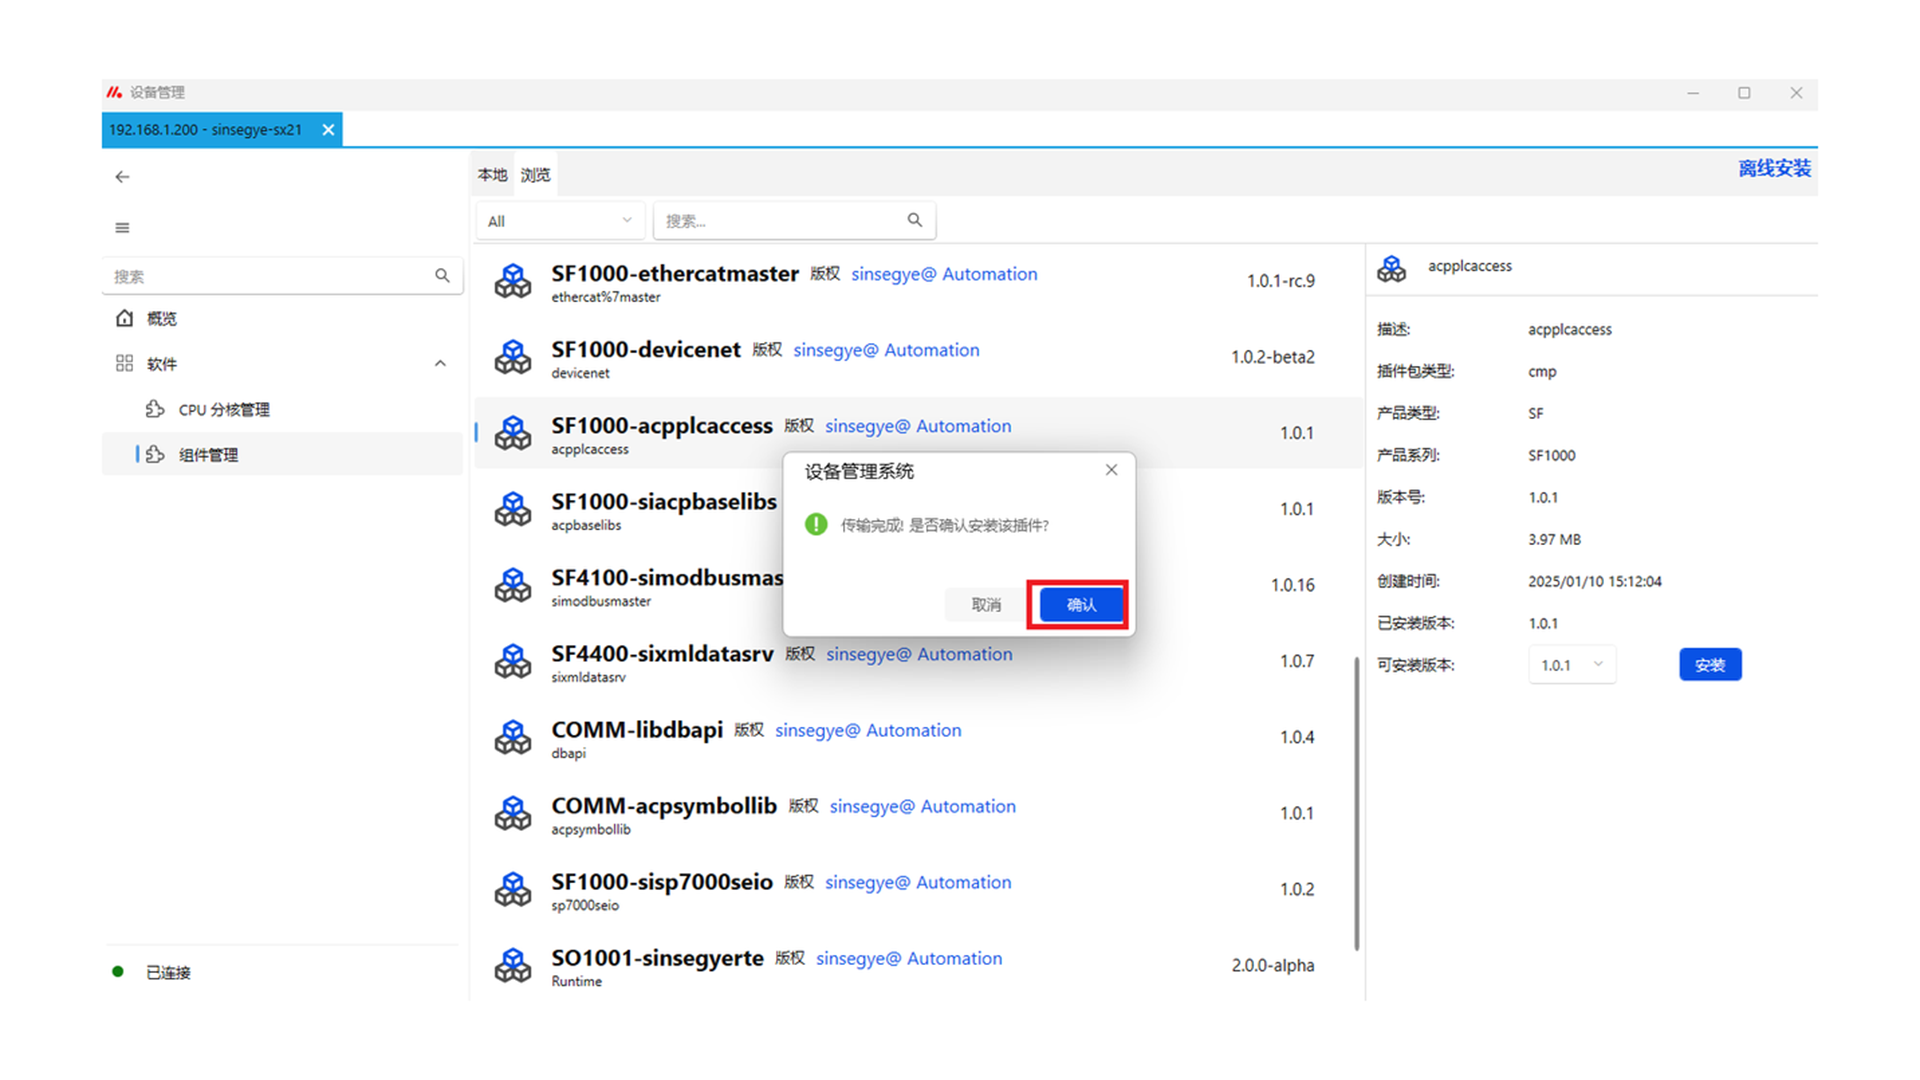
Wait for the deb package to be transferred to the icomputer. After transfer, click "OK" to install.
-
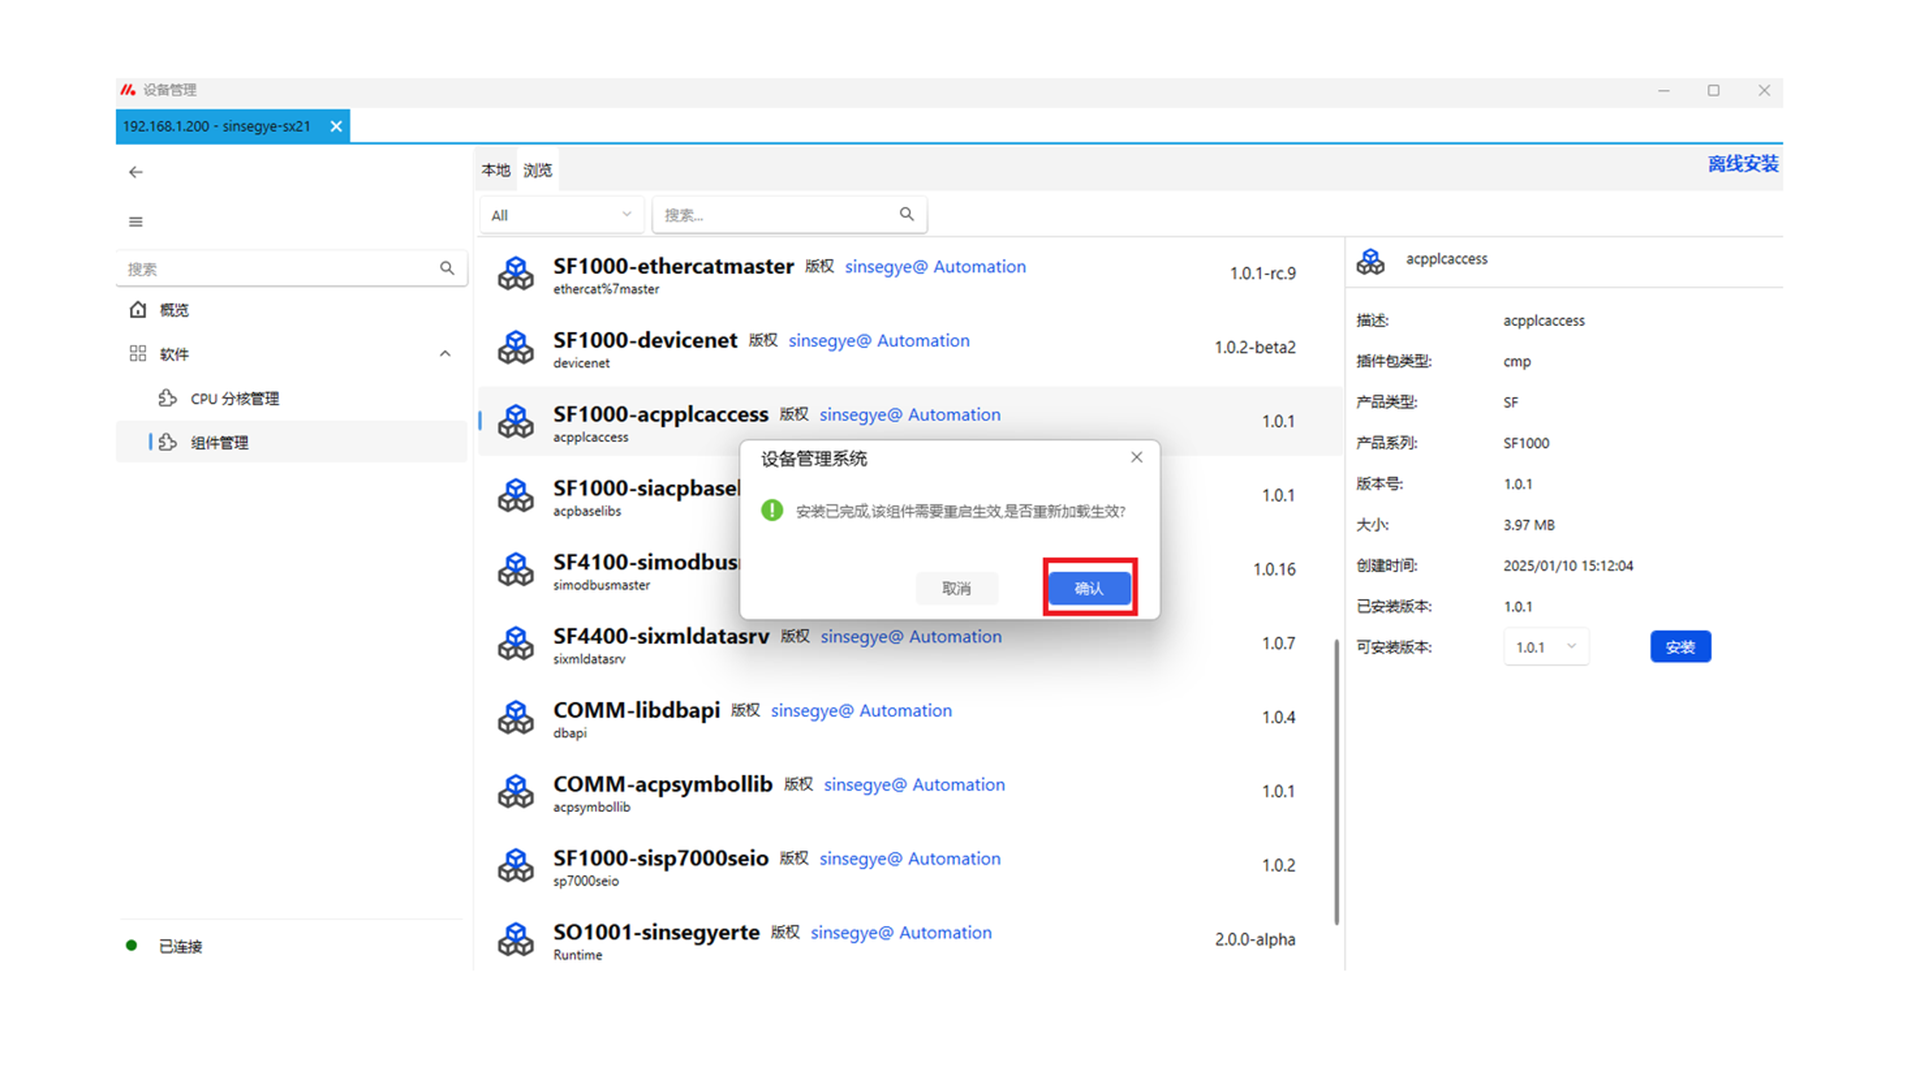
After installation, click "Confirm" to restart for the changes to take effect.
-
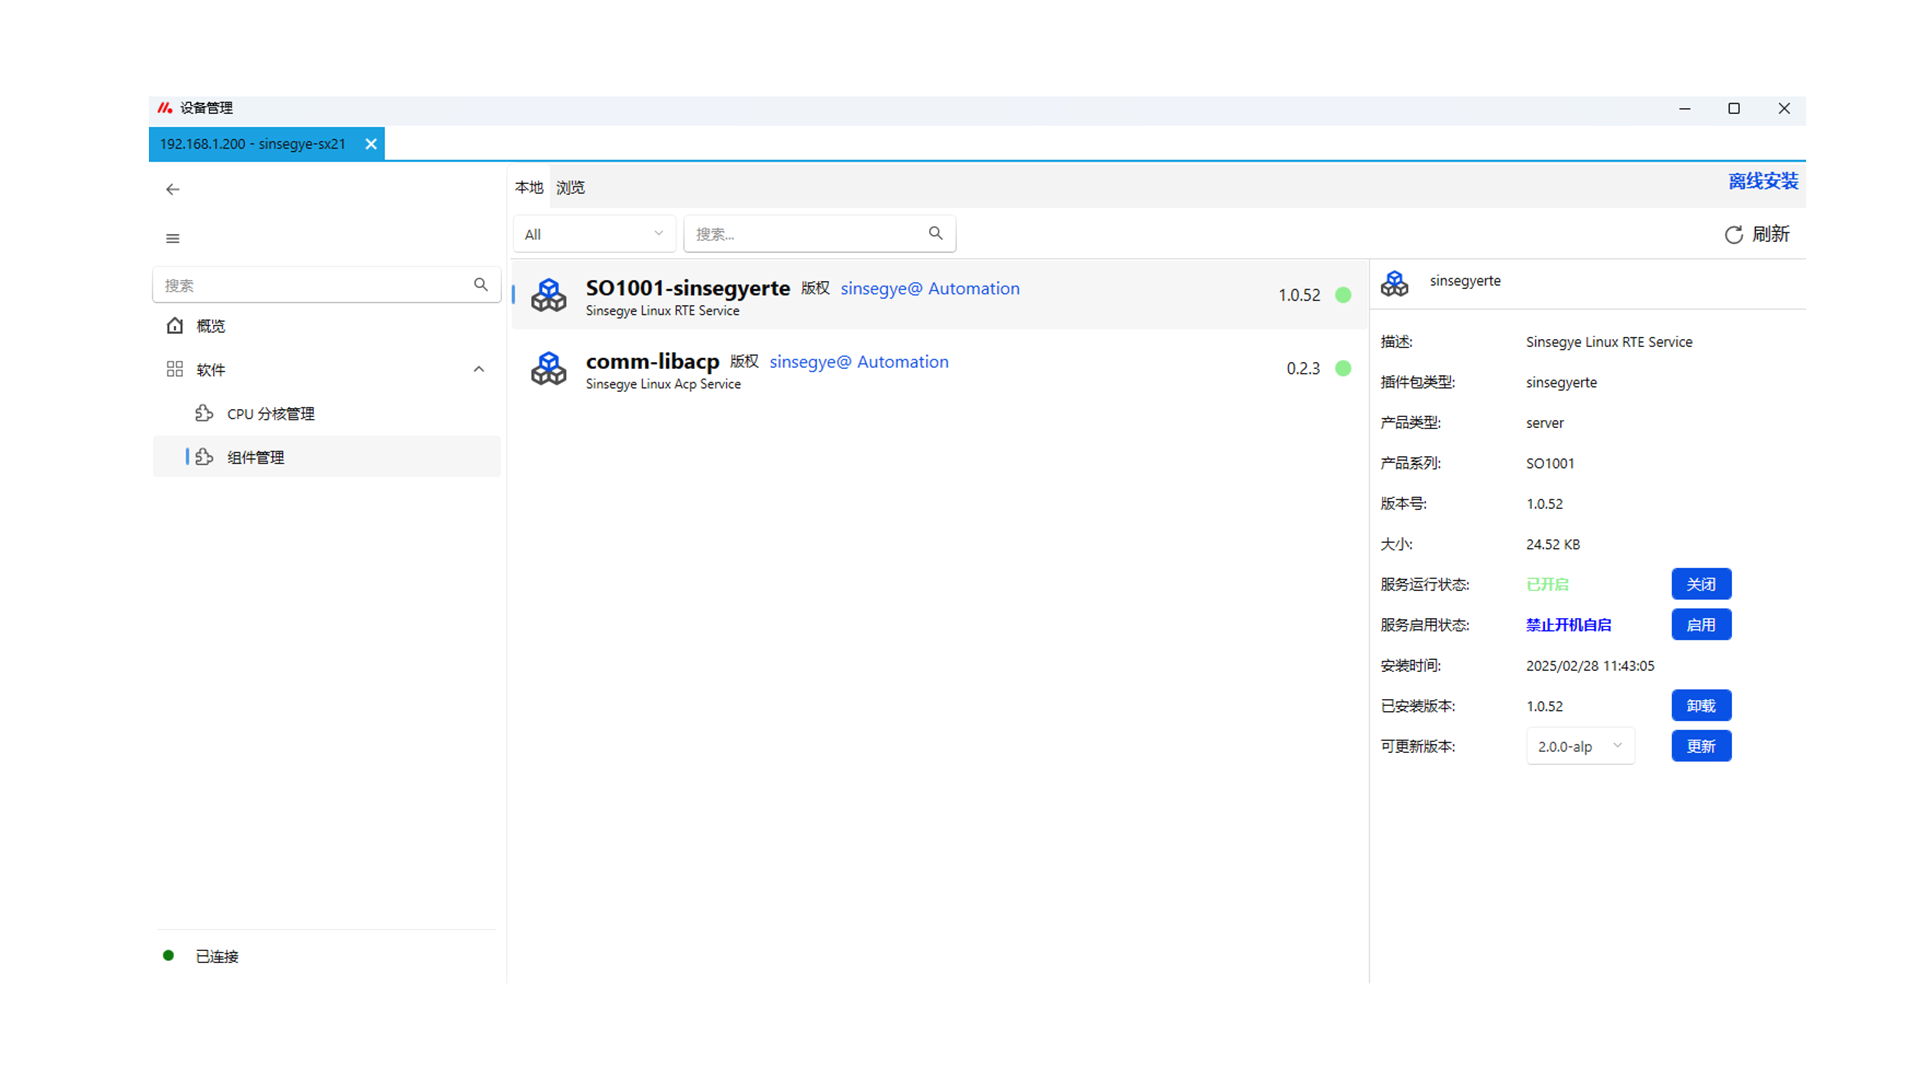
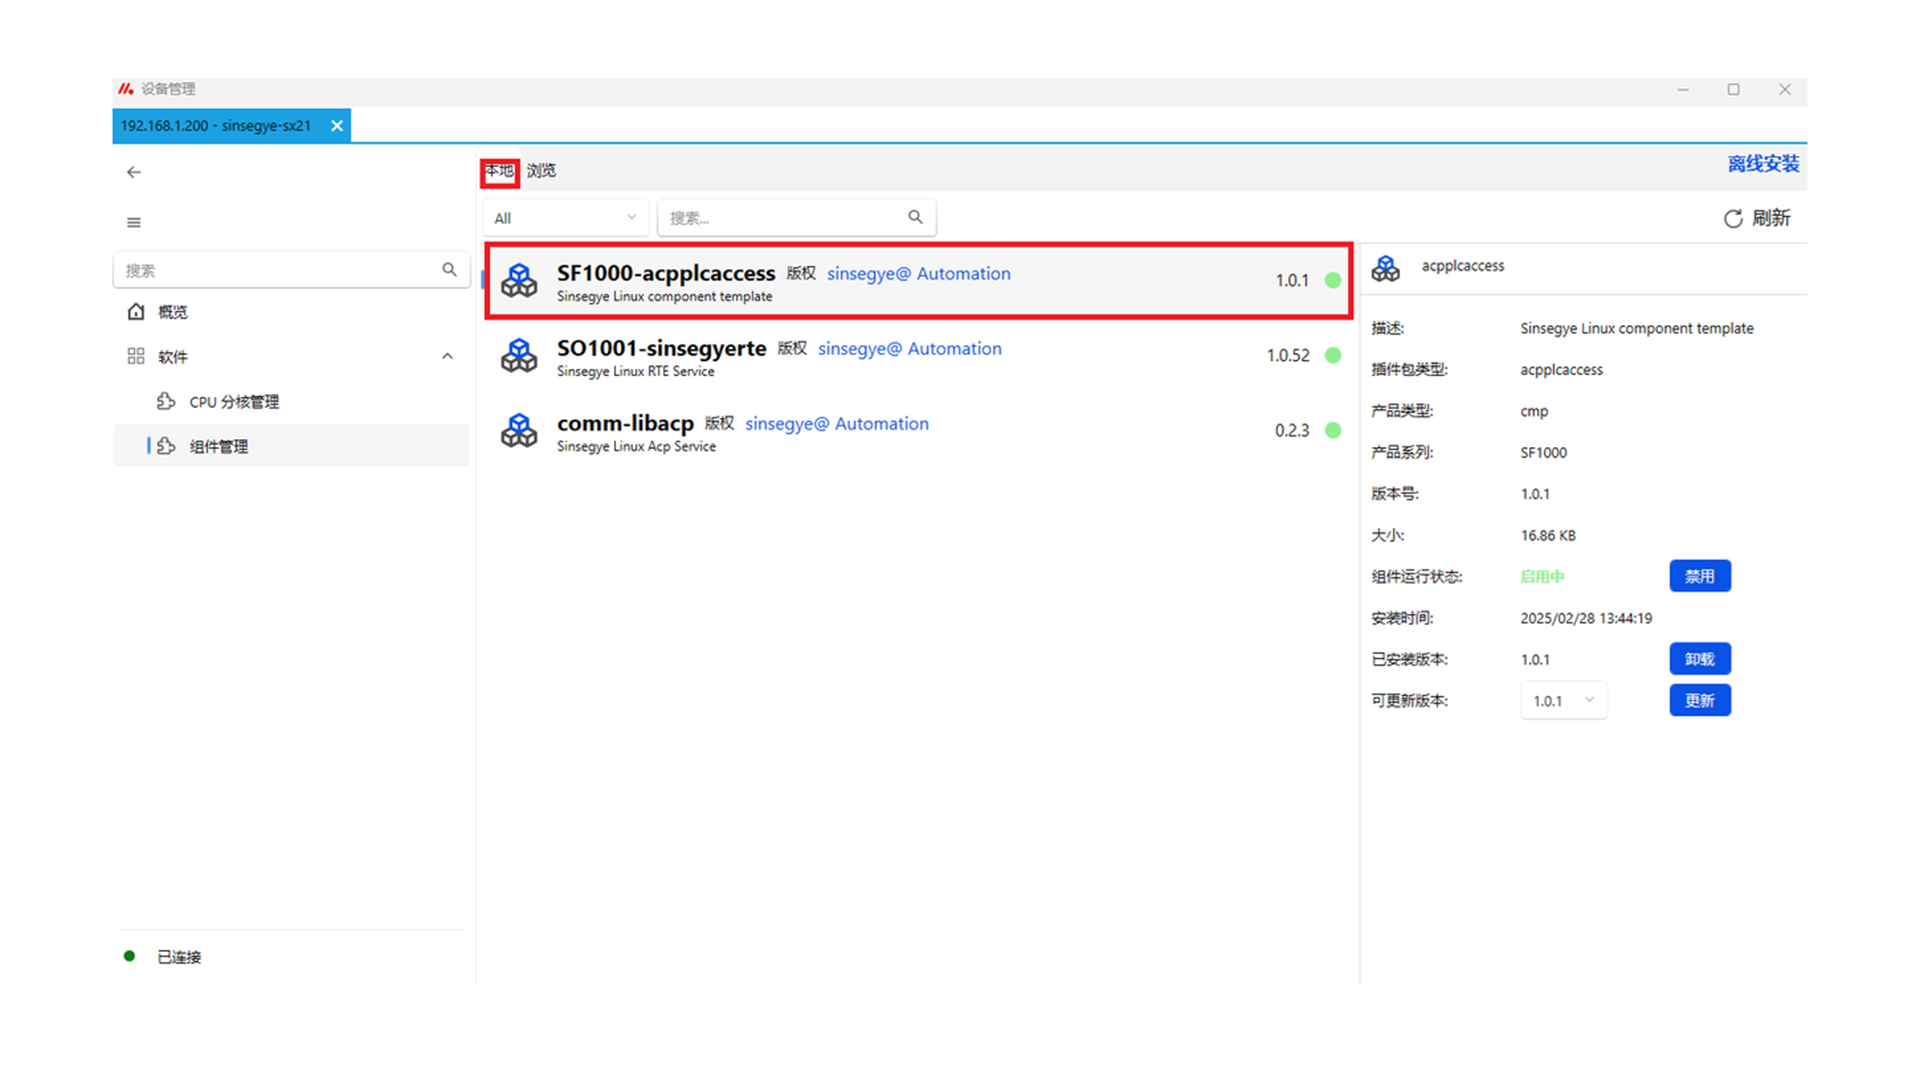
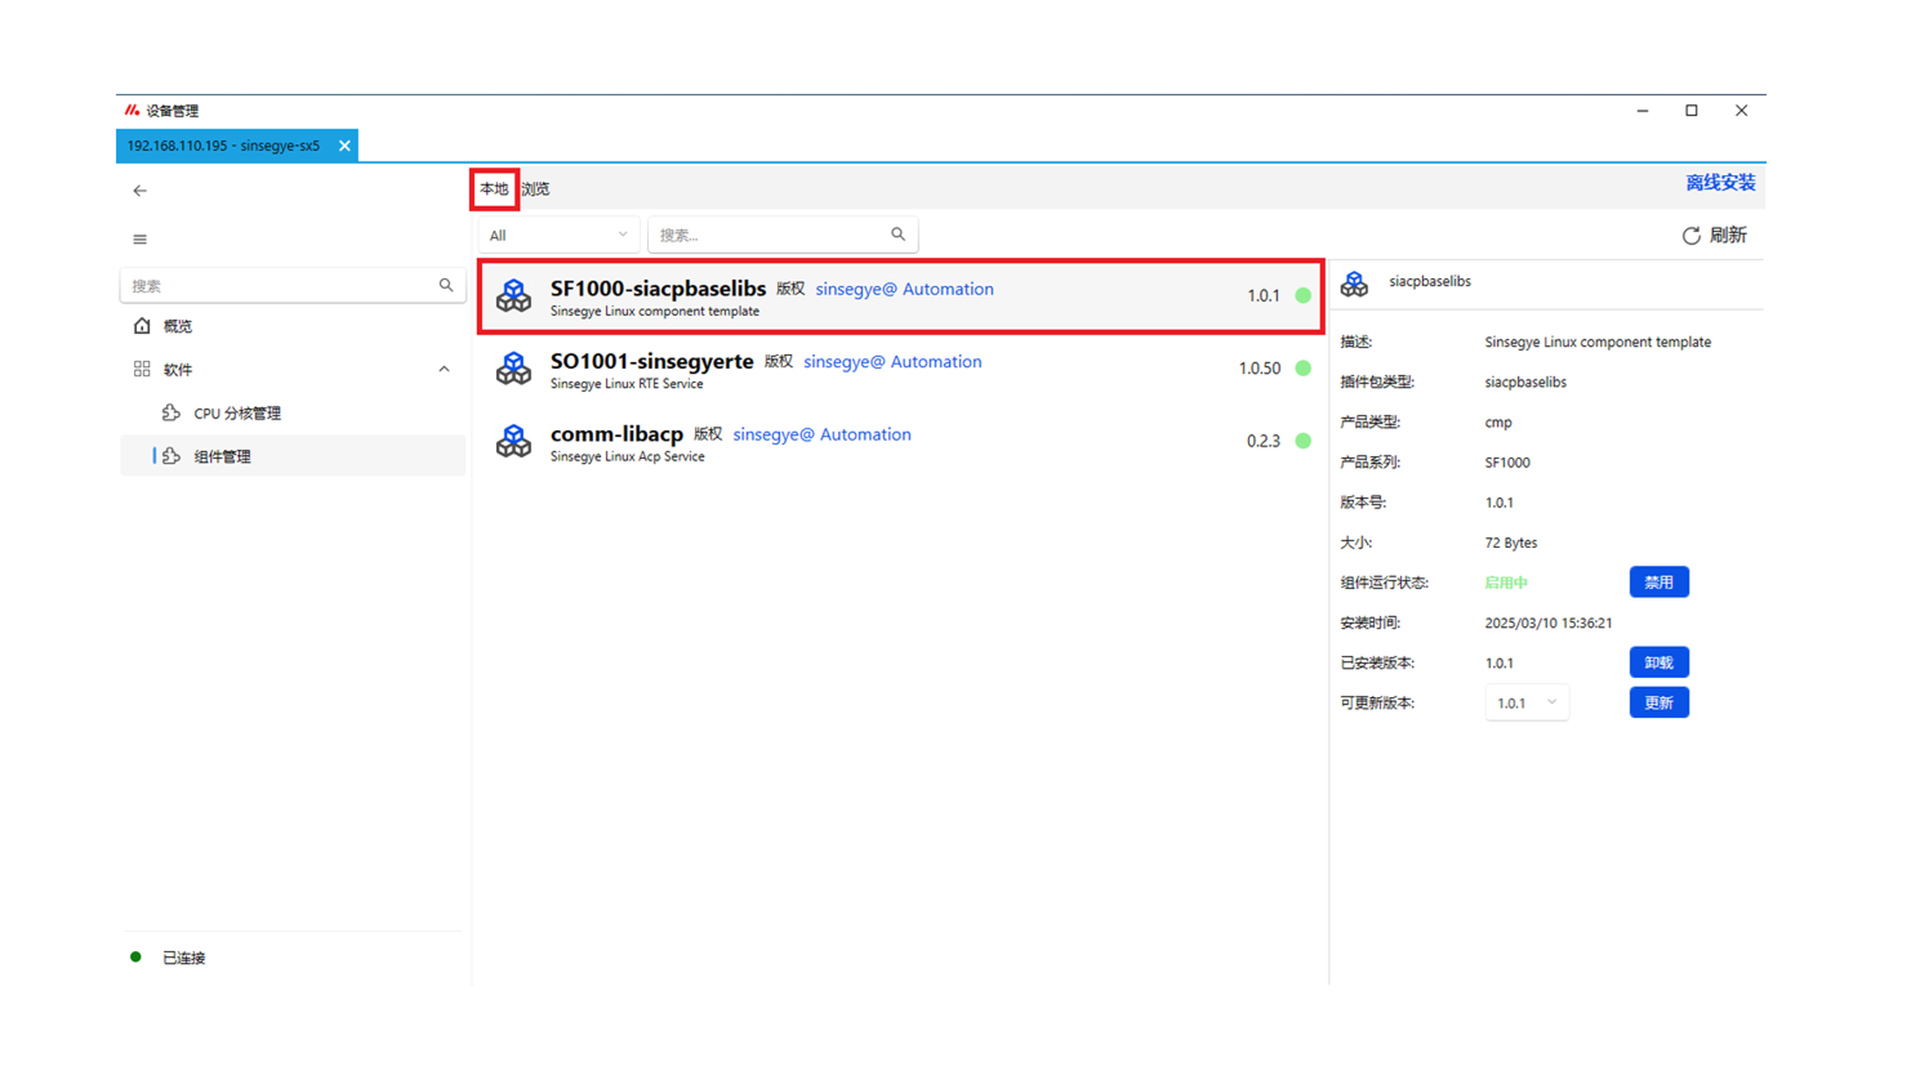
After installation, you can check that SF1000-acpplcaccess is successfully installed on the "Local" page.
2. Install SF1000-siacpbaselibs.deb component on the client icomputer
-
Open the Device Manager software.
-
For first-time use, you need to install the ACP communication service. Click "Install ACP Service" at the bottom left.

-
Enter the fixed IP address, port, username, and password of the icomputer, then click "Online Install".
IP Address 192.168.110.195 Port 2224 Username sinsegye Password 1 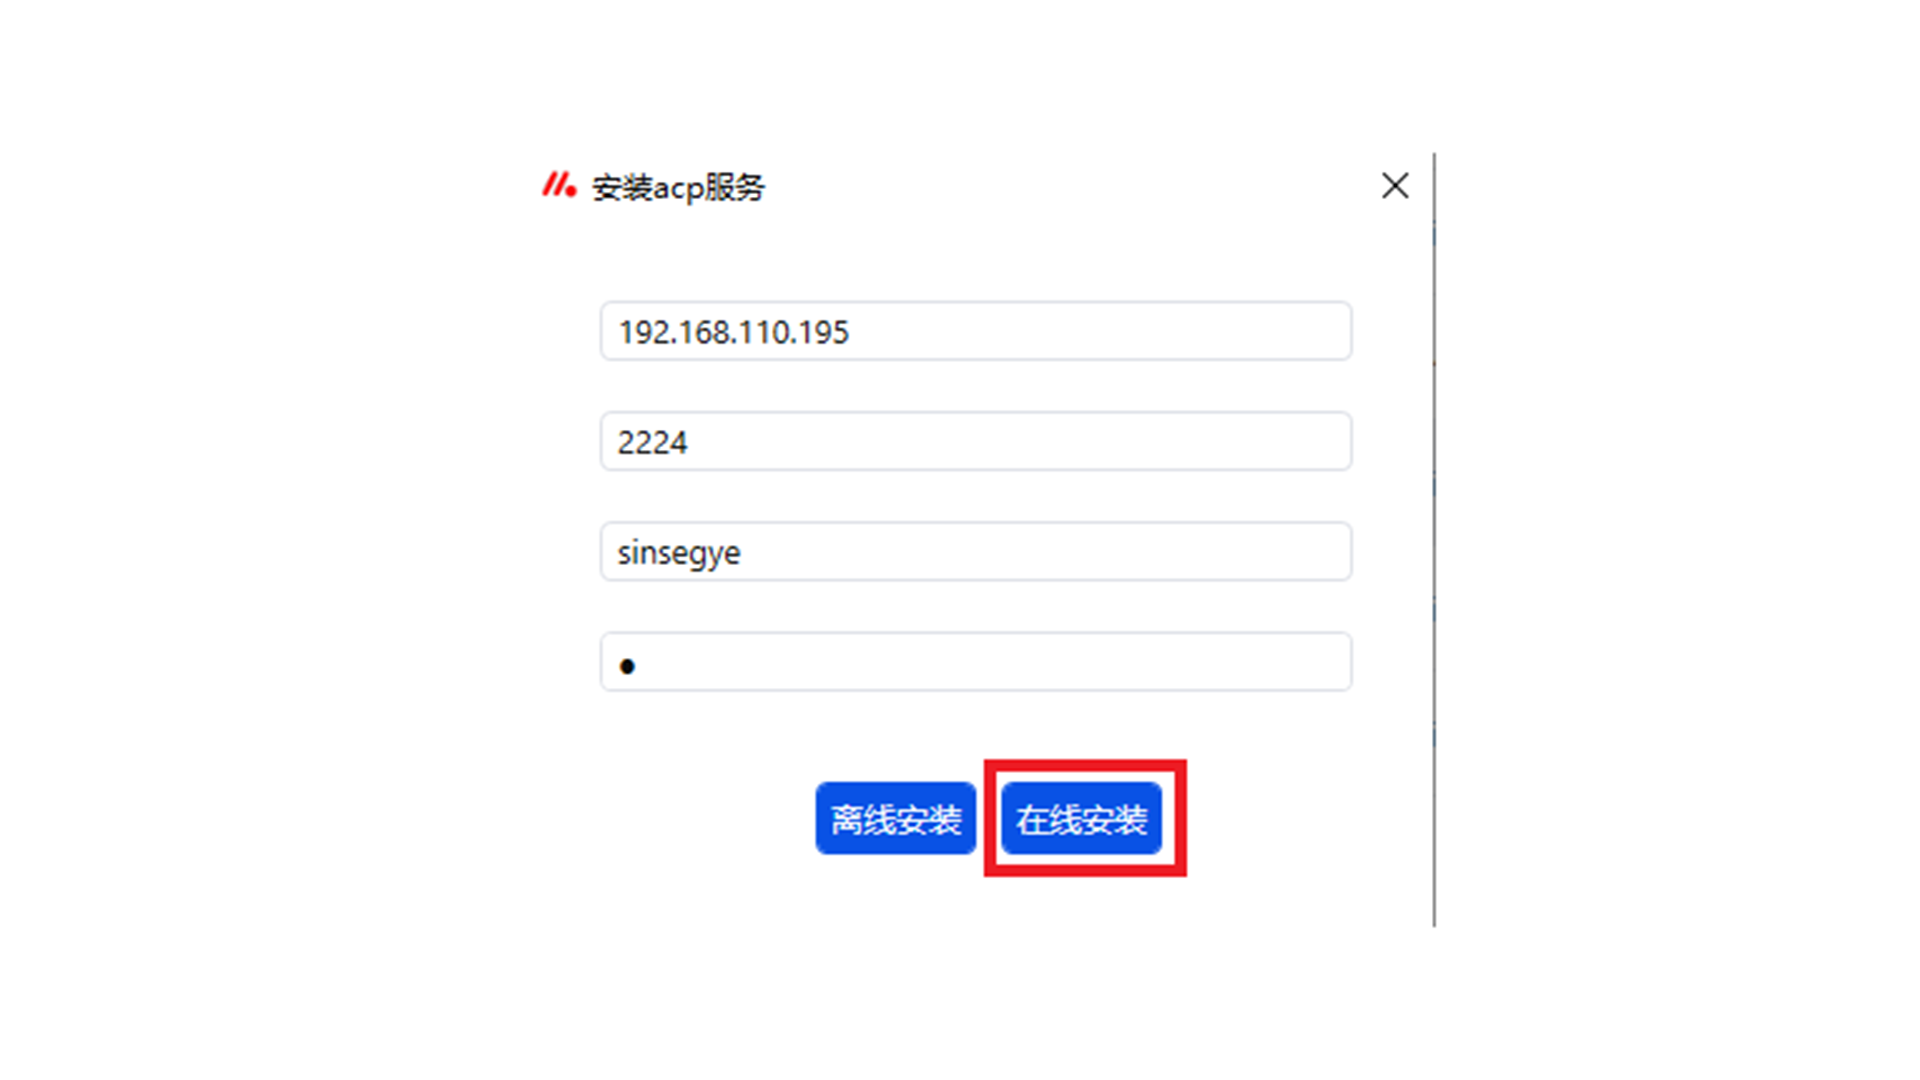
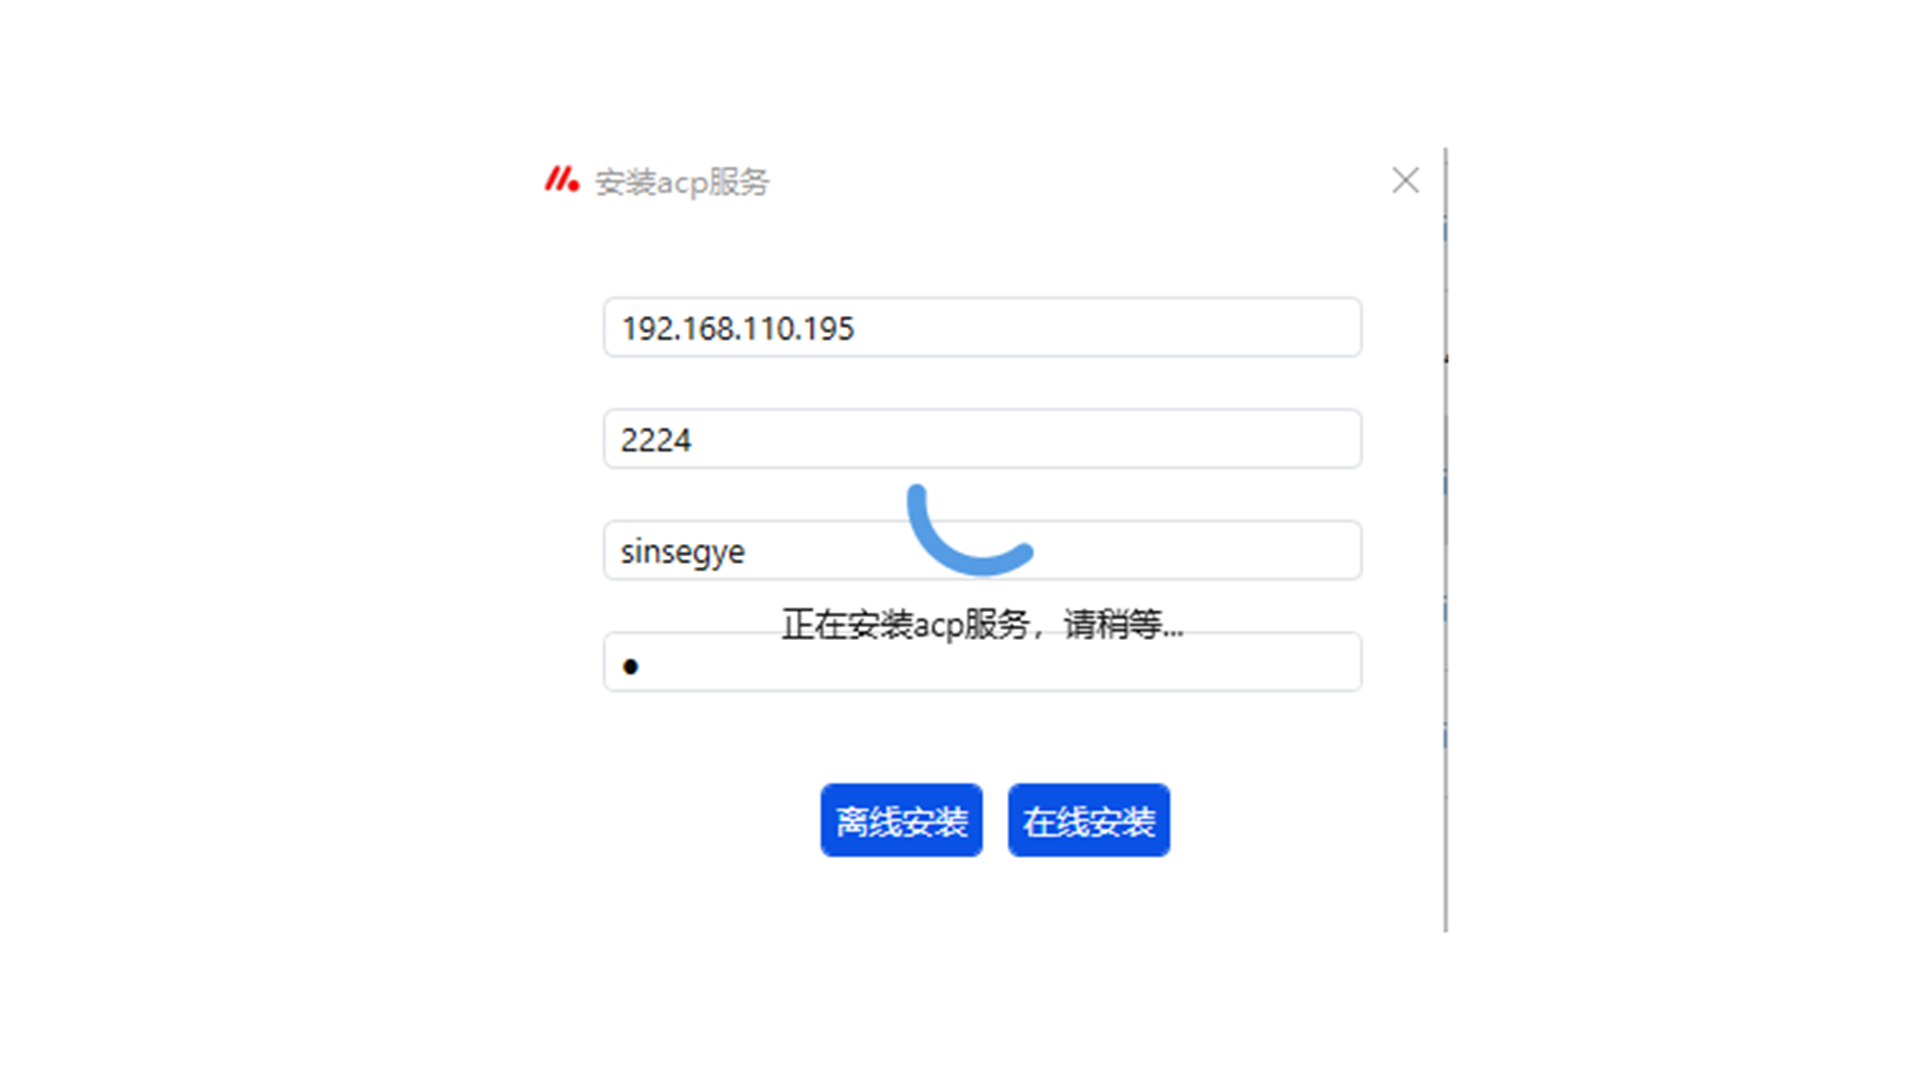
Wait for the installation to complete.
-
After installation, click "Scan" to detect the icomputer connected via the fixed network port 192.168.110.195.
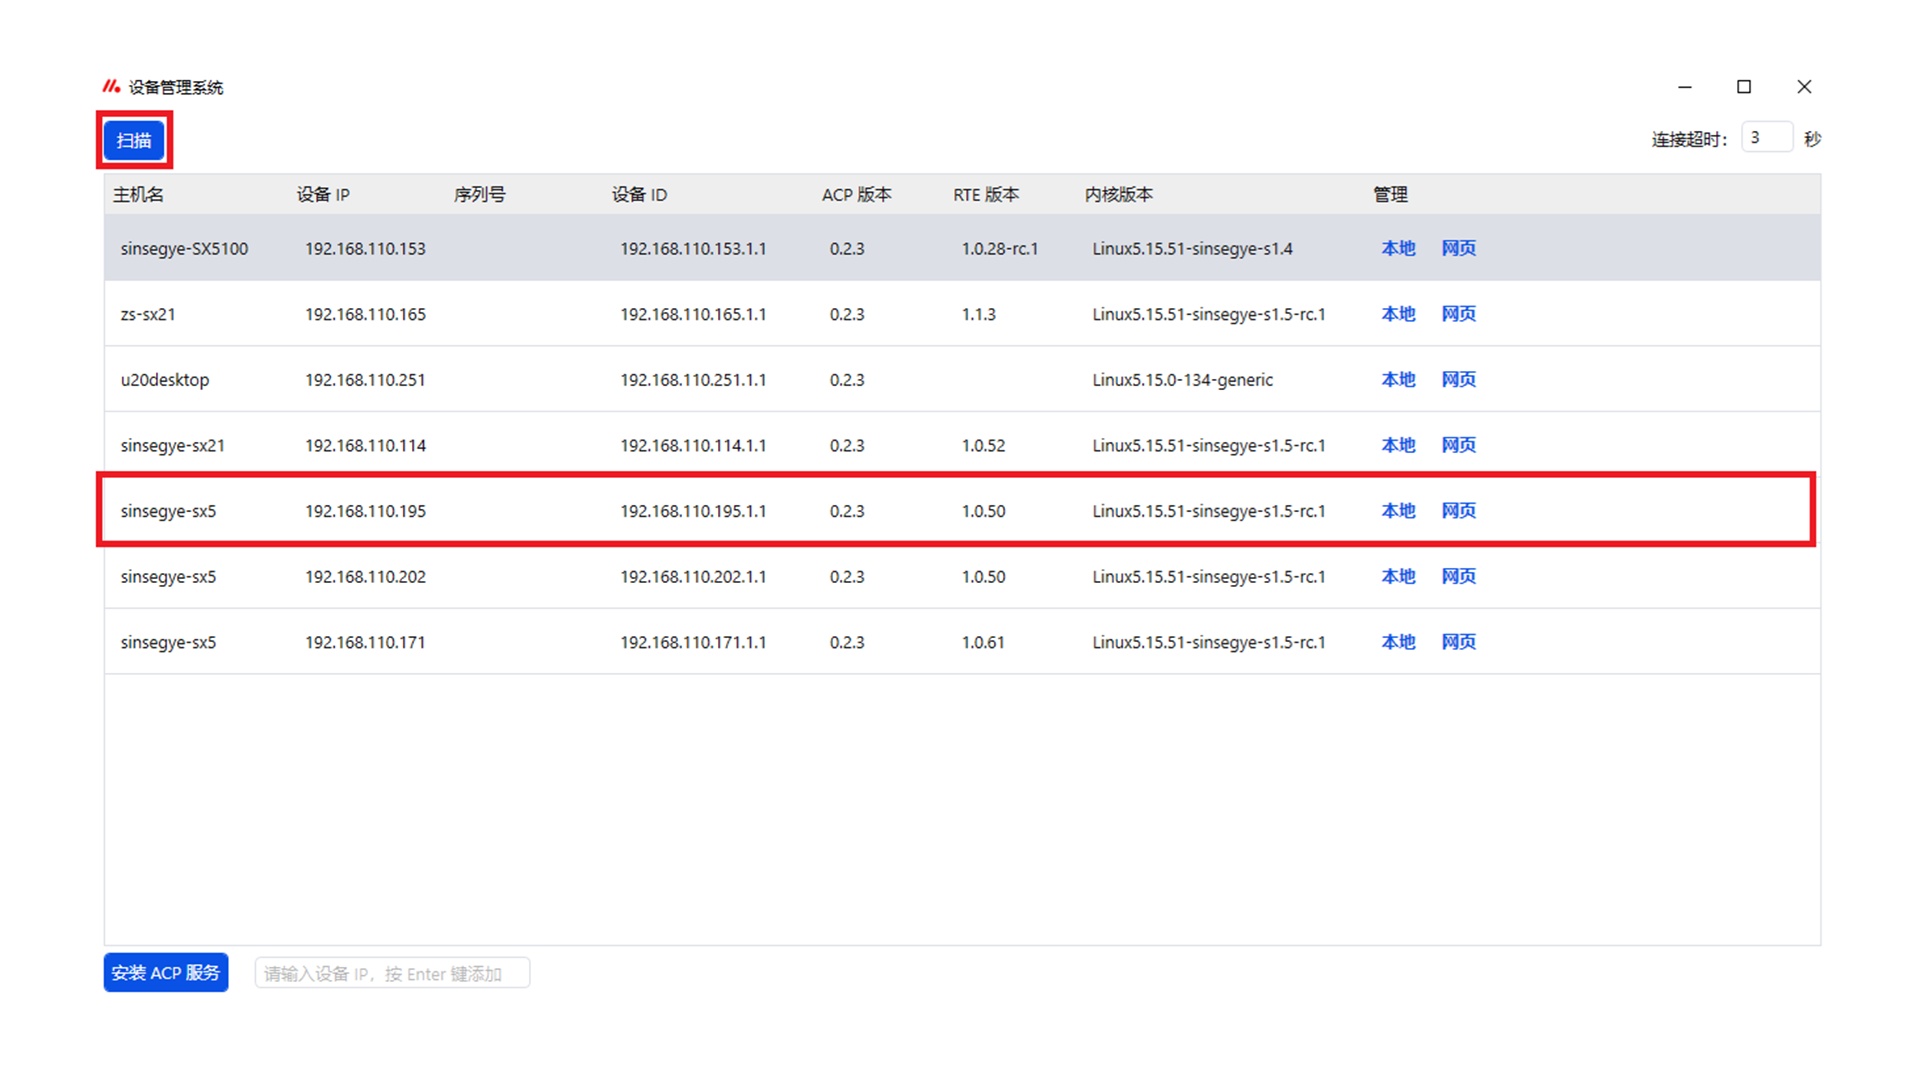
After clicking to enter the icomputer, the status "Connected" will be displayed at the bottom left.
-
Click "Install RTE Plugin Service".
-
Enter username: sinsegye, password: 1, then click "Online Install".

-
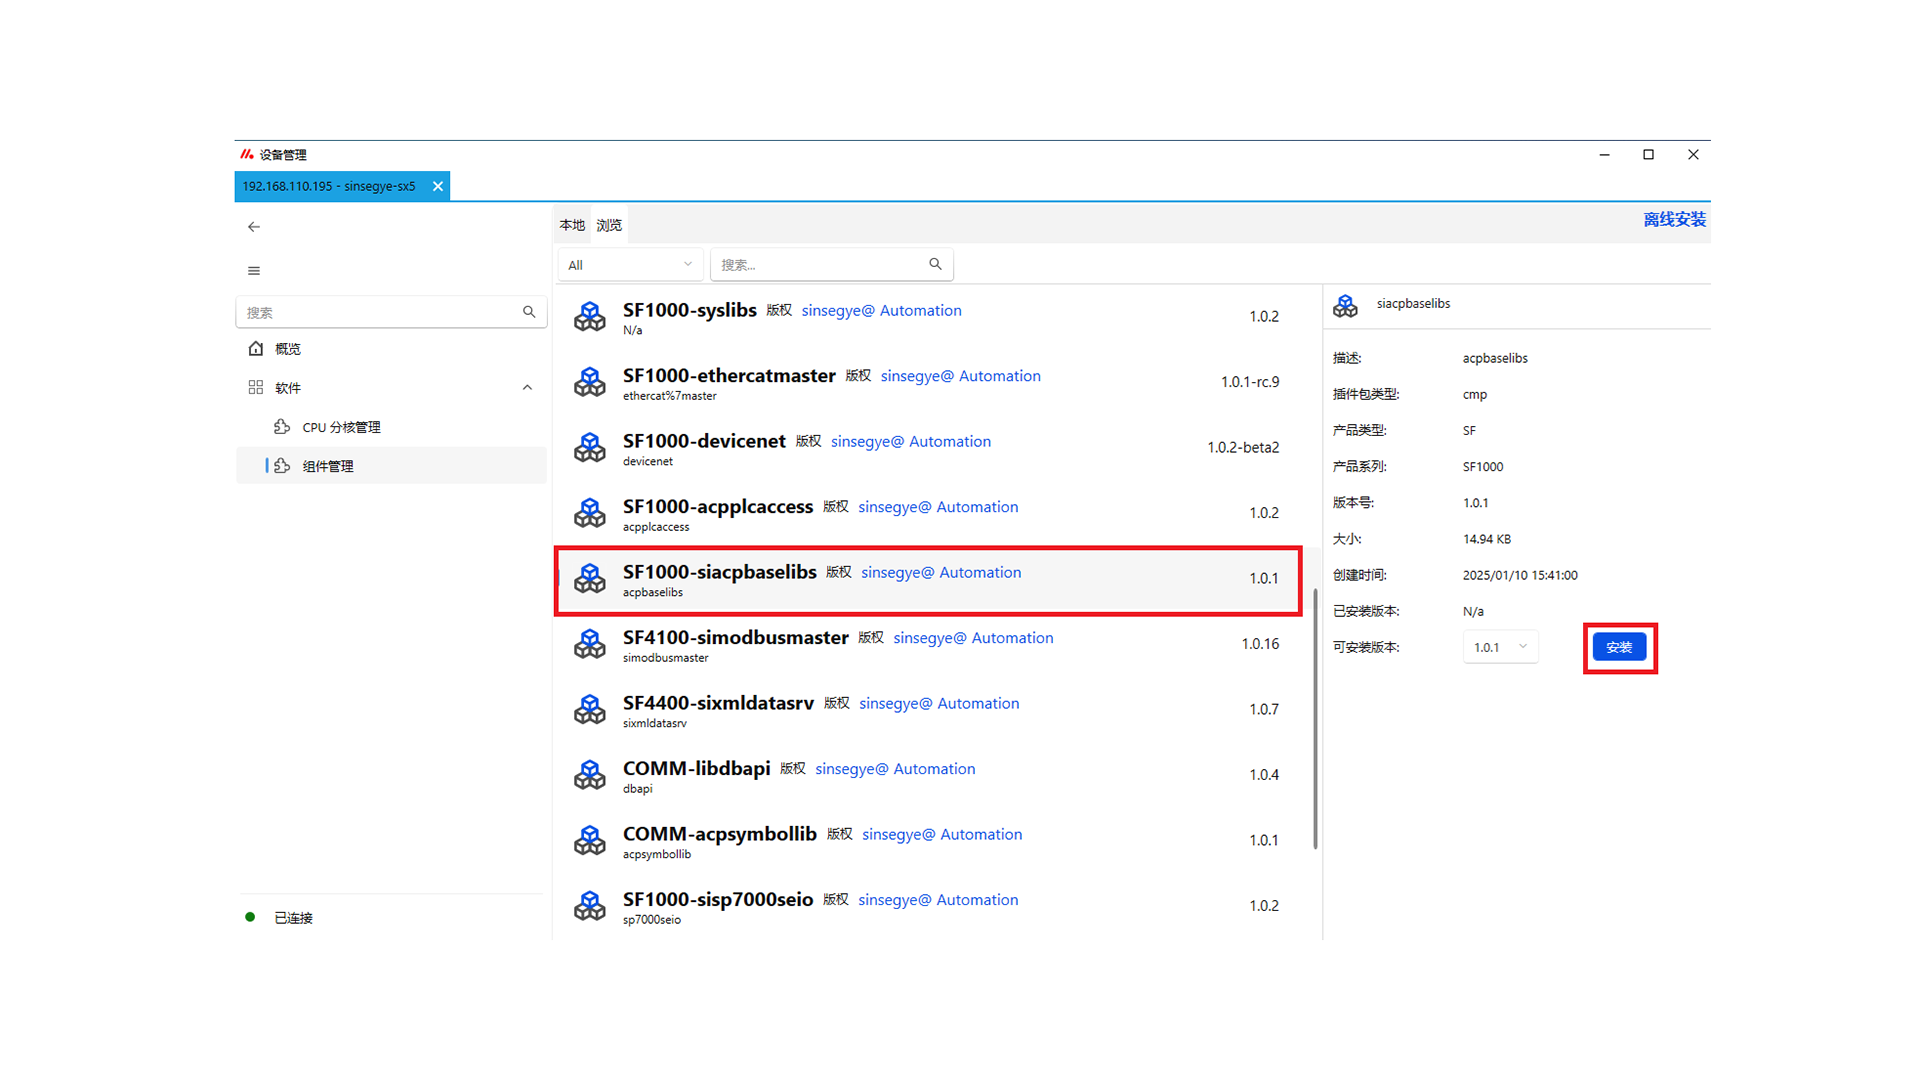
After installation, click "Software" and select "Component Management" from the drop-down menu.
-
Click "Browse" to view available components online.
-
Find "SF1000-siacpbaselibs" in the components and click "Install".
-
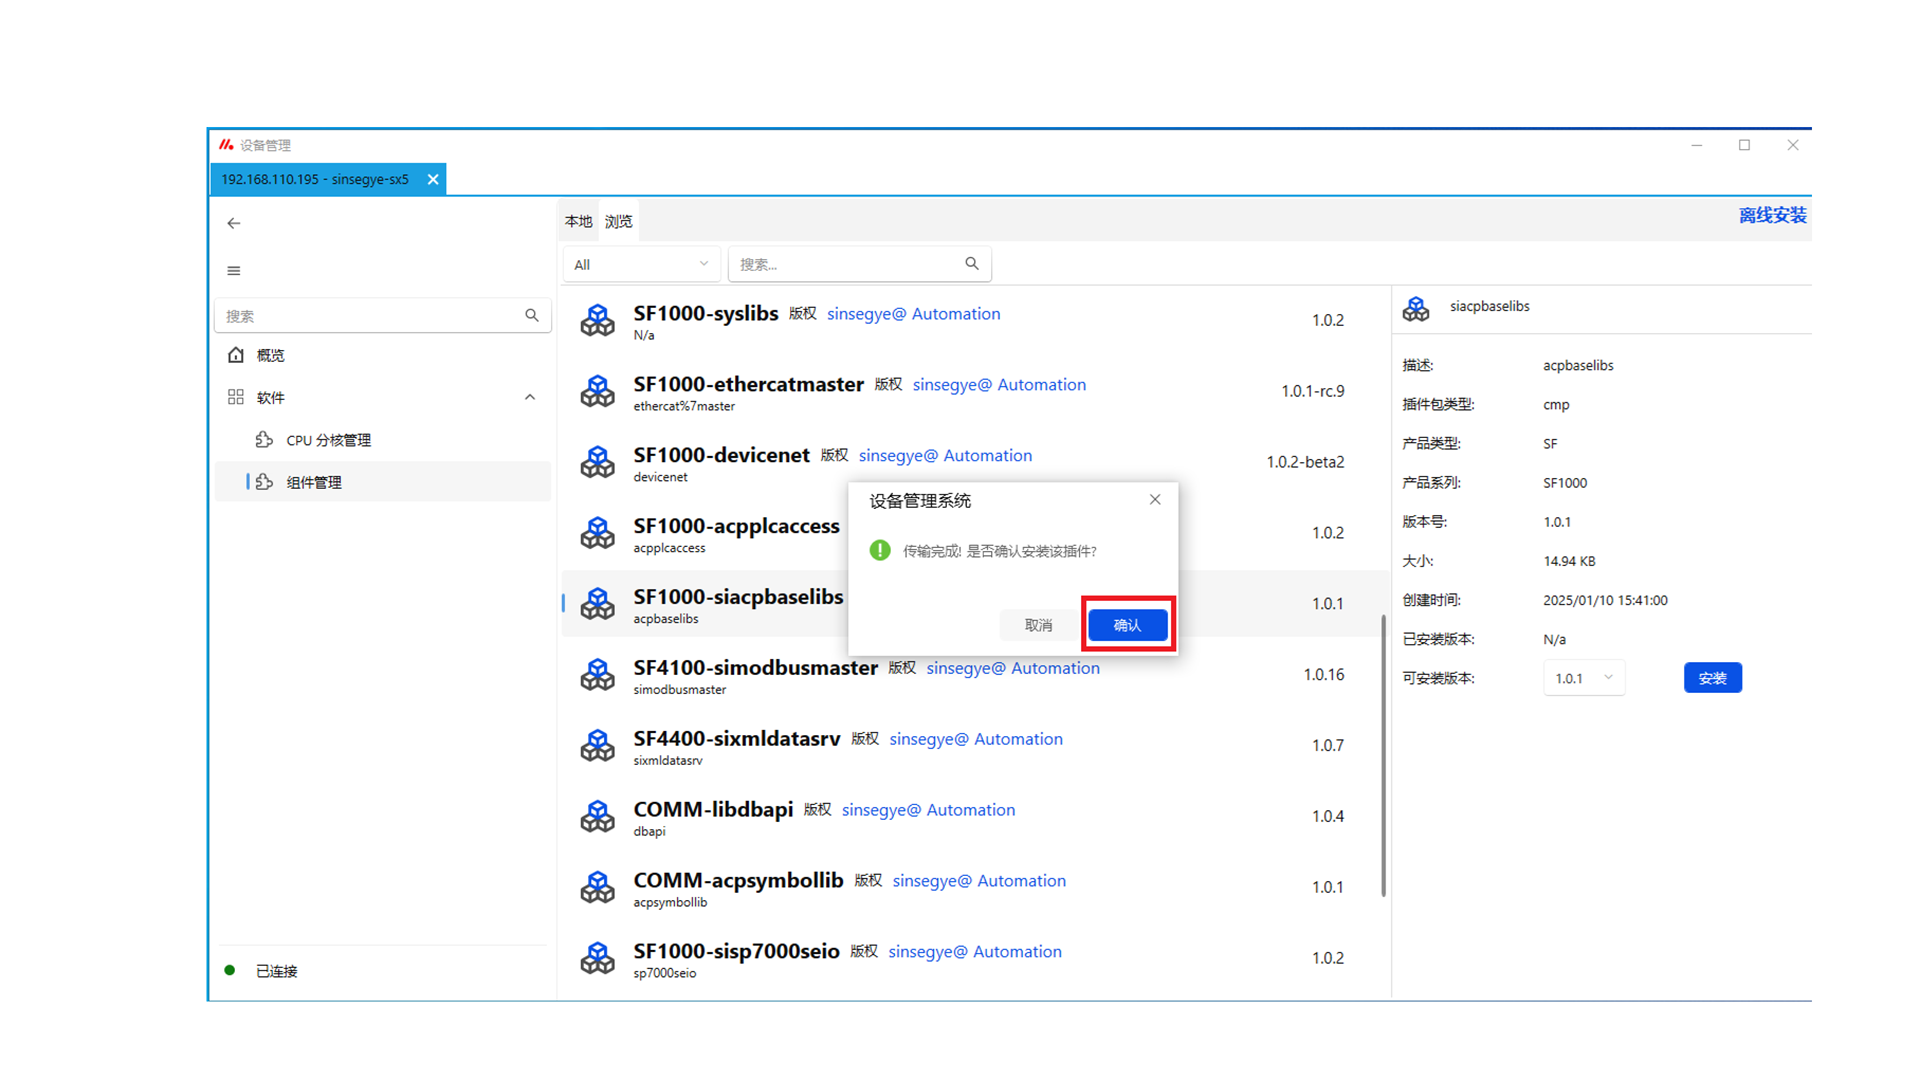
Wait for the deb package to be transferred to the icomputer. After transfer, click "OK" to install.
-
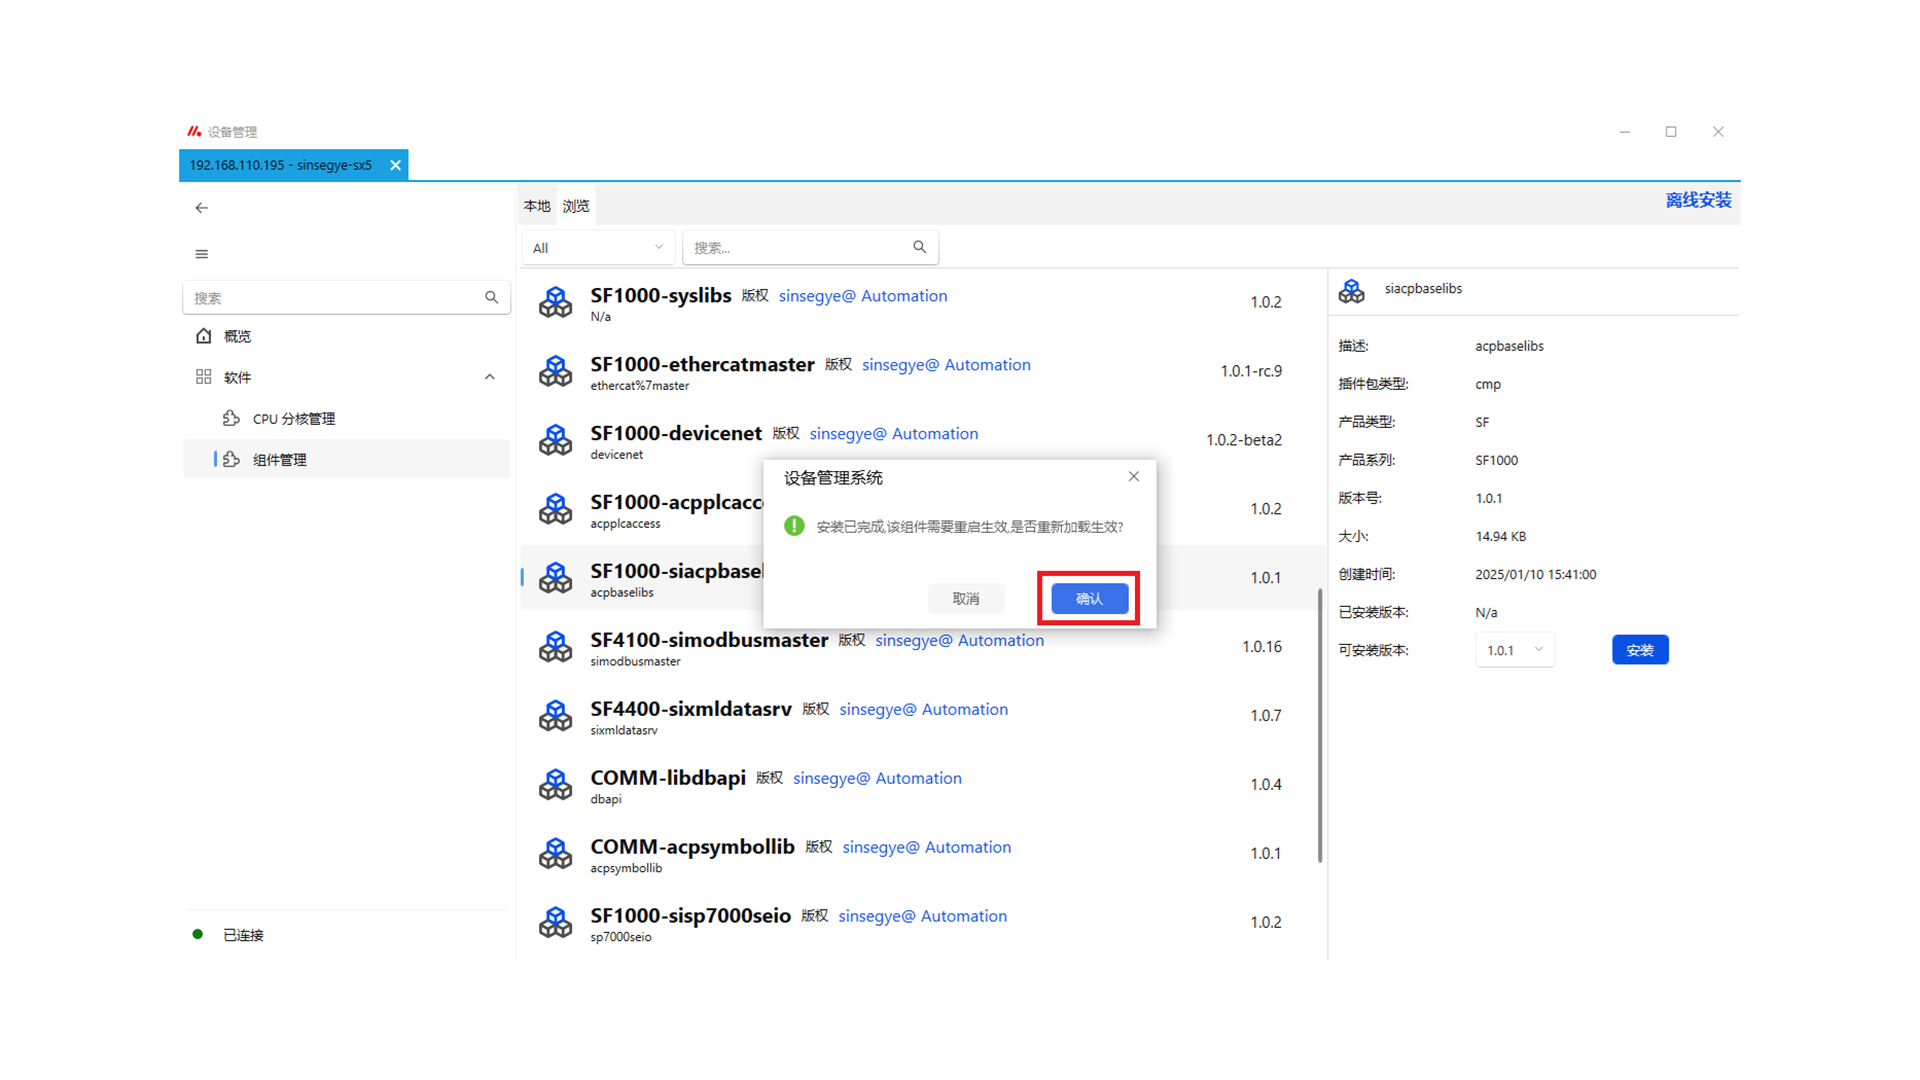
After installation, click "Confirm" to restart for the changes to take effect.
-
After installation, you can check that SF1000-siacpbaselibs is successfully installed on the "Local" page.
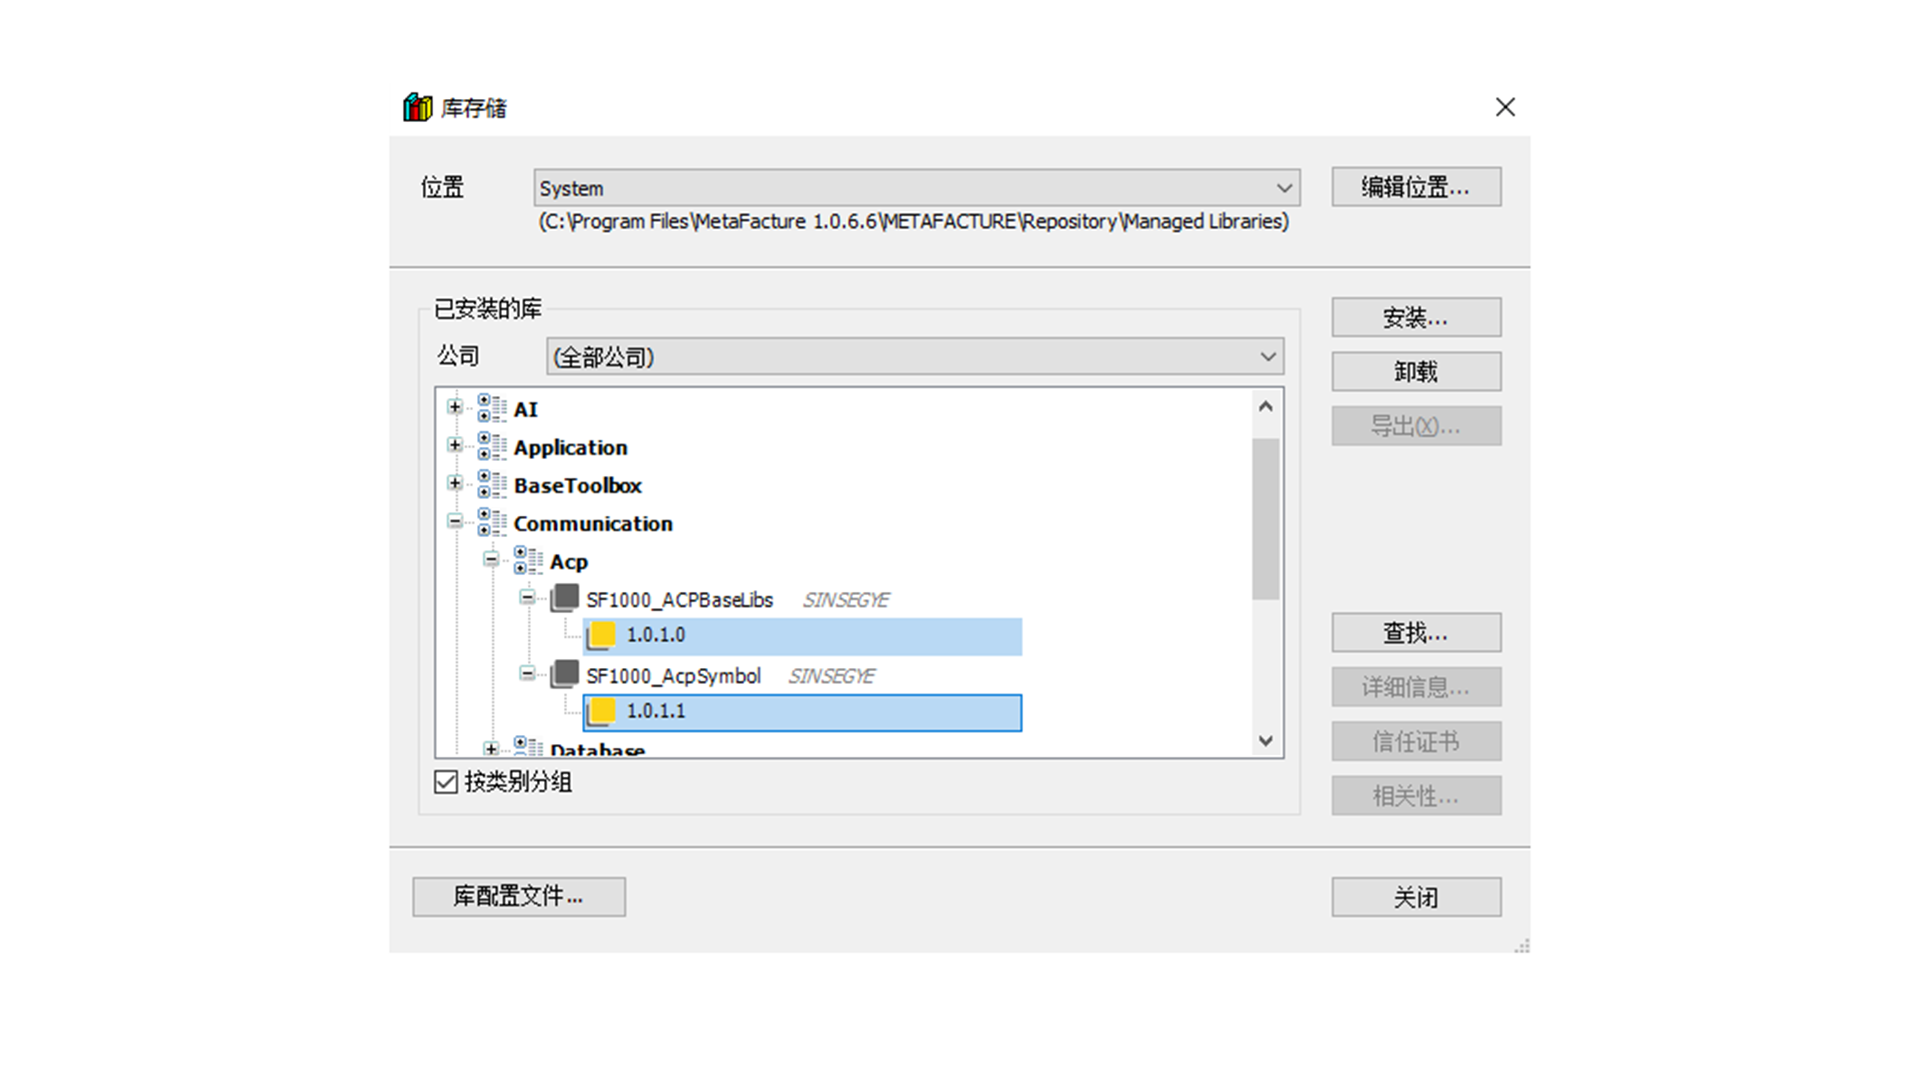
3. Install SF1000_ACPBaseLibs and SF1000_AcpSymbol library files on the client icomputer
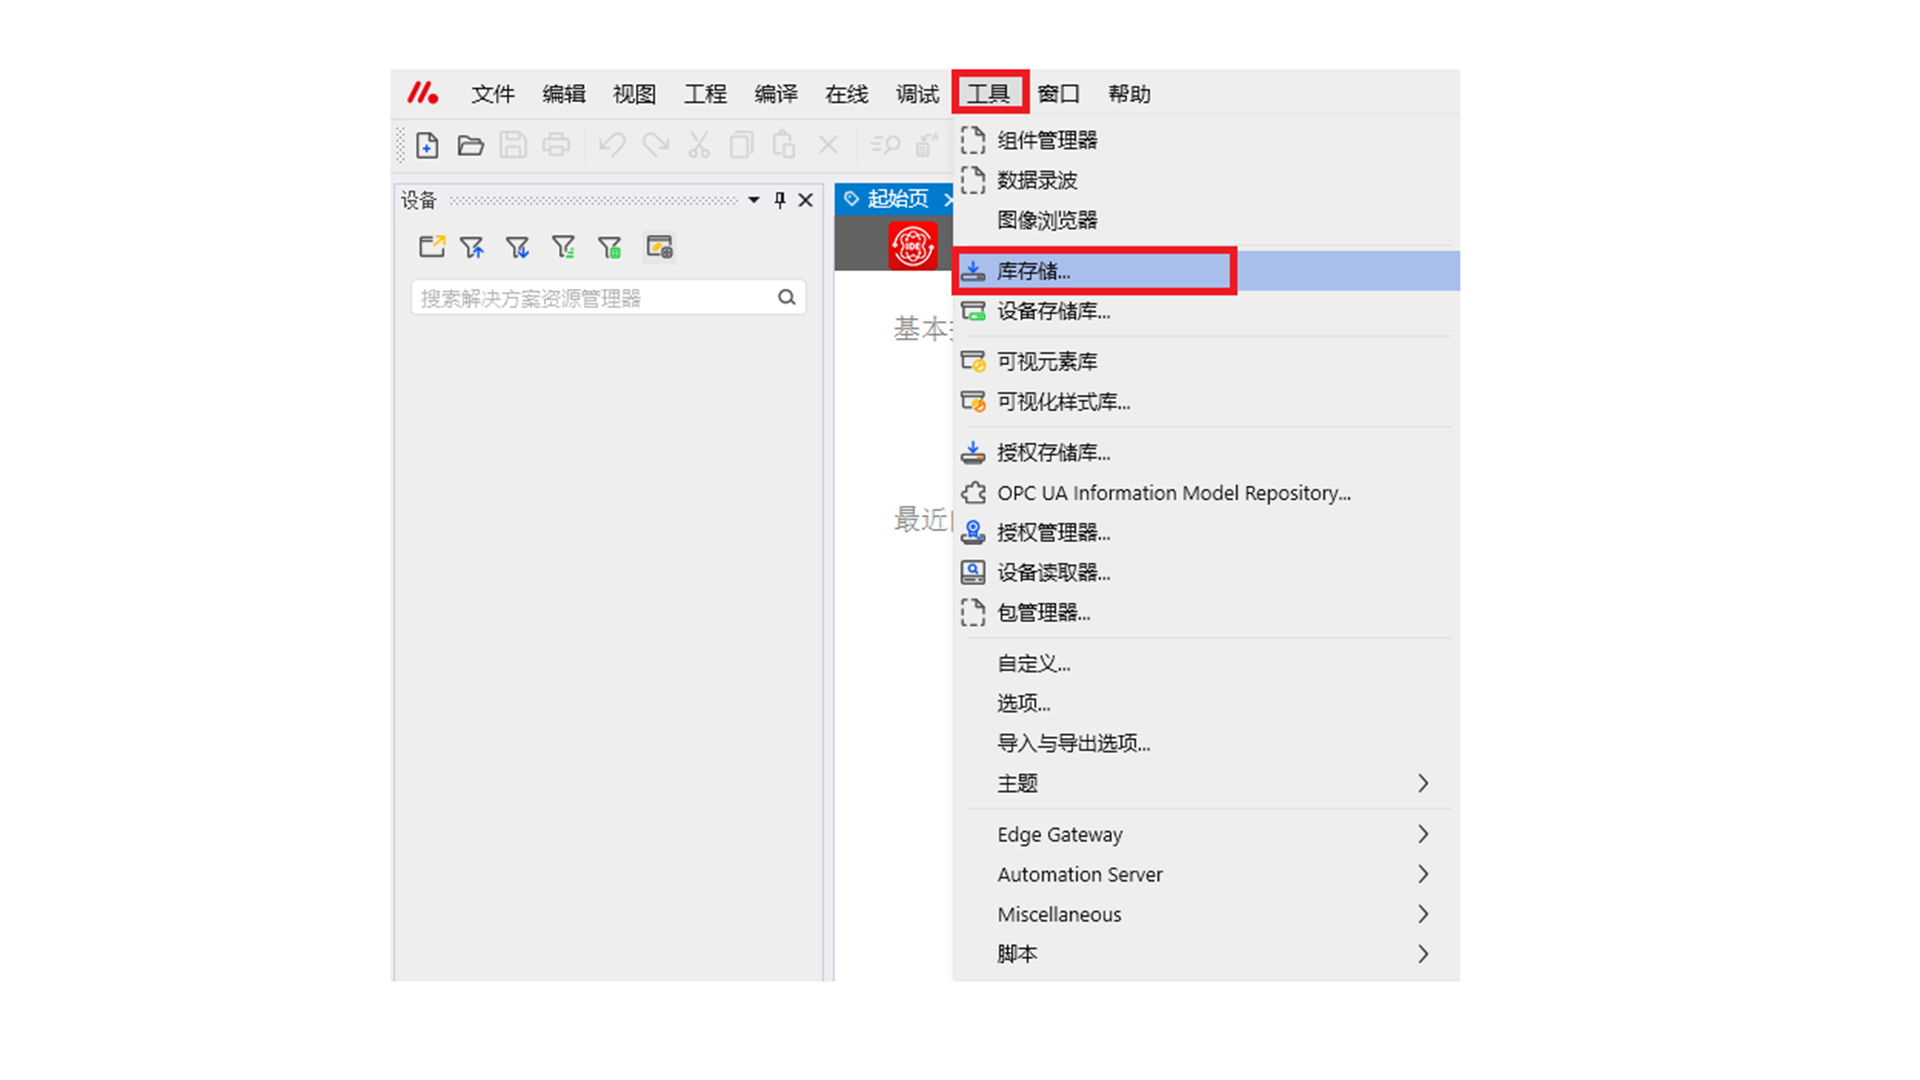
Open the MataFacture IDE software, select "Tools" -- "Library Storage".
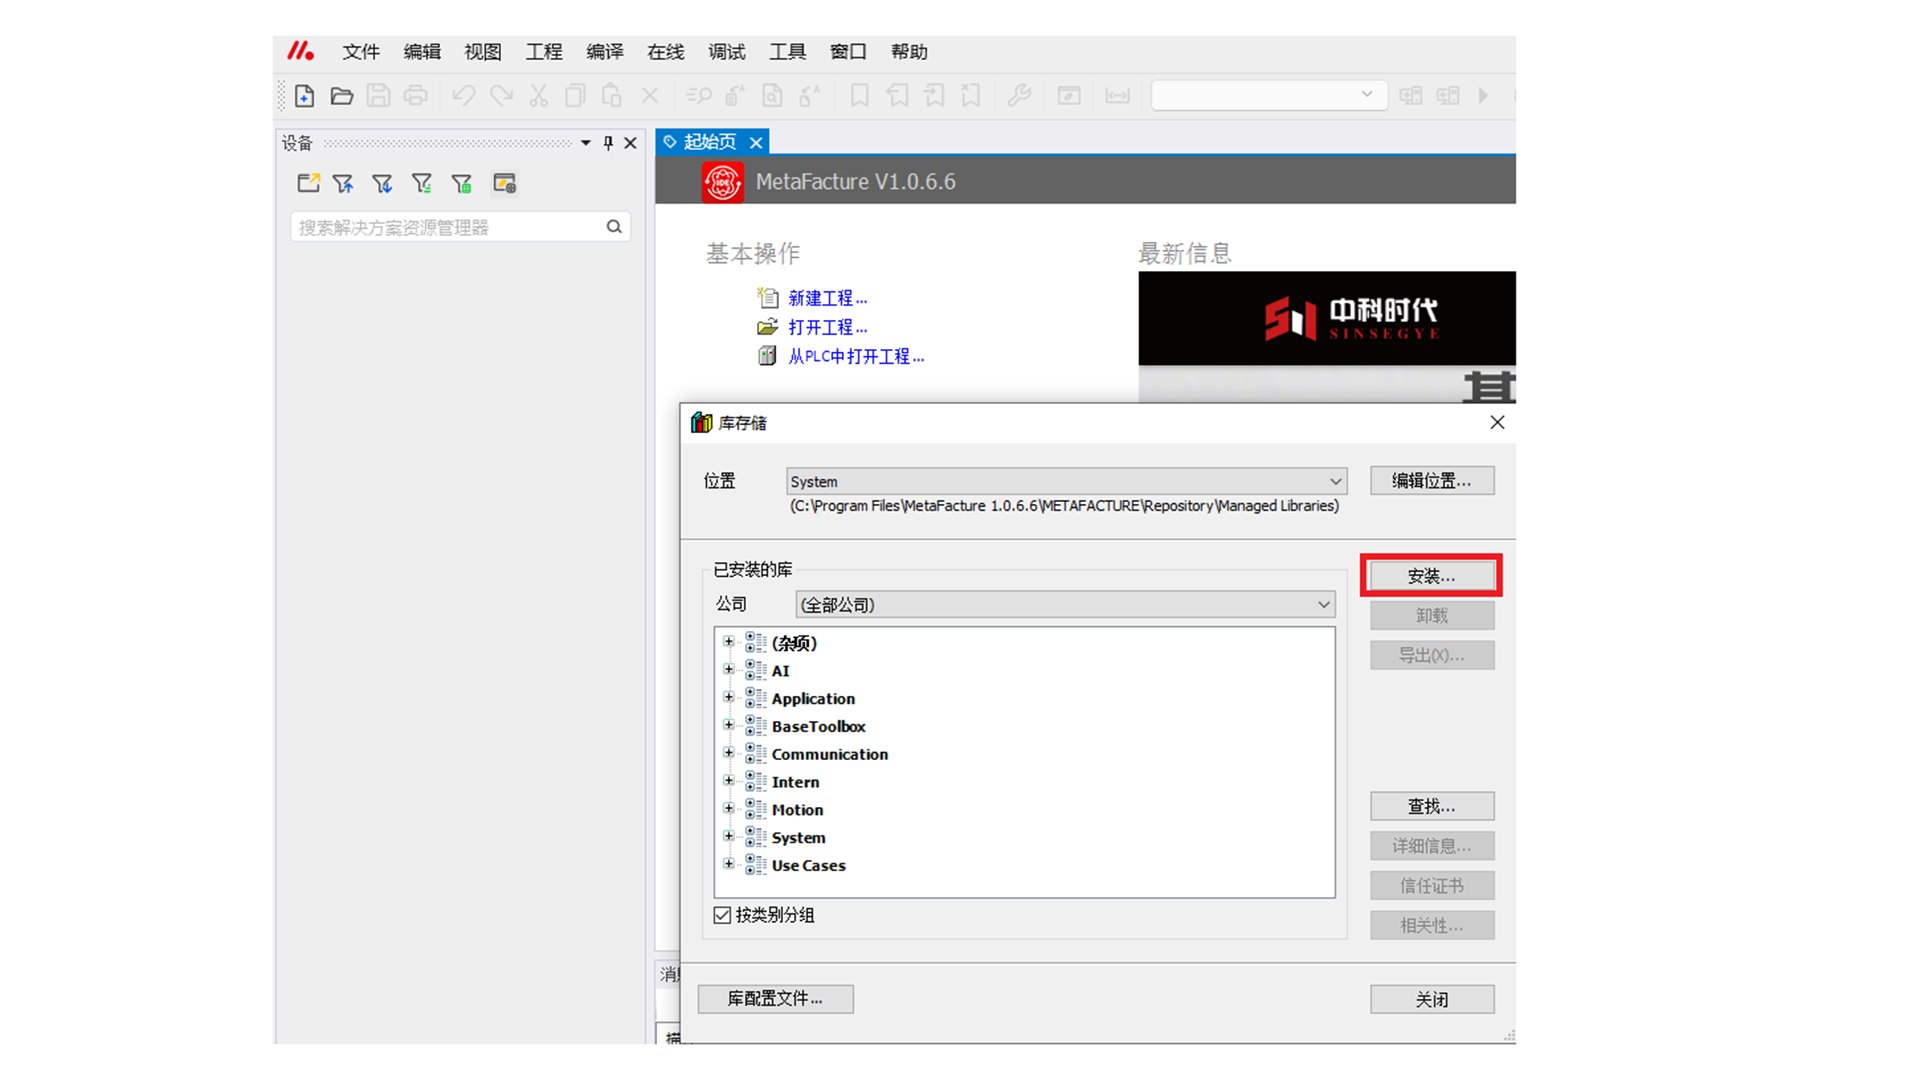
Click "Install".
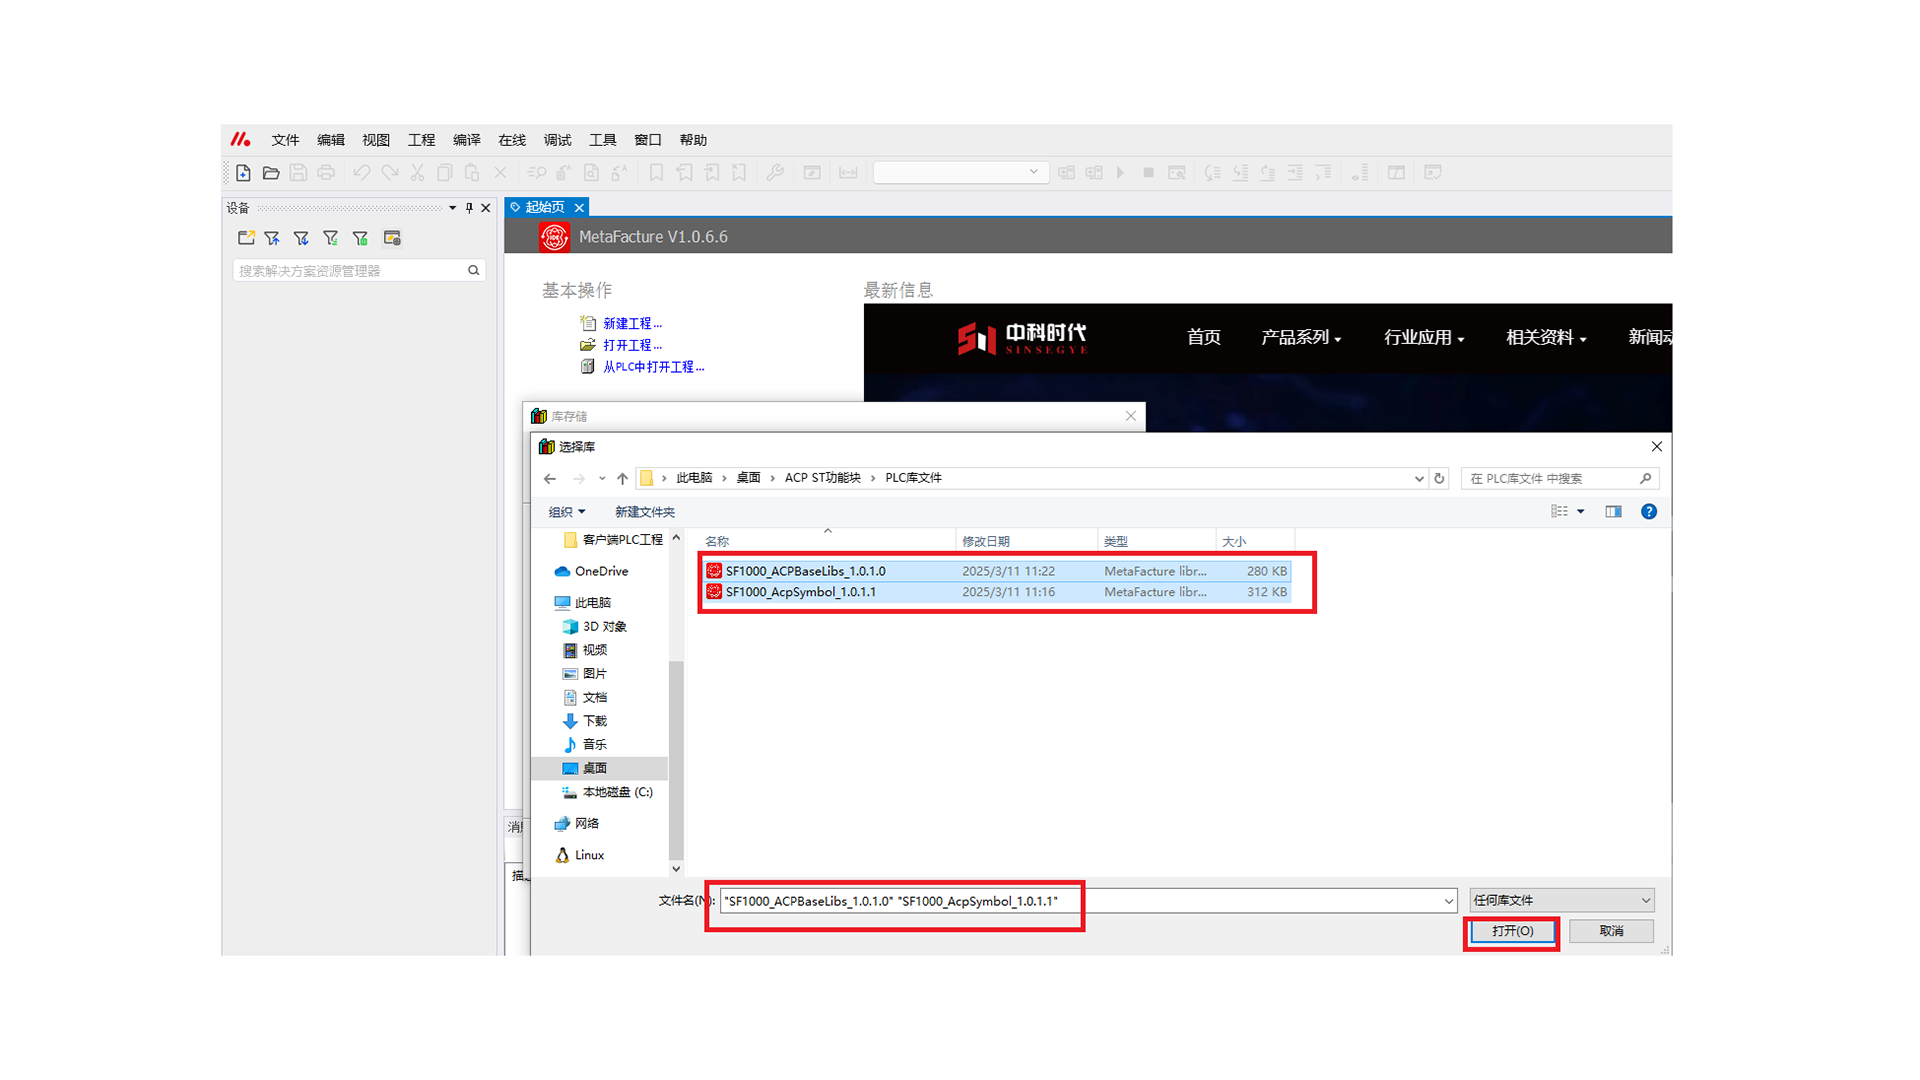
Select the SF1000_ACPBaseLibs and SF1000_AcpSymbol library files downloaded from the Sinsegye official website, then click "Open".
Wait for the library files to be installed.
Update Installation
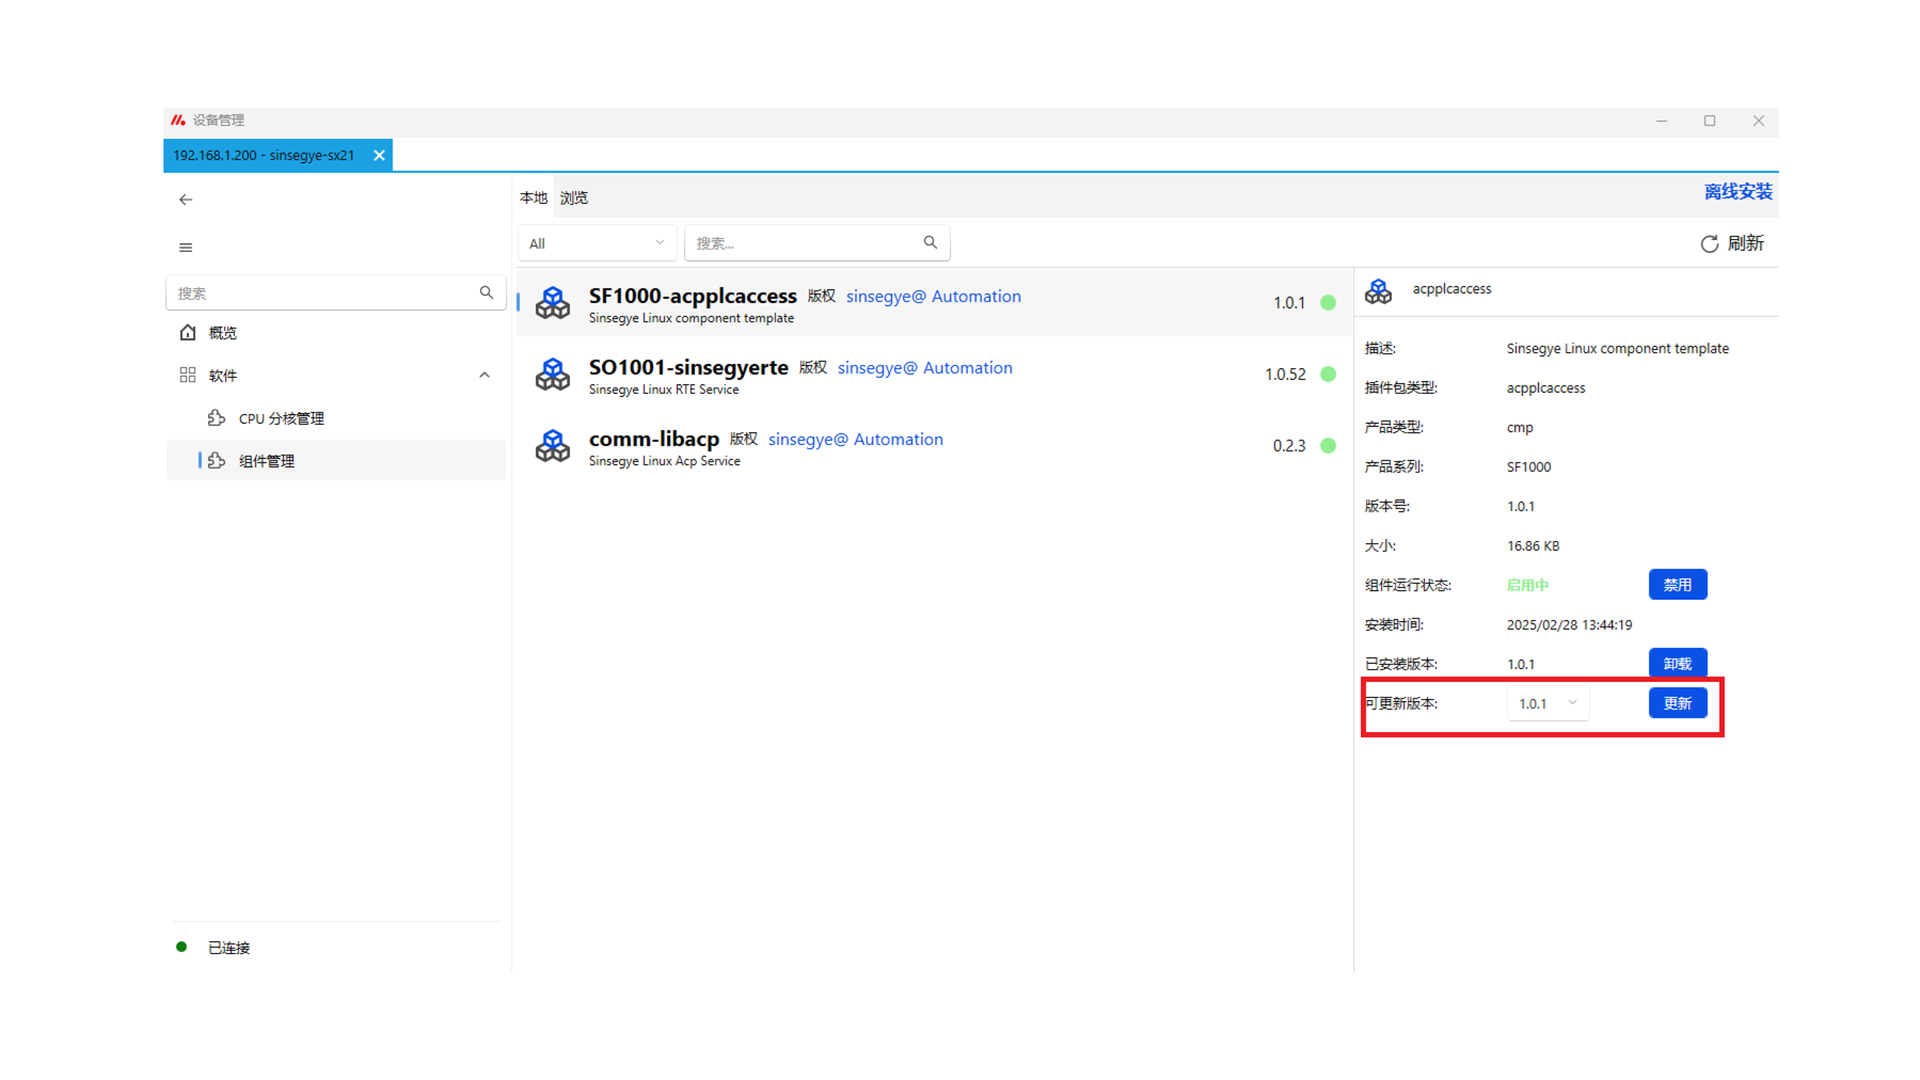
- Update acpplcaccess component on the server: In Device Manager -- Component Management -- Local Components, click SF1000-acpplcaccess, select an available update version, and click "Update".
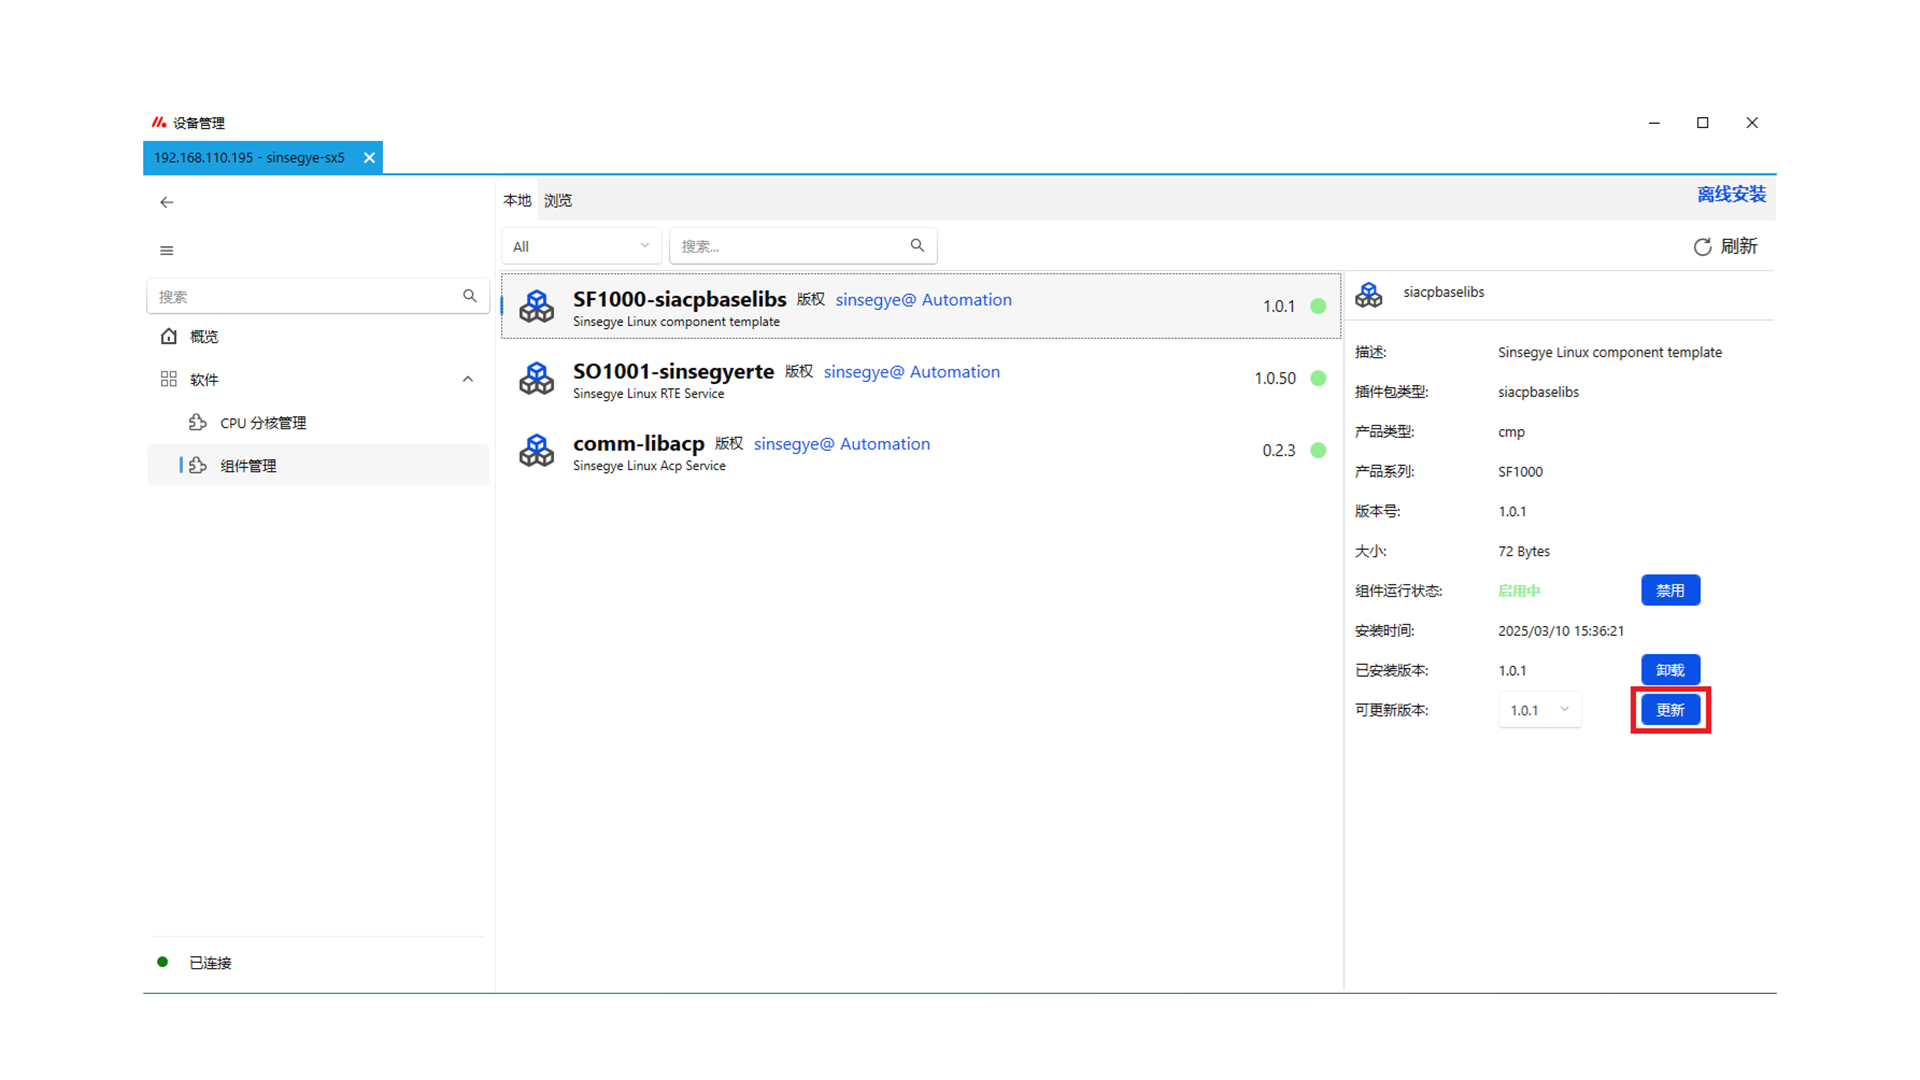
- Update SF1000-siacpbaselibs component on the client: In Device Manager -- Component Management -- Local Components, click SF1000-siacpbaselibs, select an available update version, and click "Update".
- Update PLC library files: The latest version of MetaFacture IDE comes with the latest SF1000_ACPBaseLibs and SF1000_AcpSymbol library files. For manual update, download the latest library files and perform an overwrite installation by referring to the Installation Process.
Uninstallation Process
Uninstall icomputer deb components
In Device Manager -- Component Management -- Local Components, click SF1000-acpplcaccess and select "Uninstall".
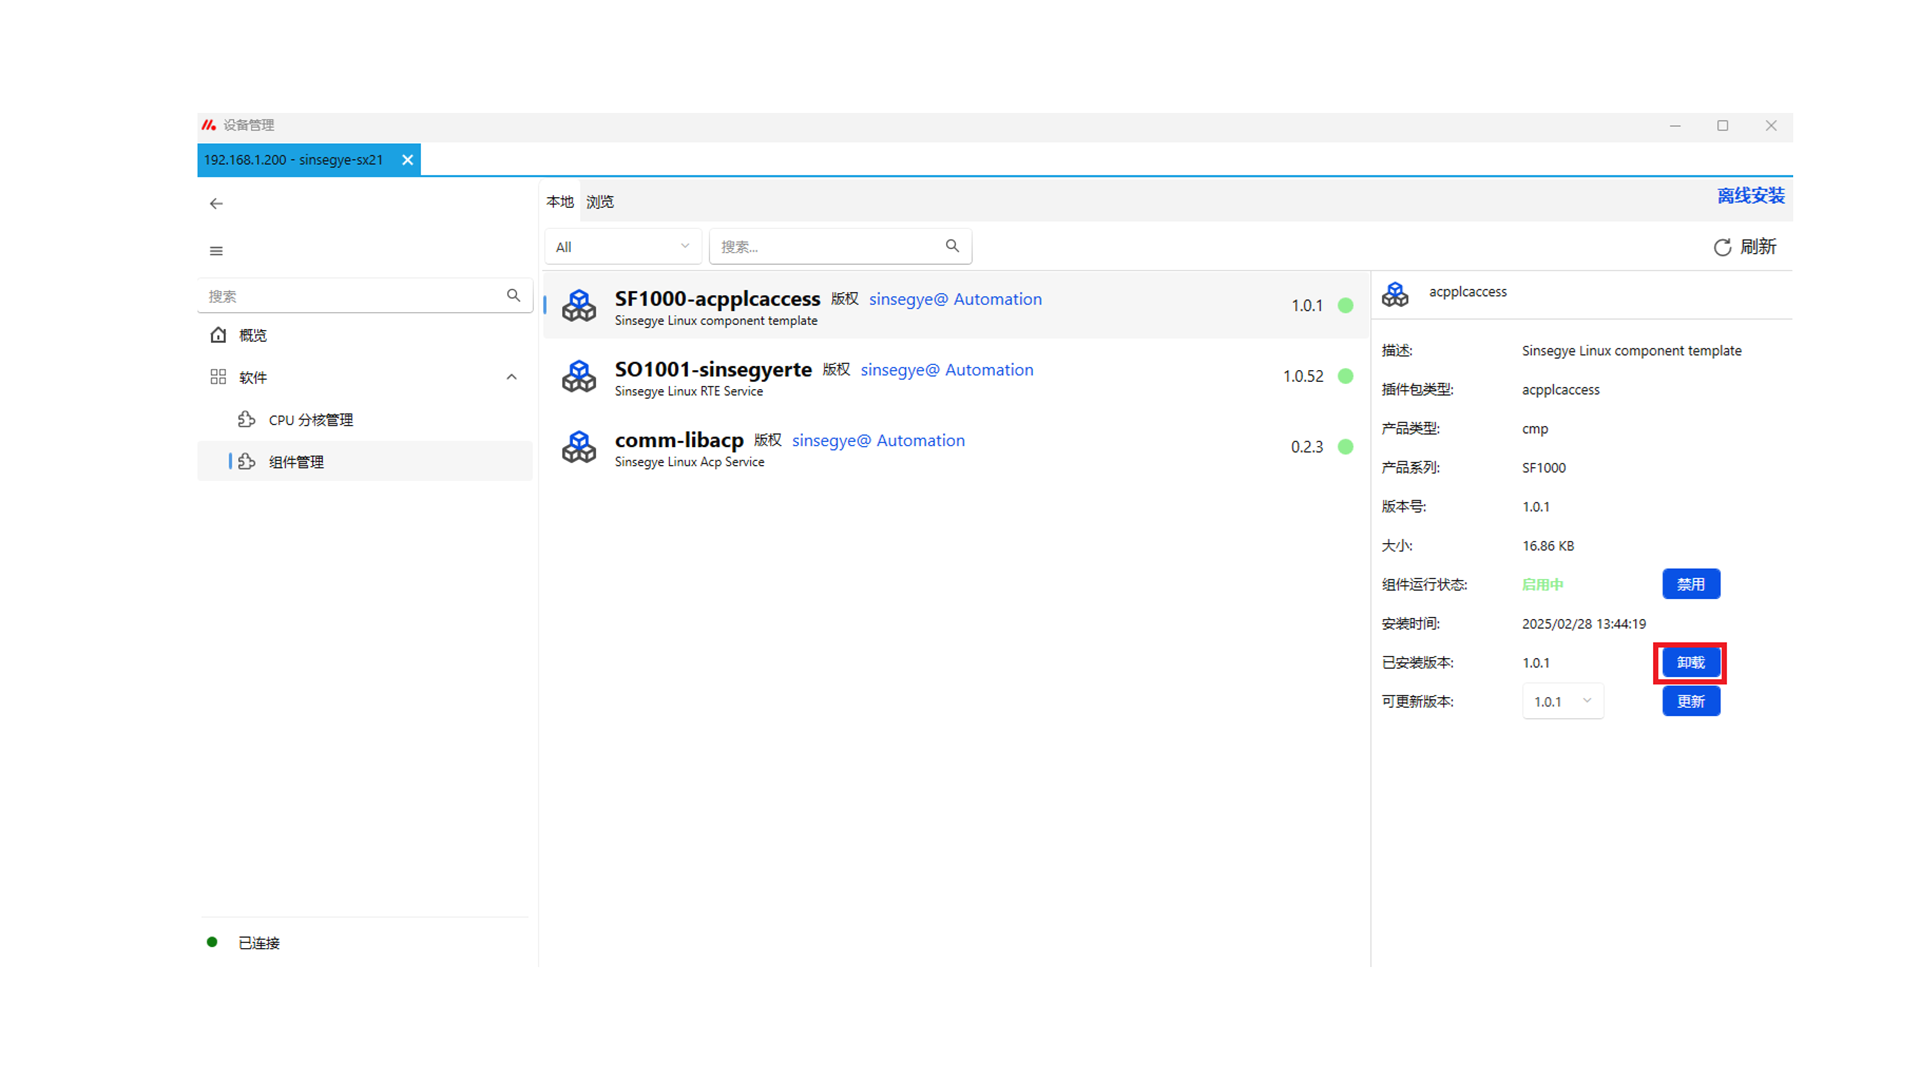
Click "OK".
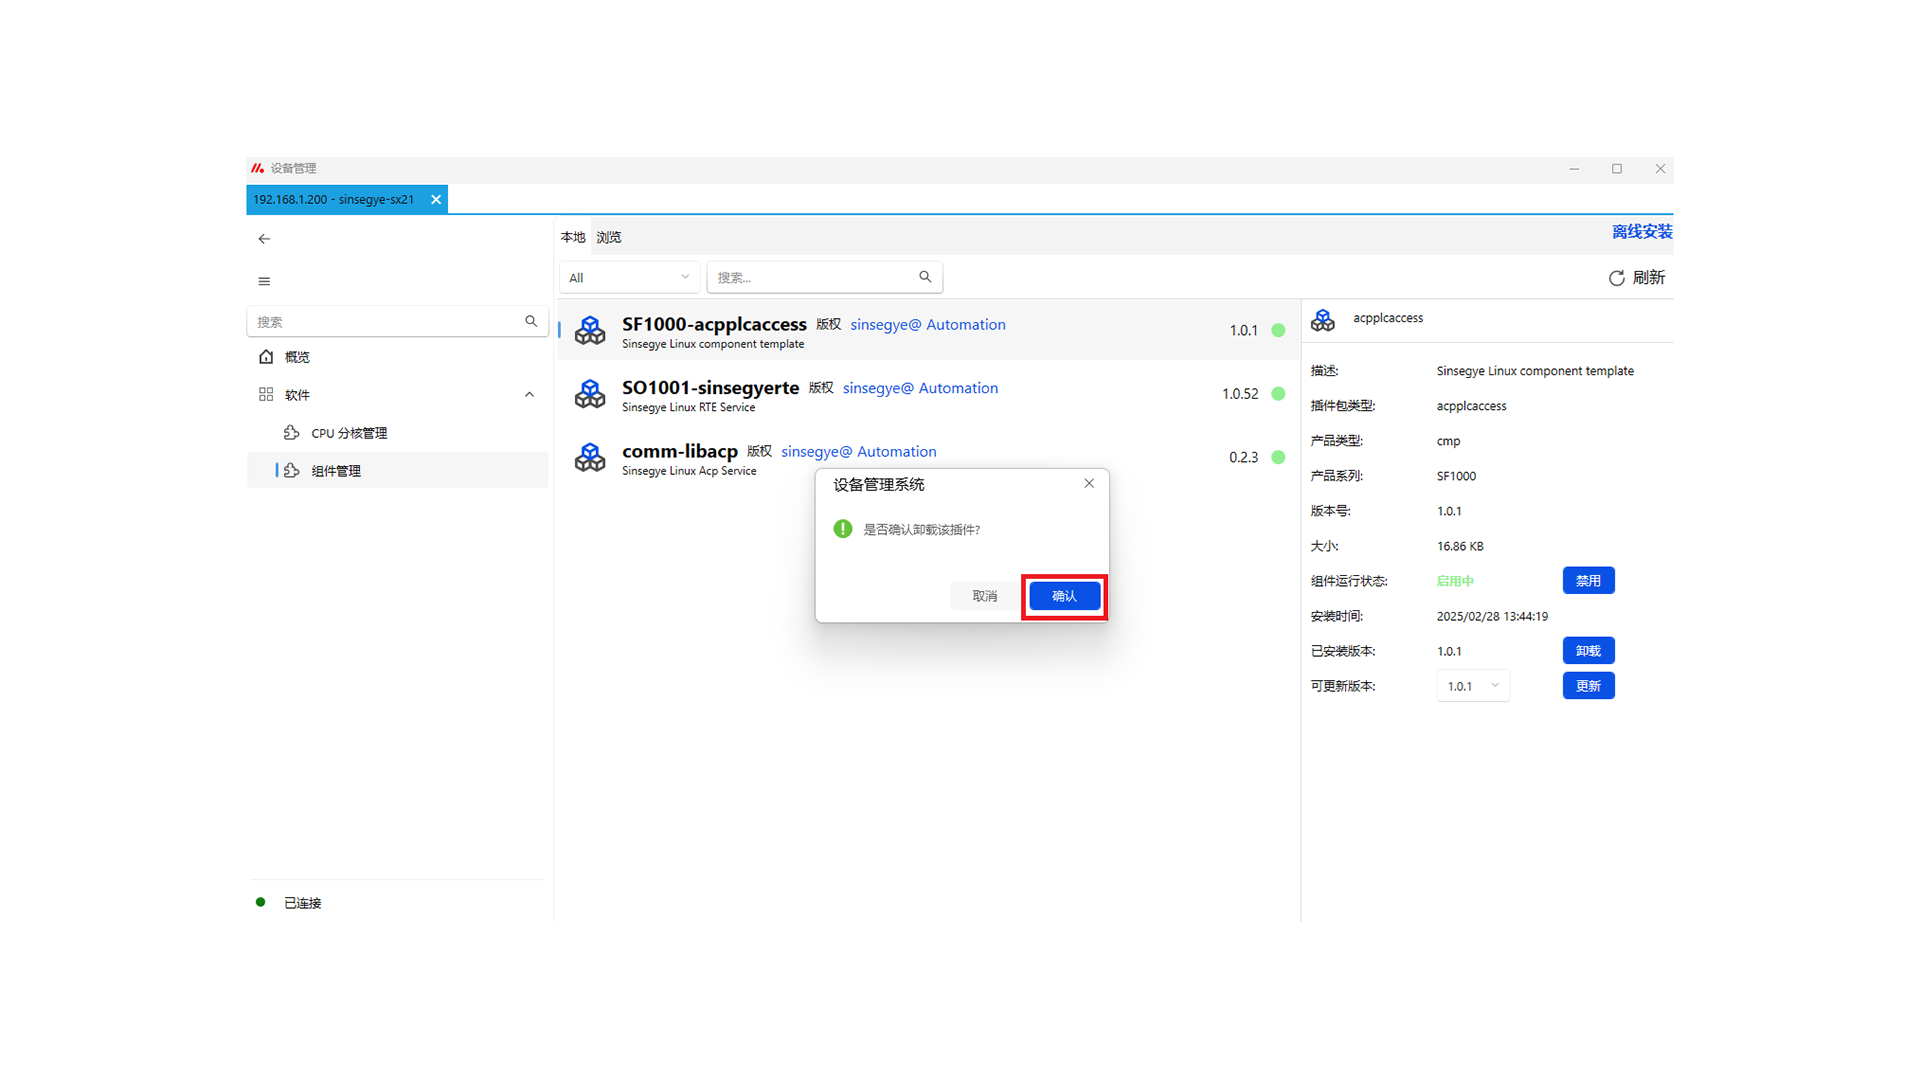
After successful uninstallation, click "Confirm" to restart for the changes to take effect.
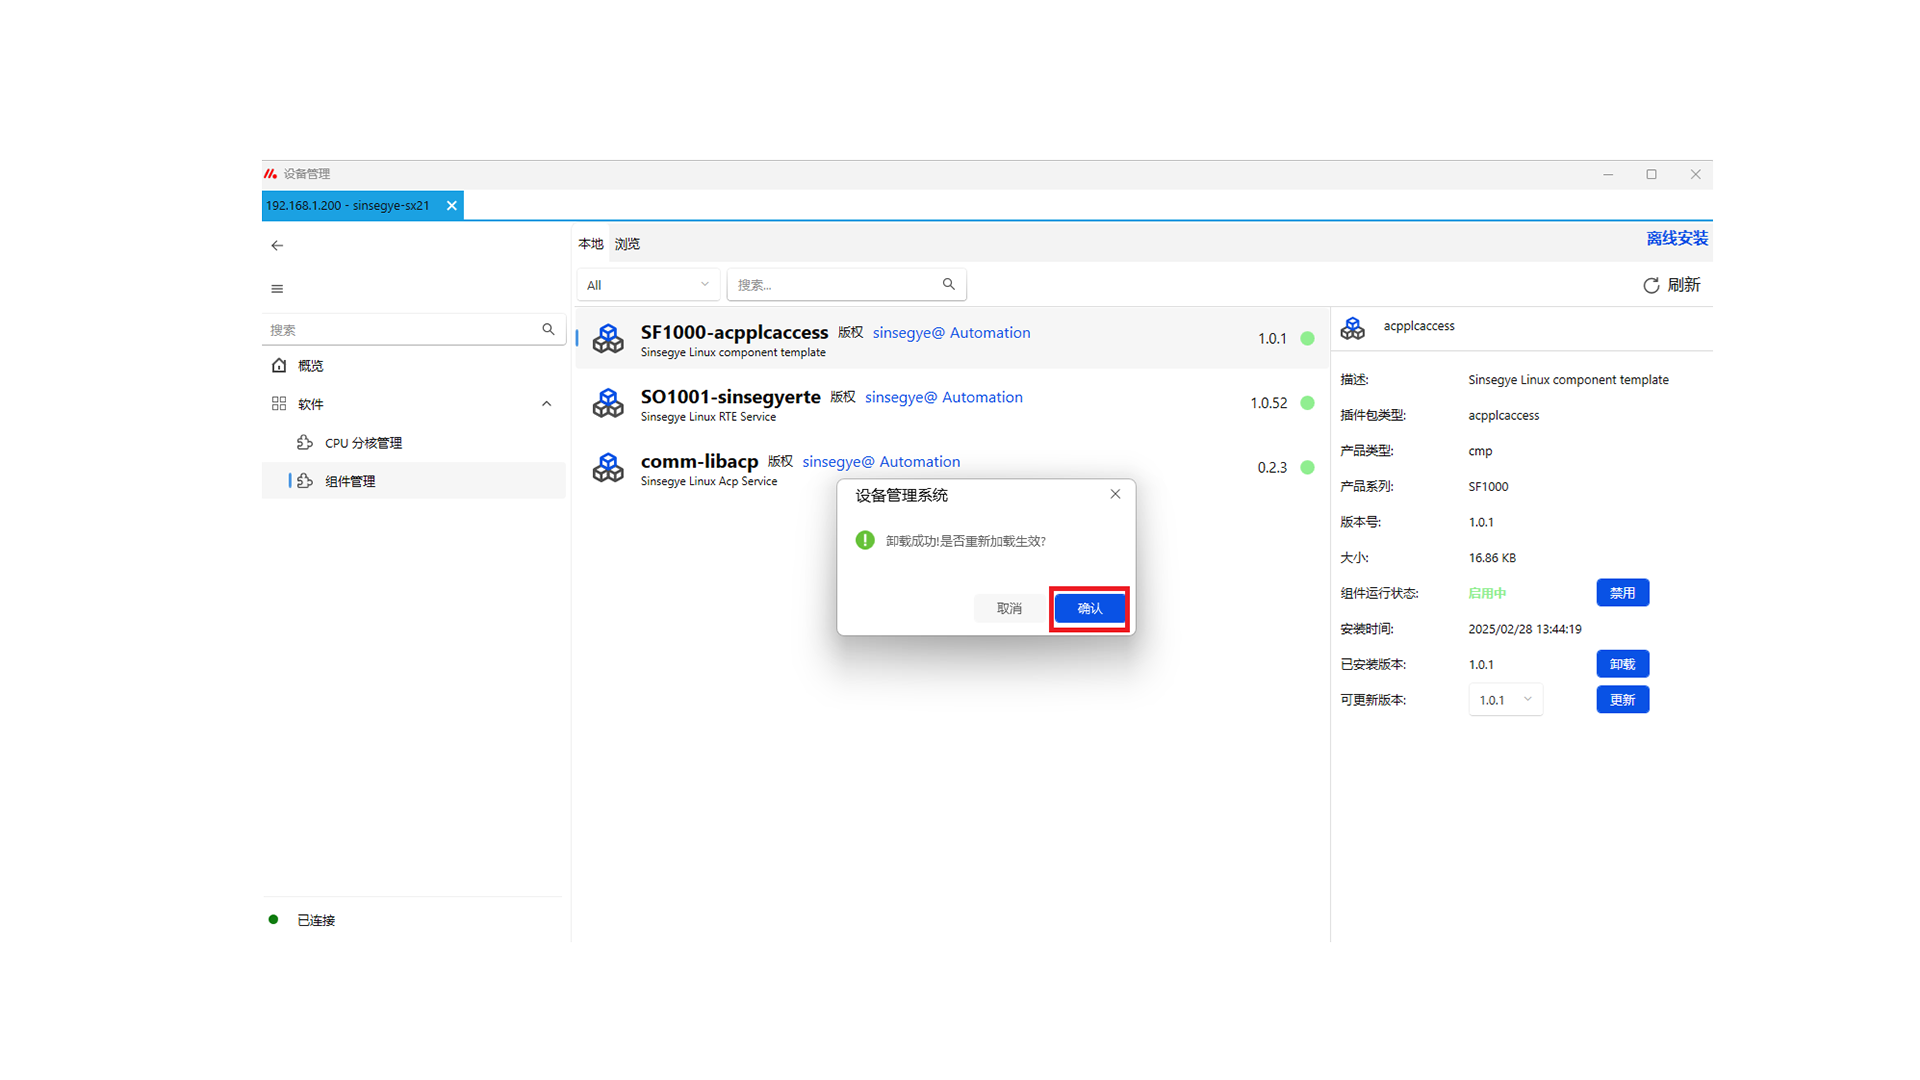
After successful uninstallation, the component will disappear from the "Local" page.
Technical Description
Quick Start
(I) Software and hardware configuration in this example
Hardware:
- Server icomputer SX21
- Client icomputer SX5132
- Industrial switch
- Personal computer
Software:
- DeviceManager_0.0.1.9
- AcpServer.projectarchive
- AcpClient.projectarchive
- MetaFacture IDE
(II) Experimental operation steps in this example
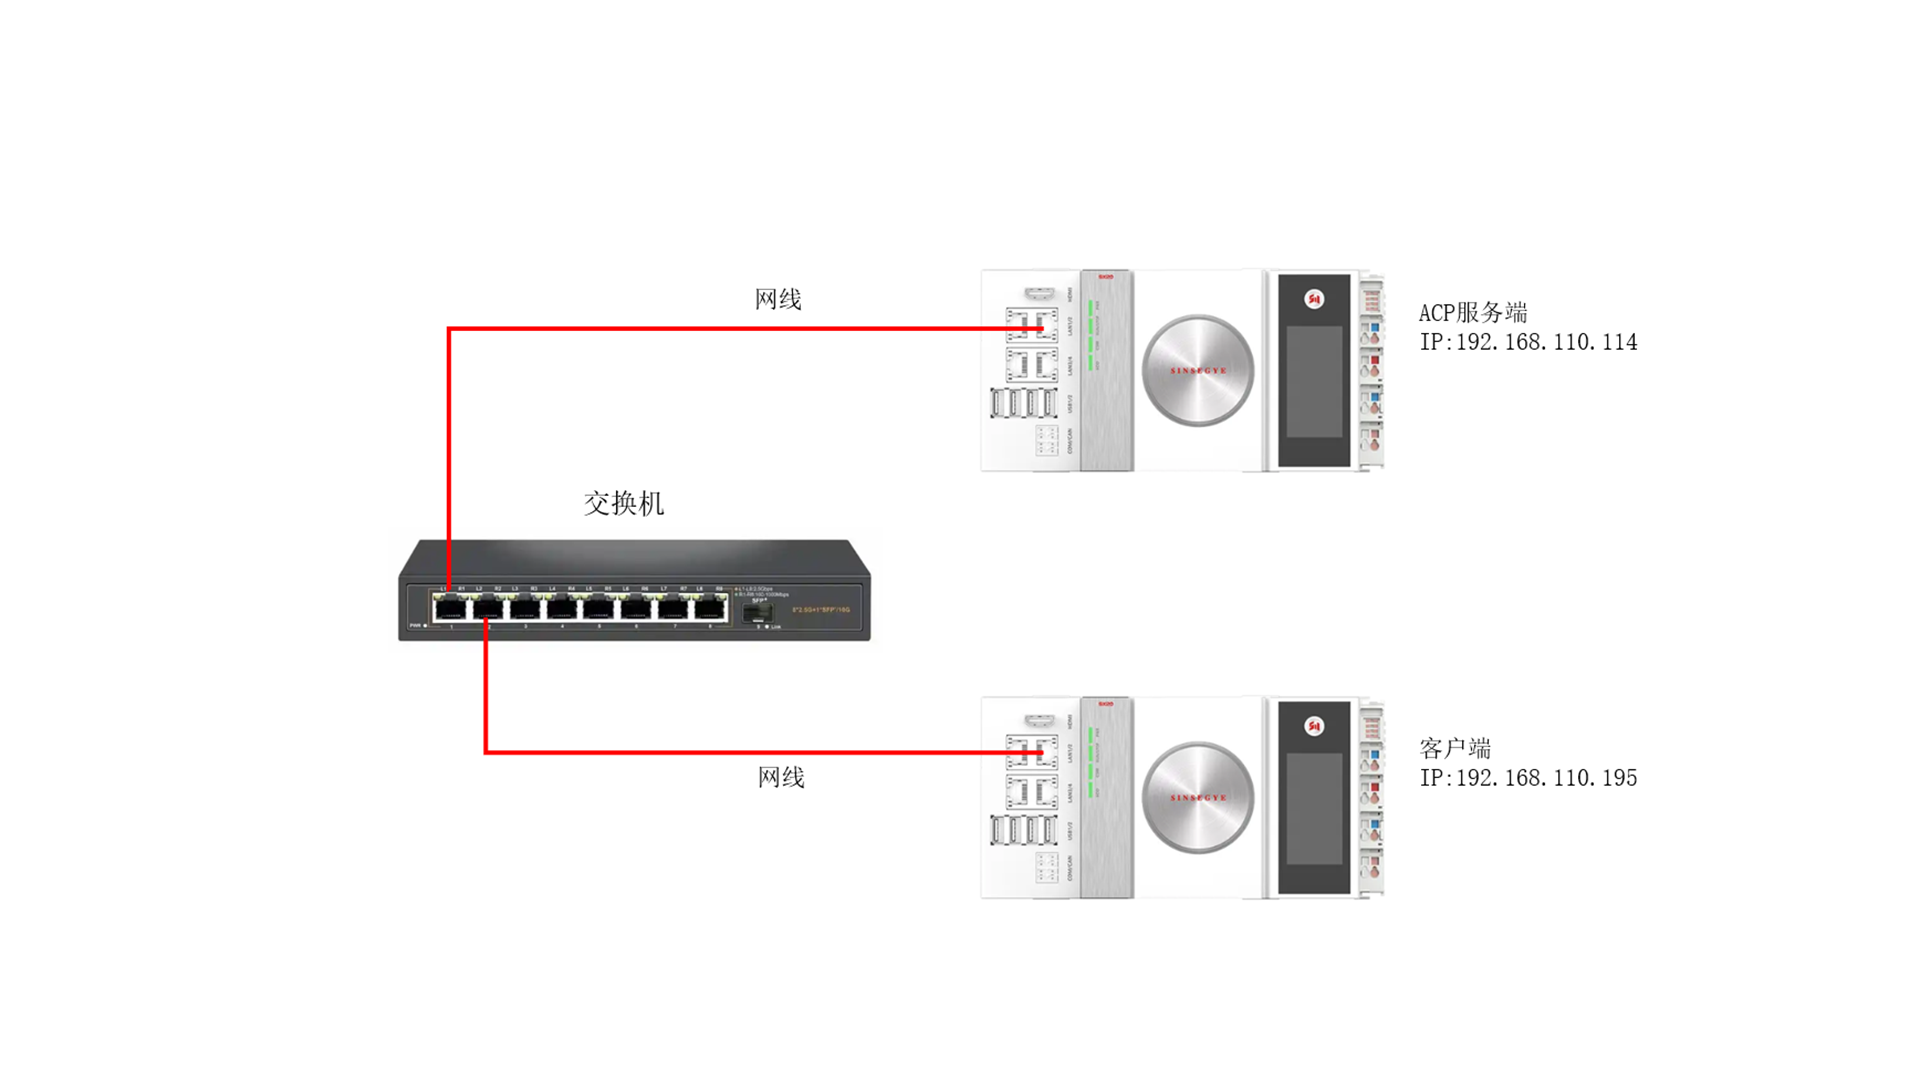
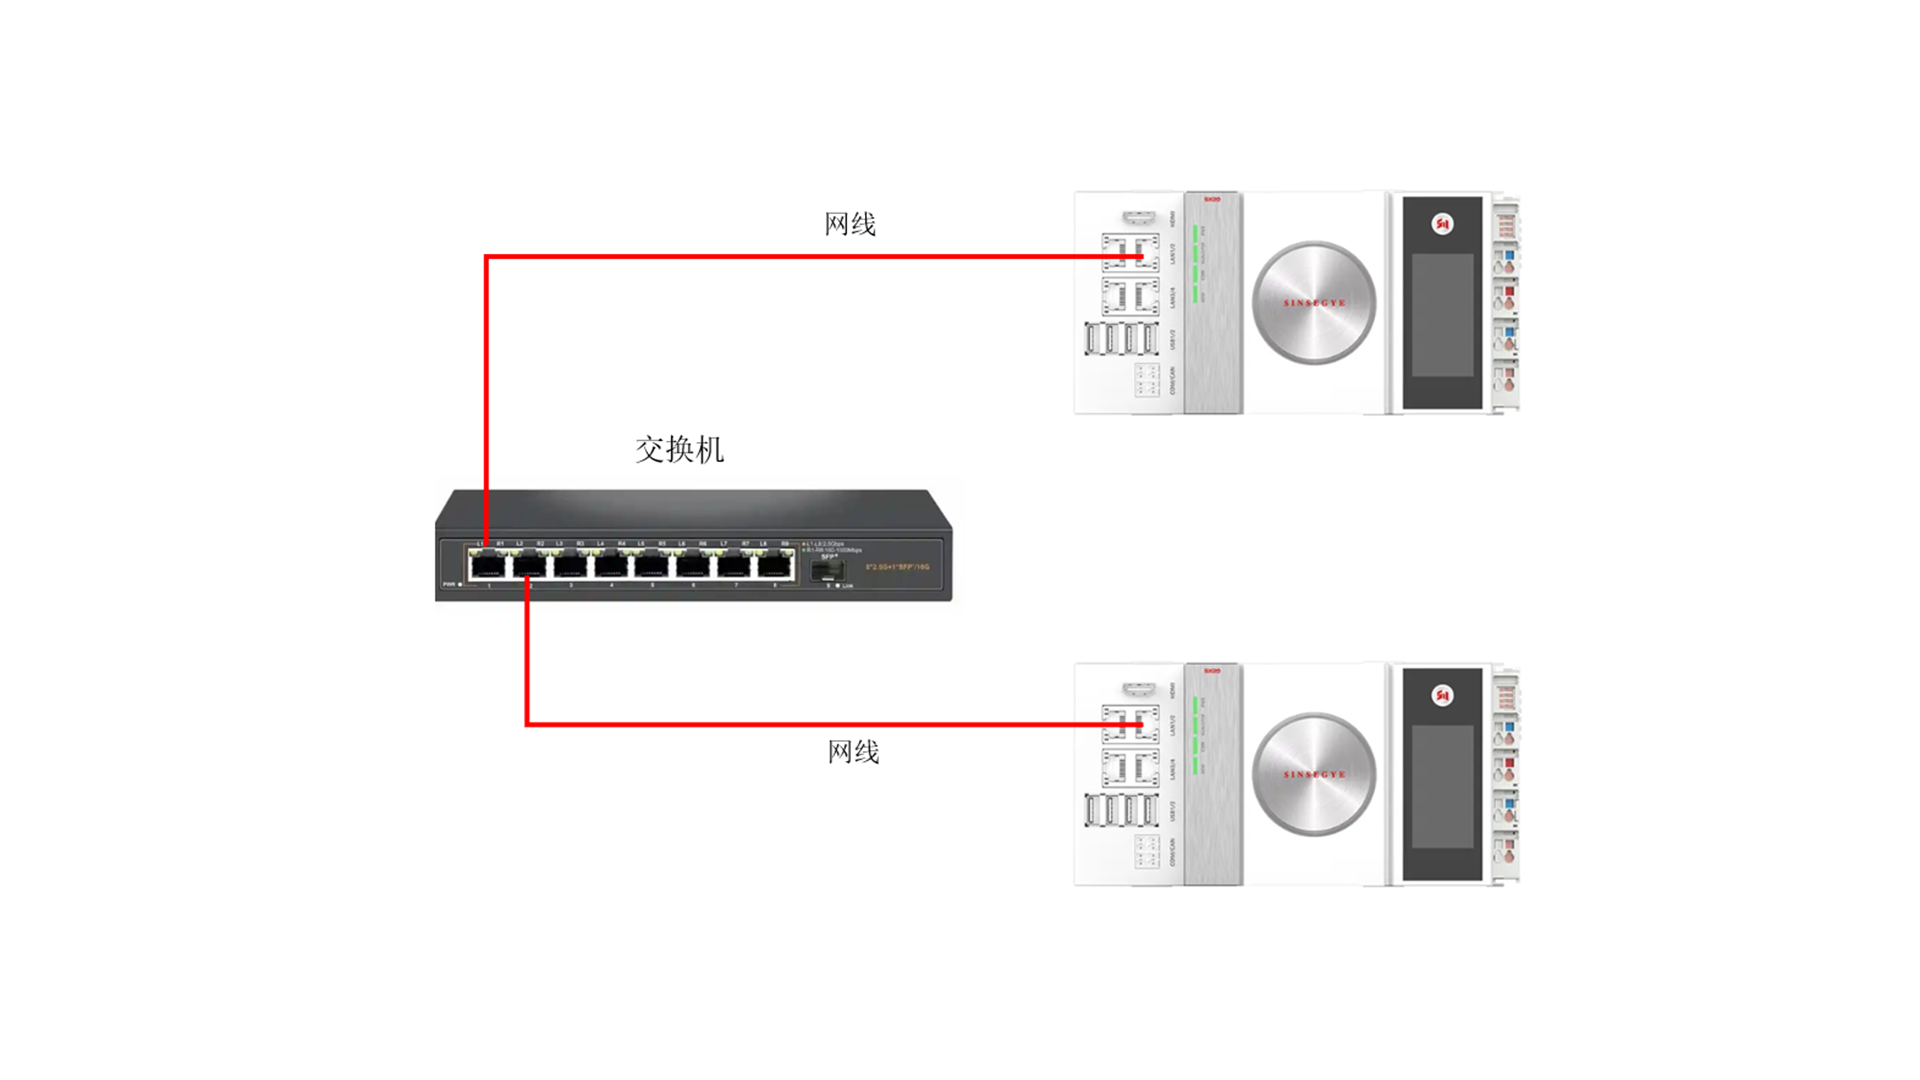
1.1 Experimental schematic diagram
Connect the server icomputer and client icomputer via a switch.
1.3 Experimental steps
a. Unzip the server PLC project archive AcpServer.projectarchive, log in, and download it to the server icomputer.
b. Unzip the client PLC project archive AcpClient.projectarchive.
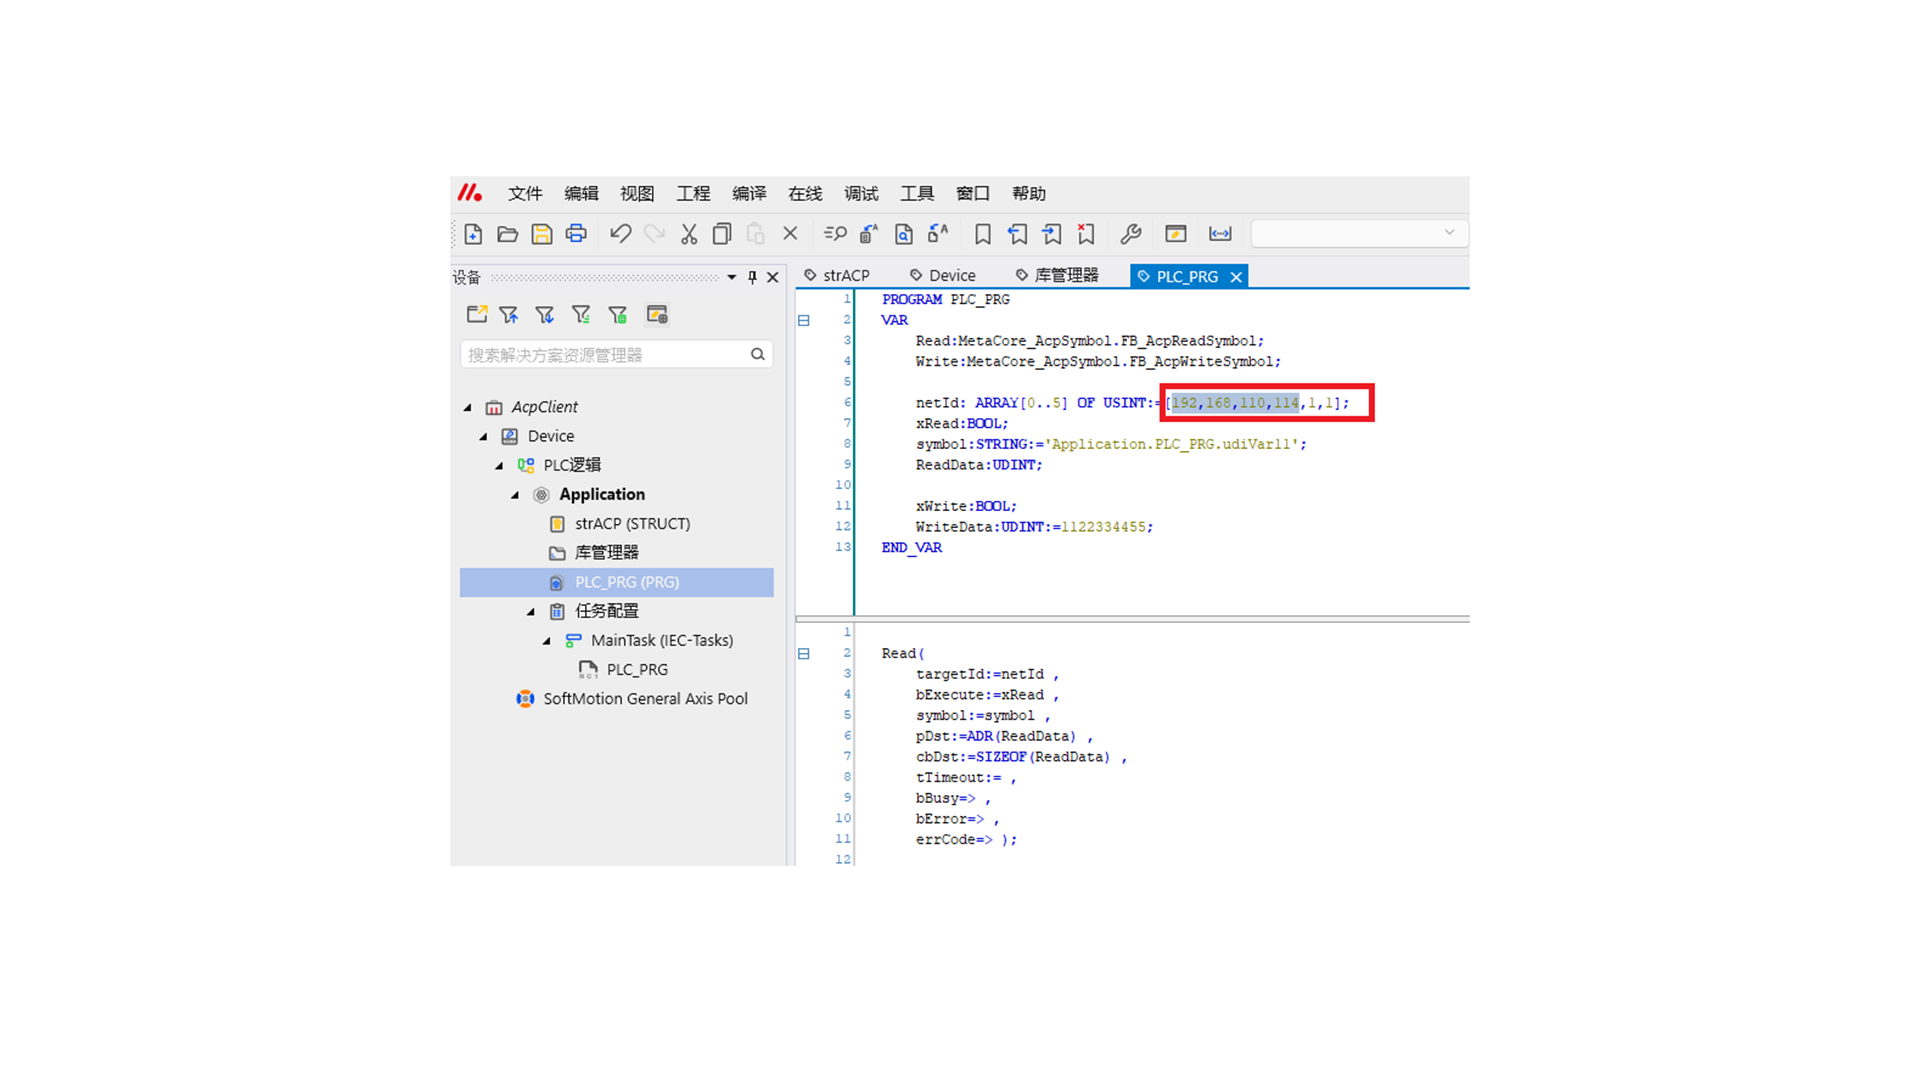
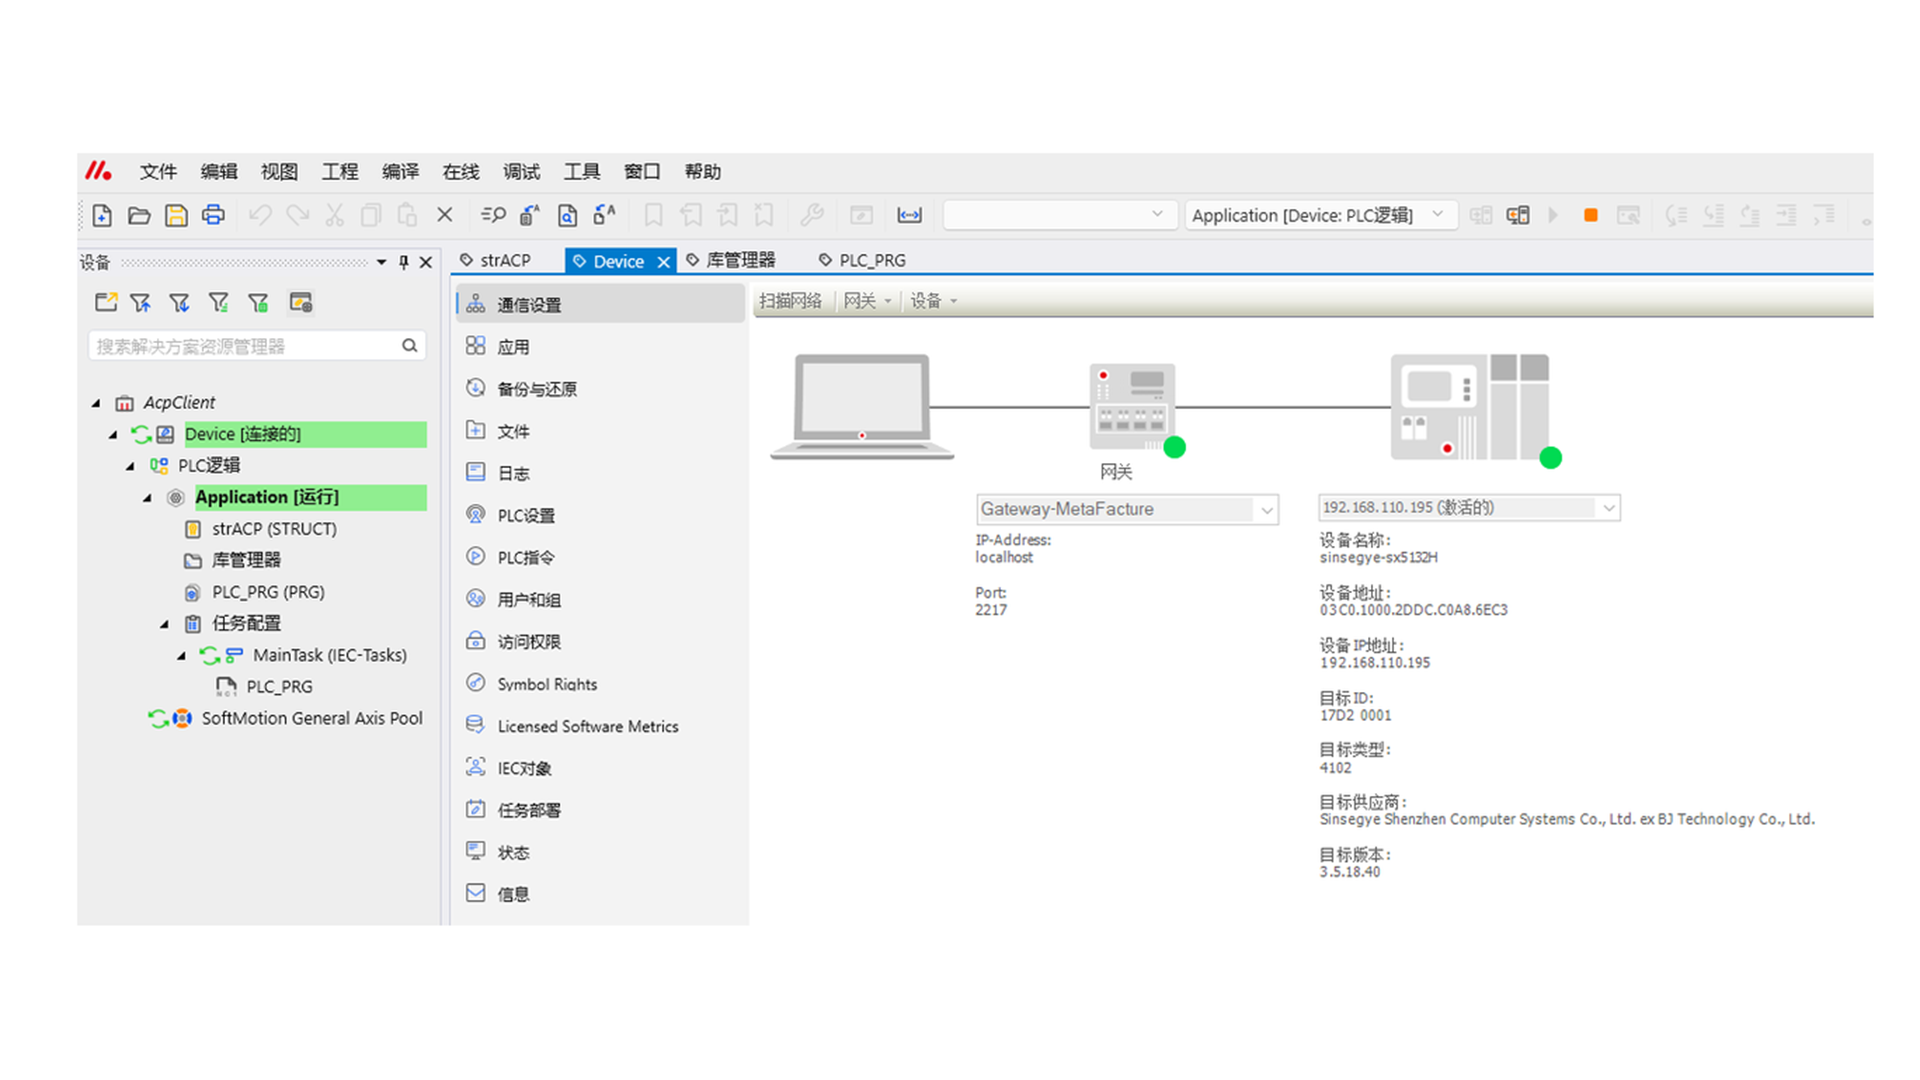
c. Modify the netId in the client PLC to the server IP, log in, and download it to the client icomputer.
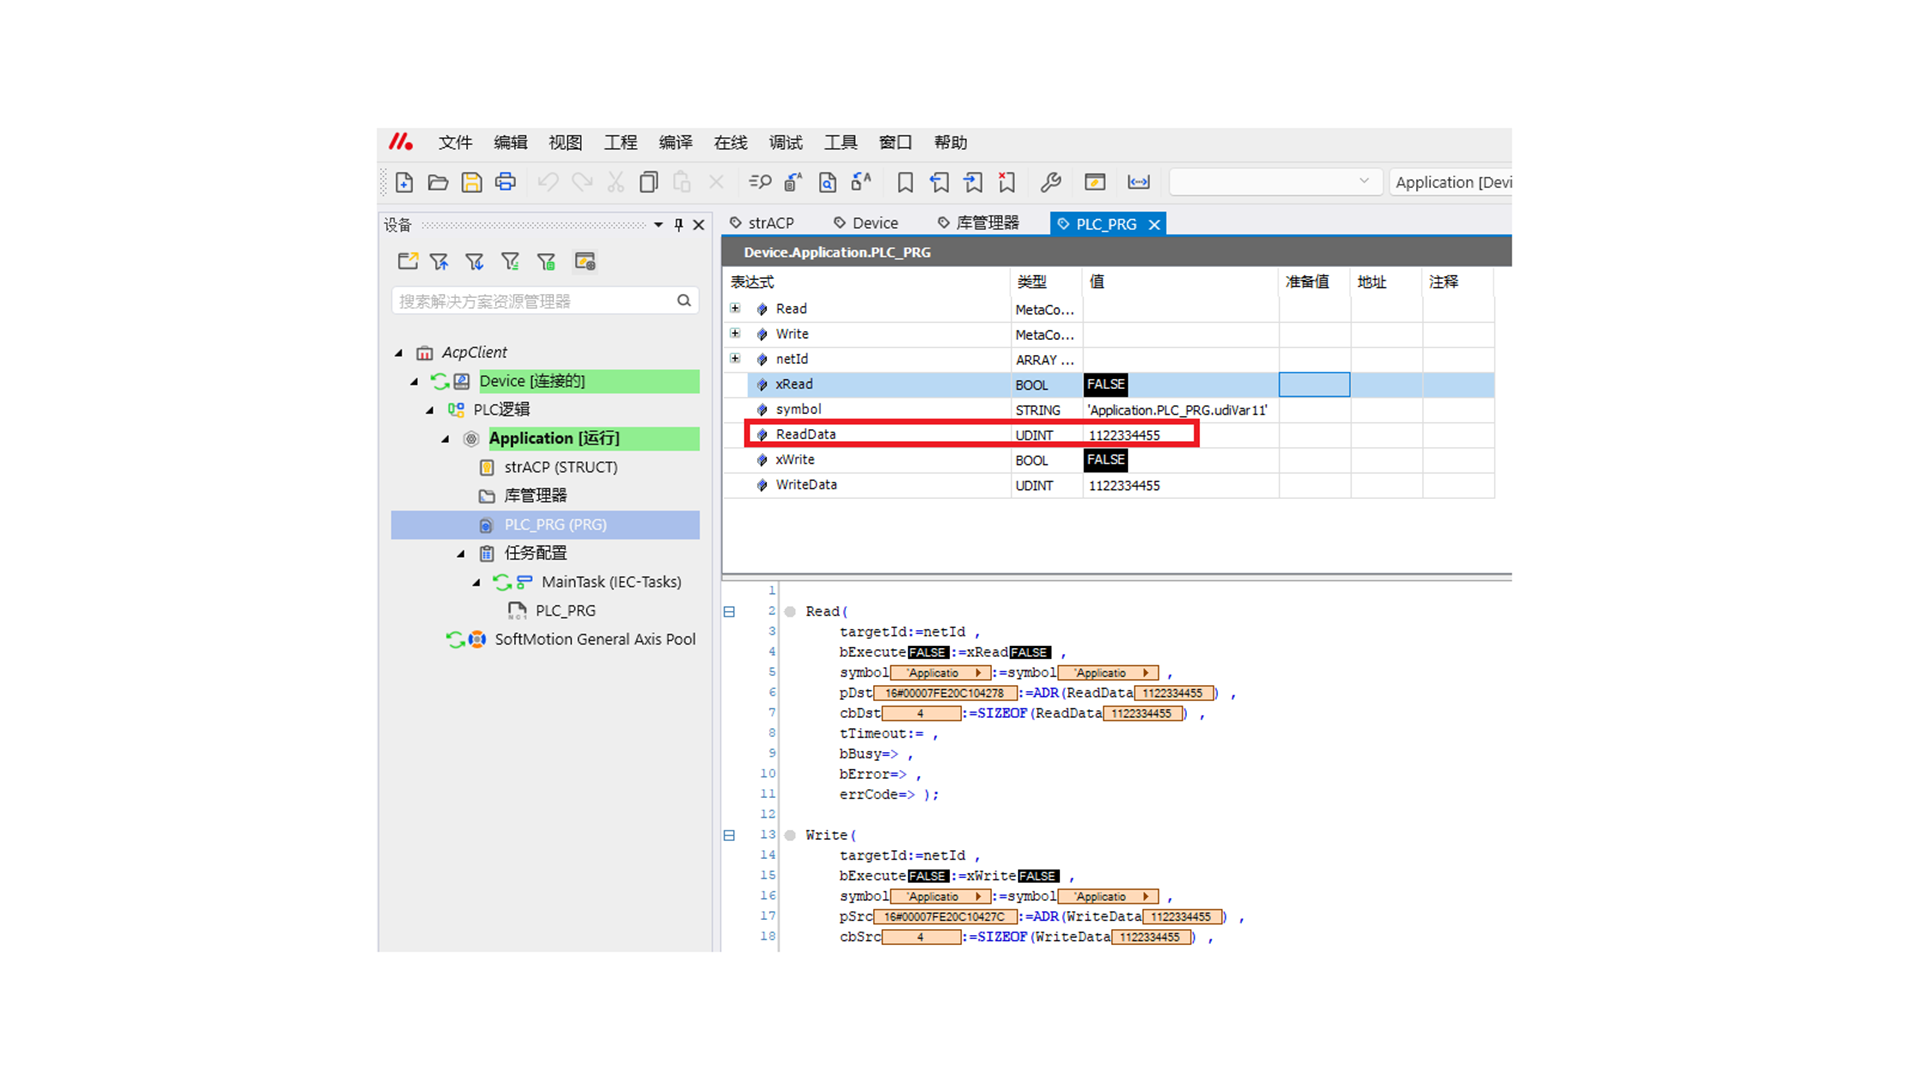
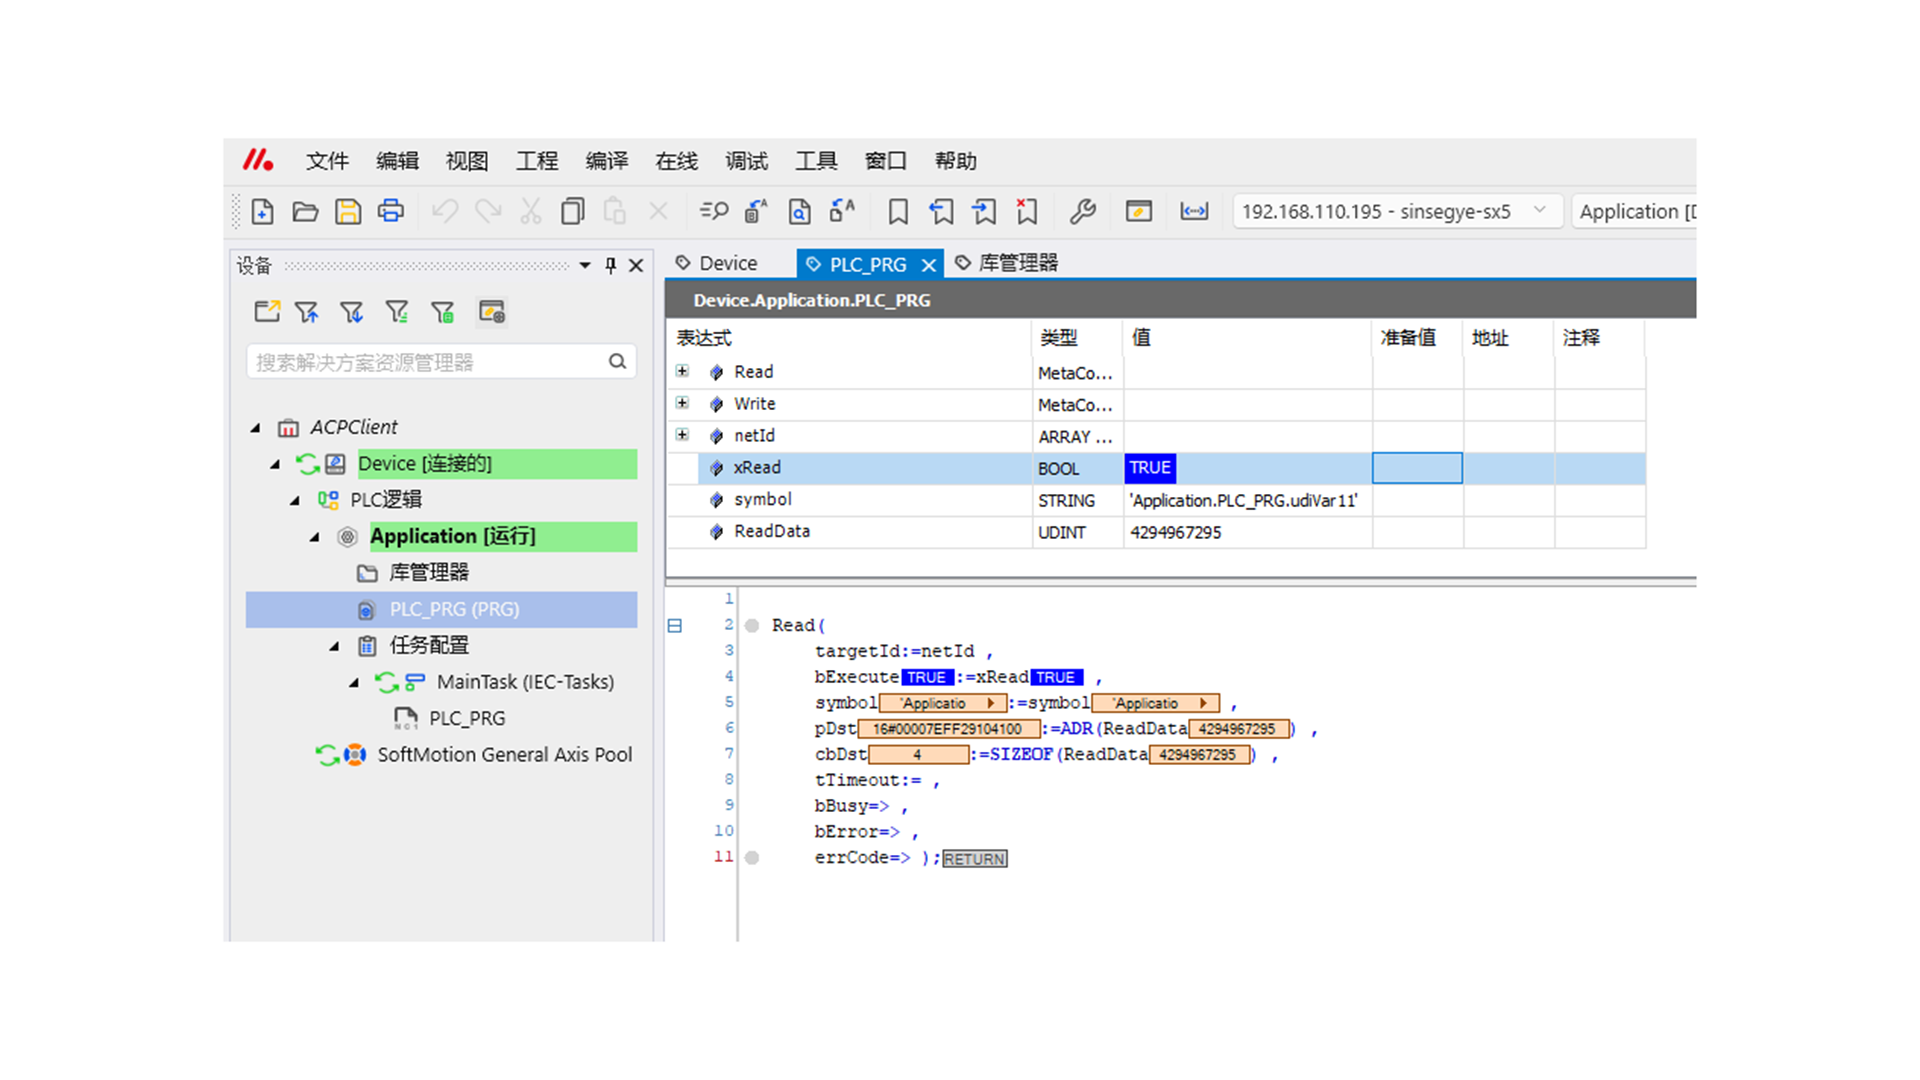
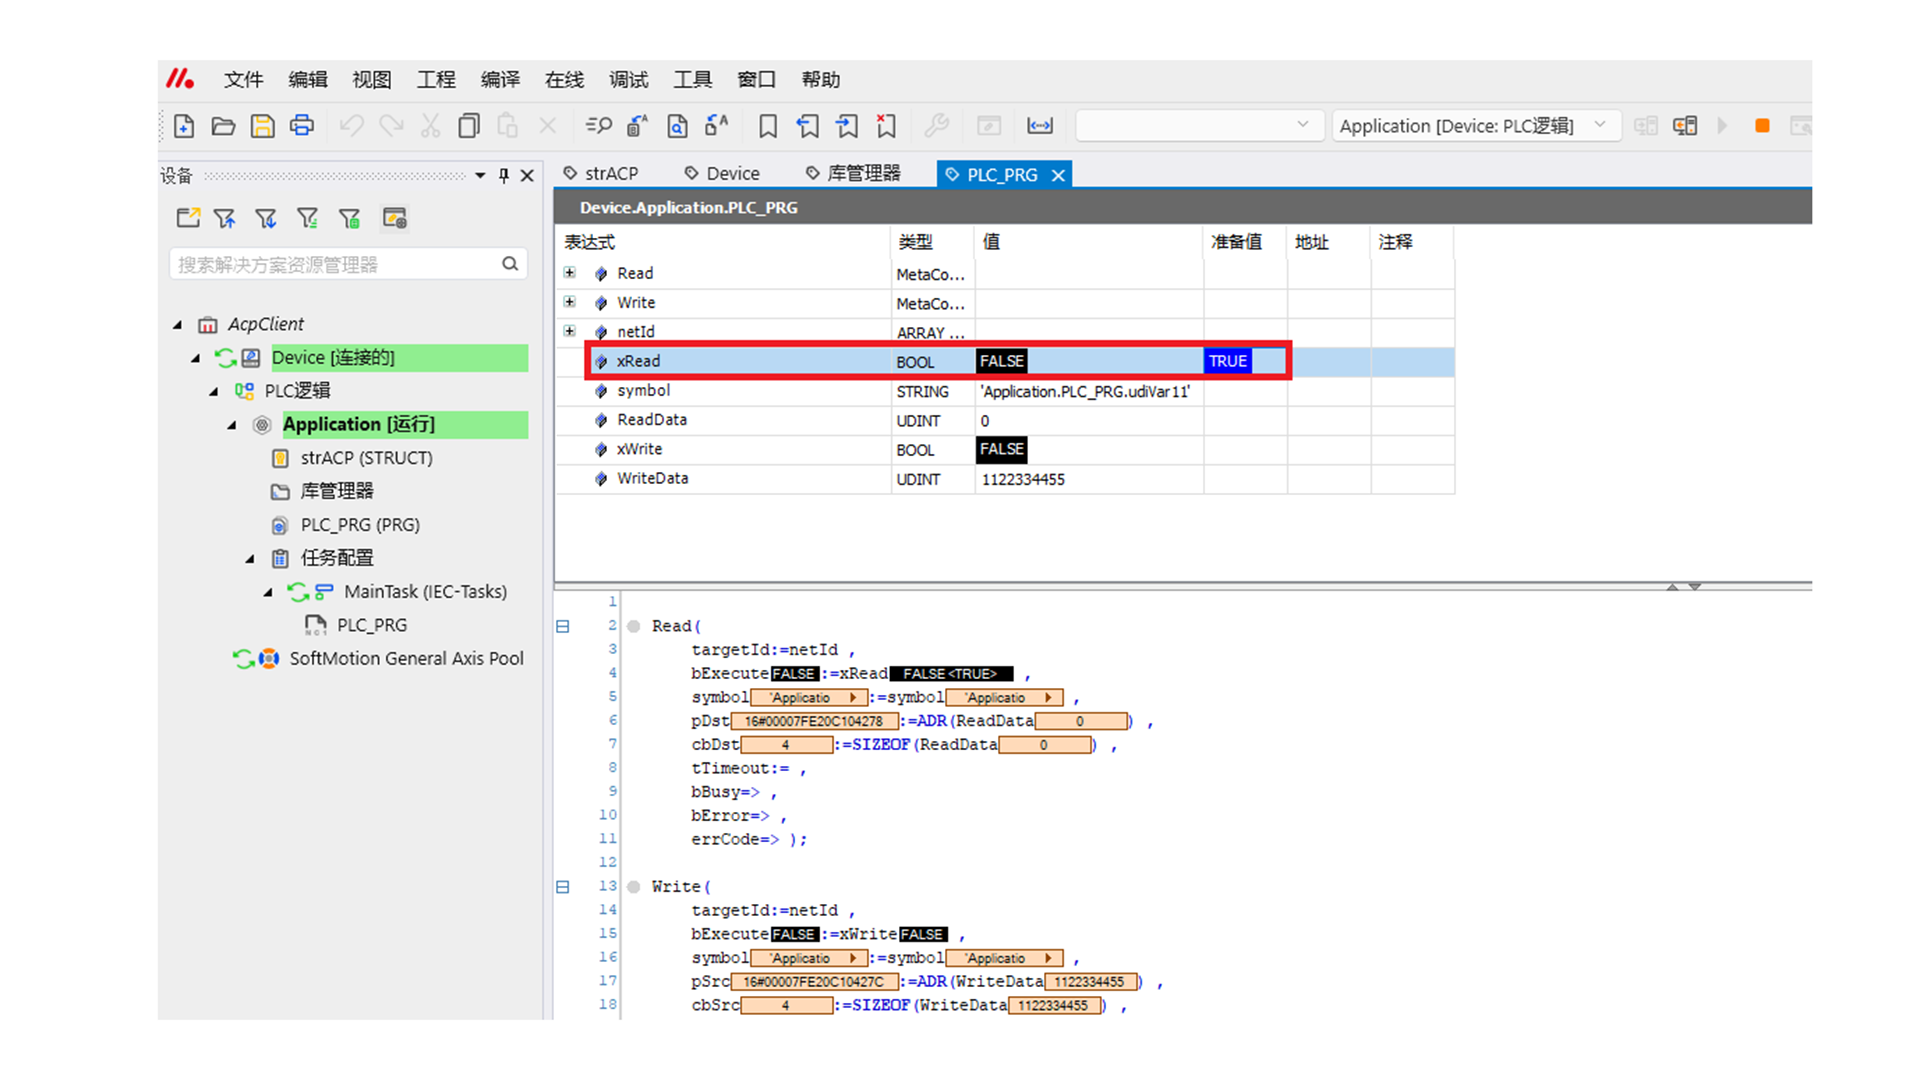
d. Set xRead to TRUE; ReadData will display the read value 4294967295.
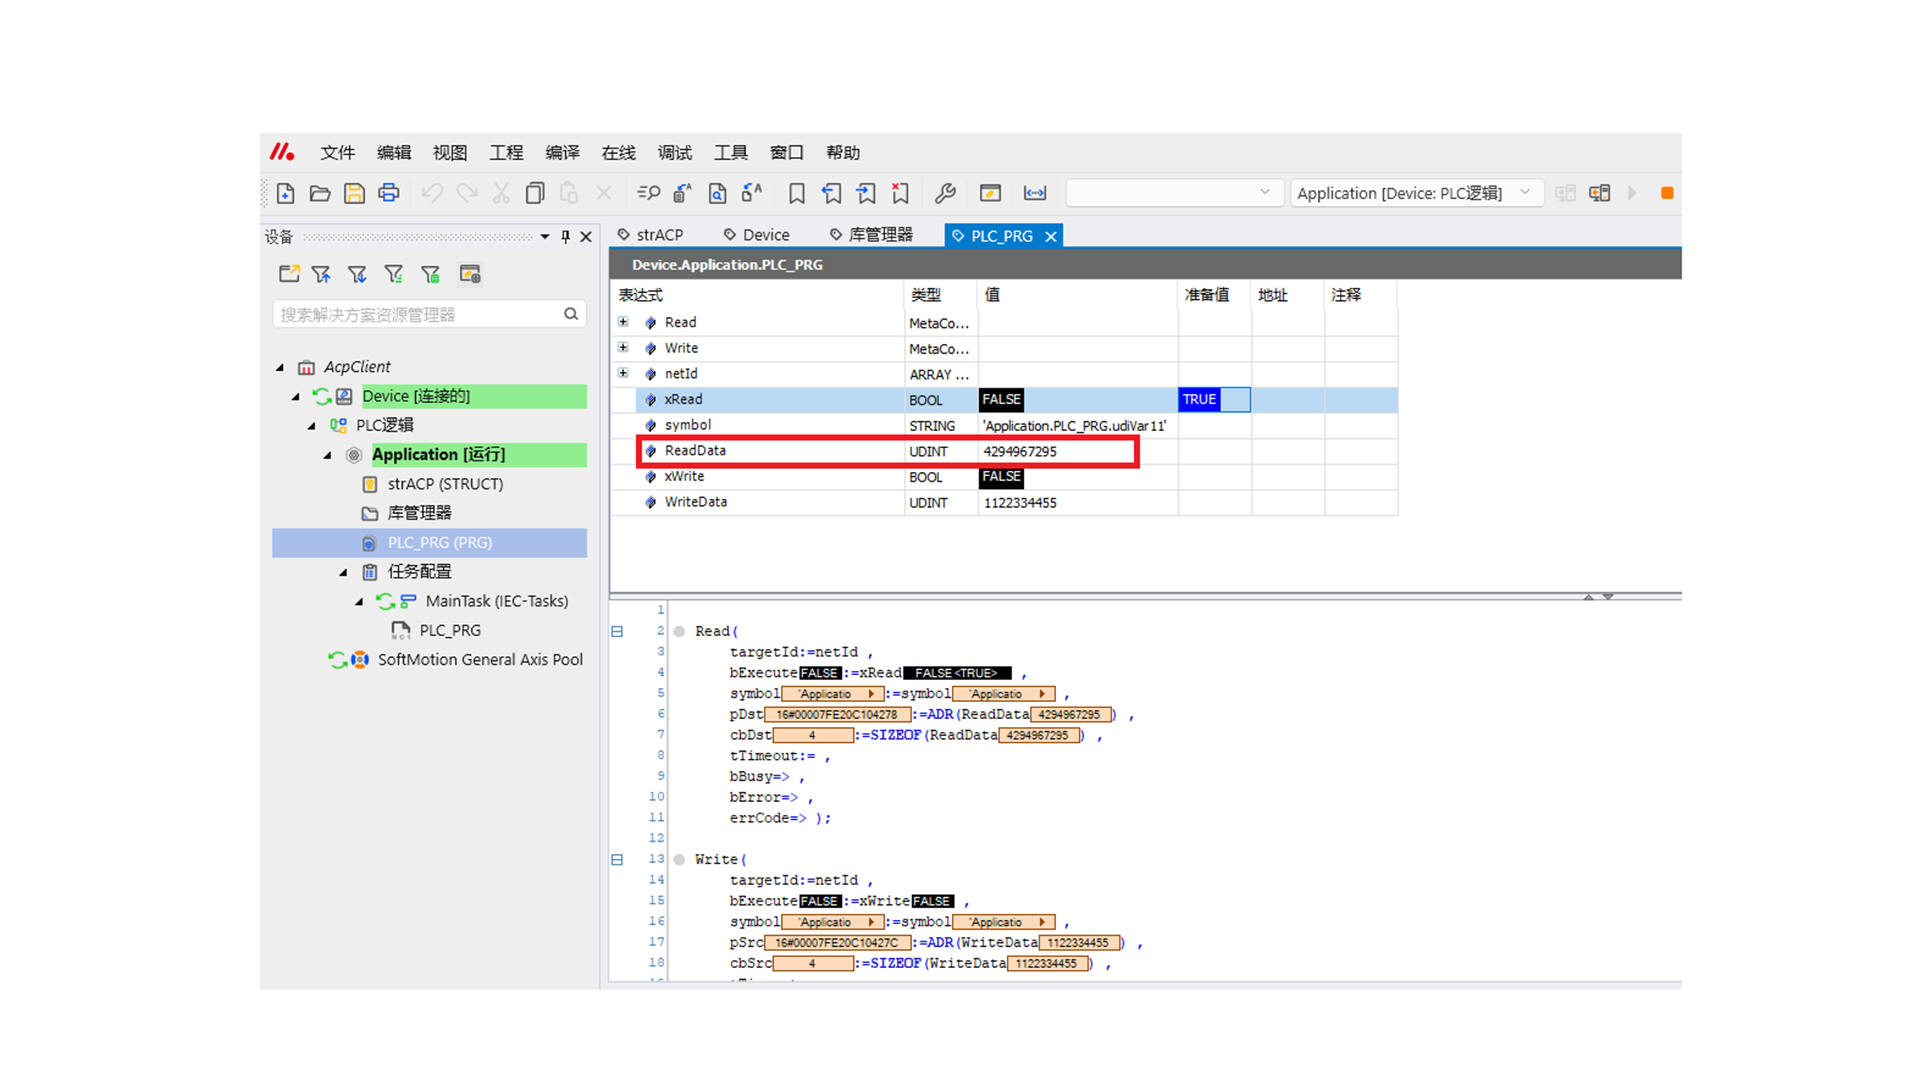
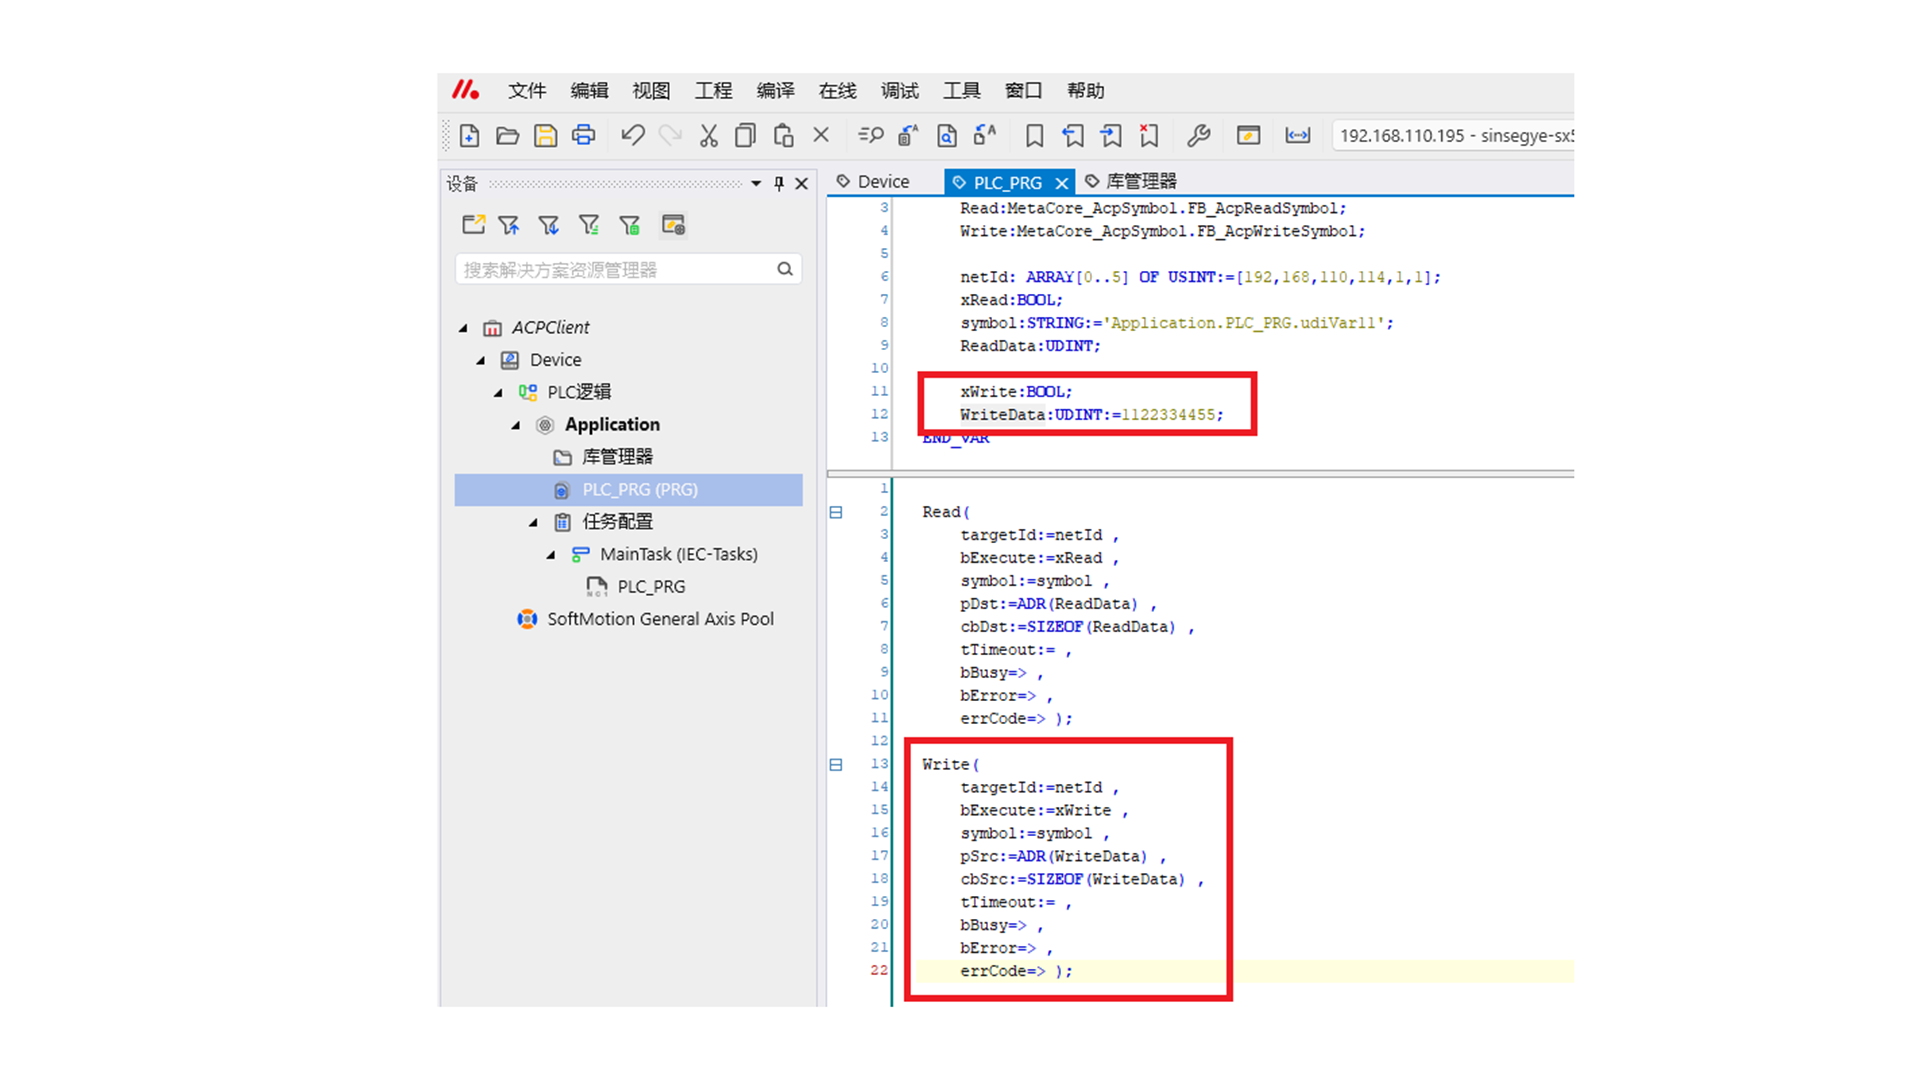
e. Modify the value of variable WriteData, set xWrite to TRUE, and write the variable value.
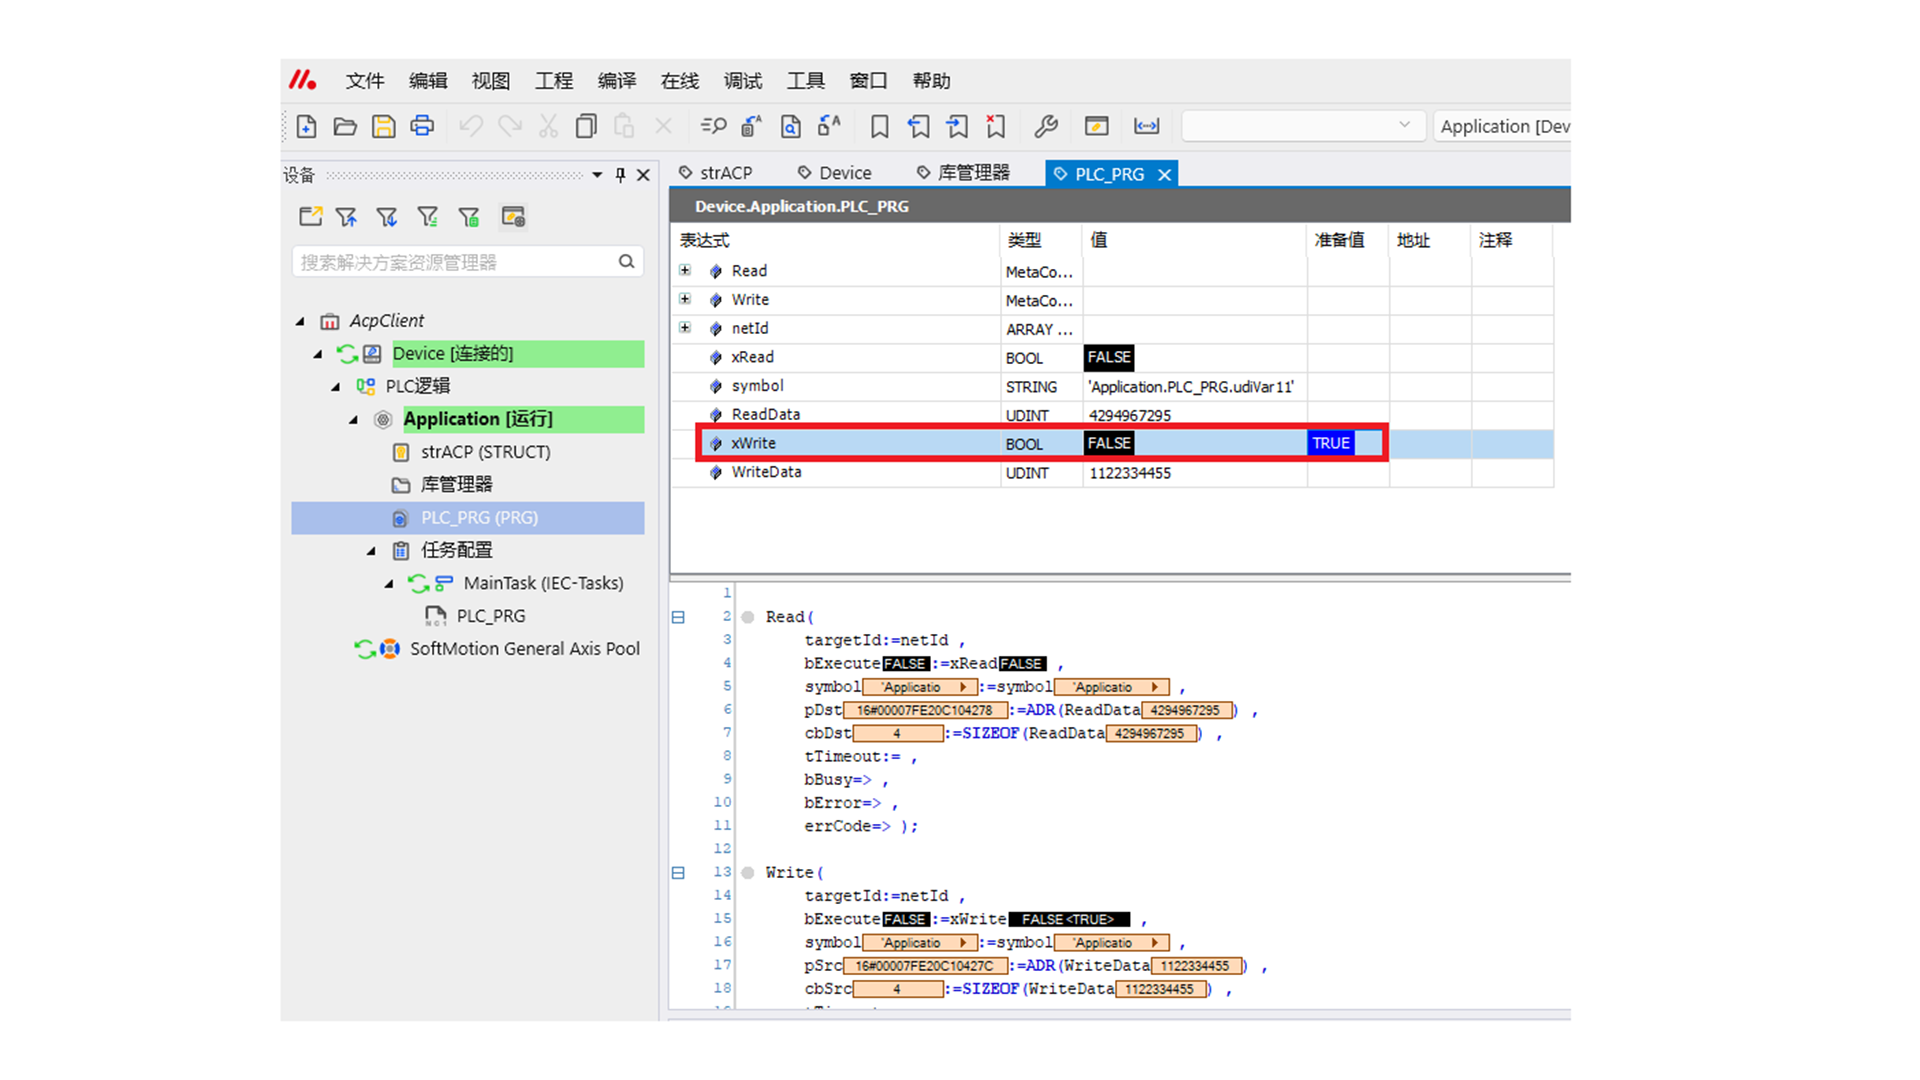
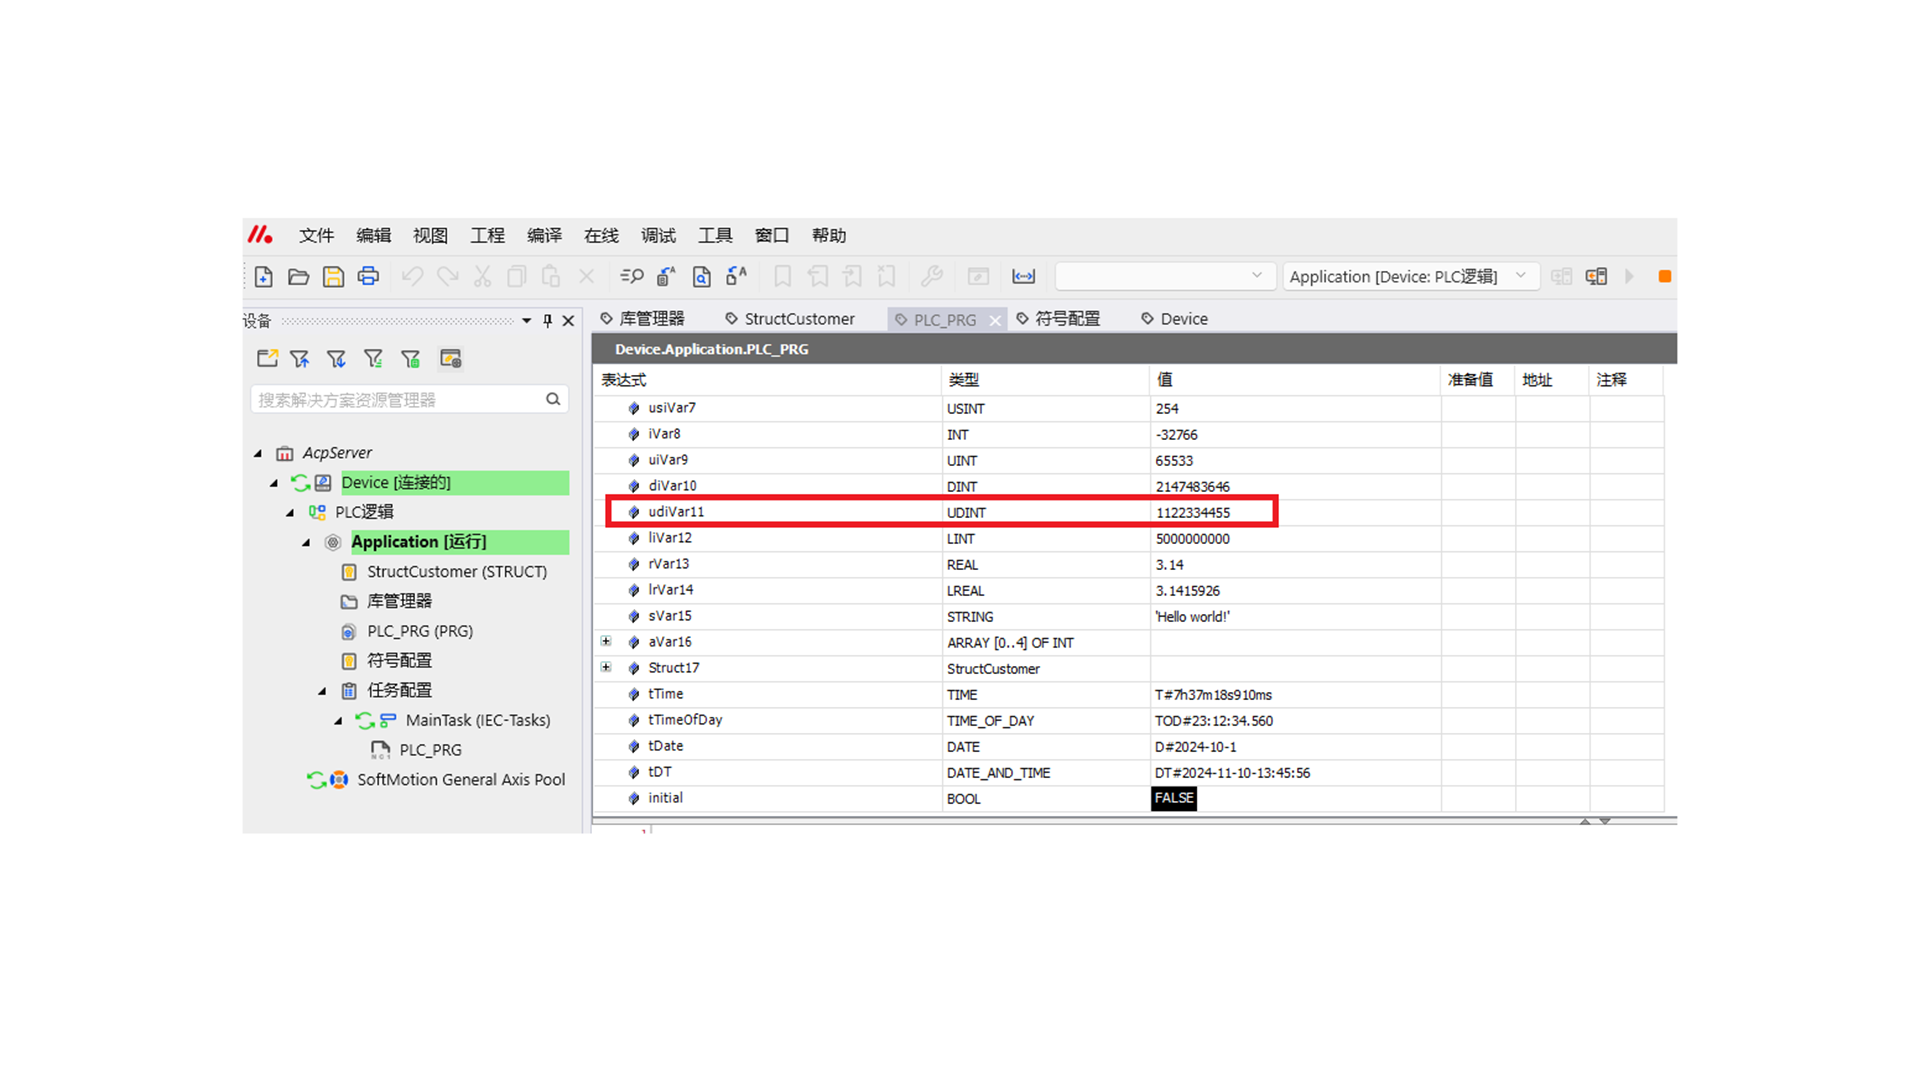
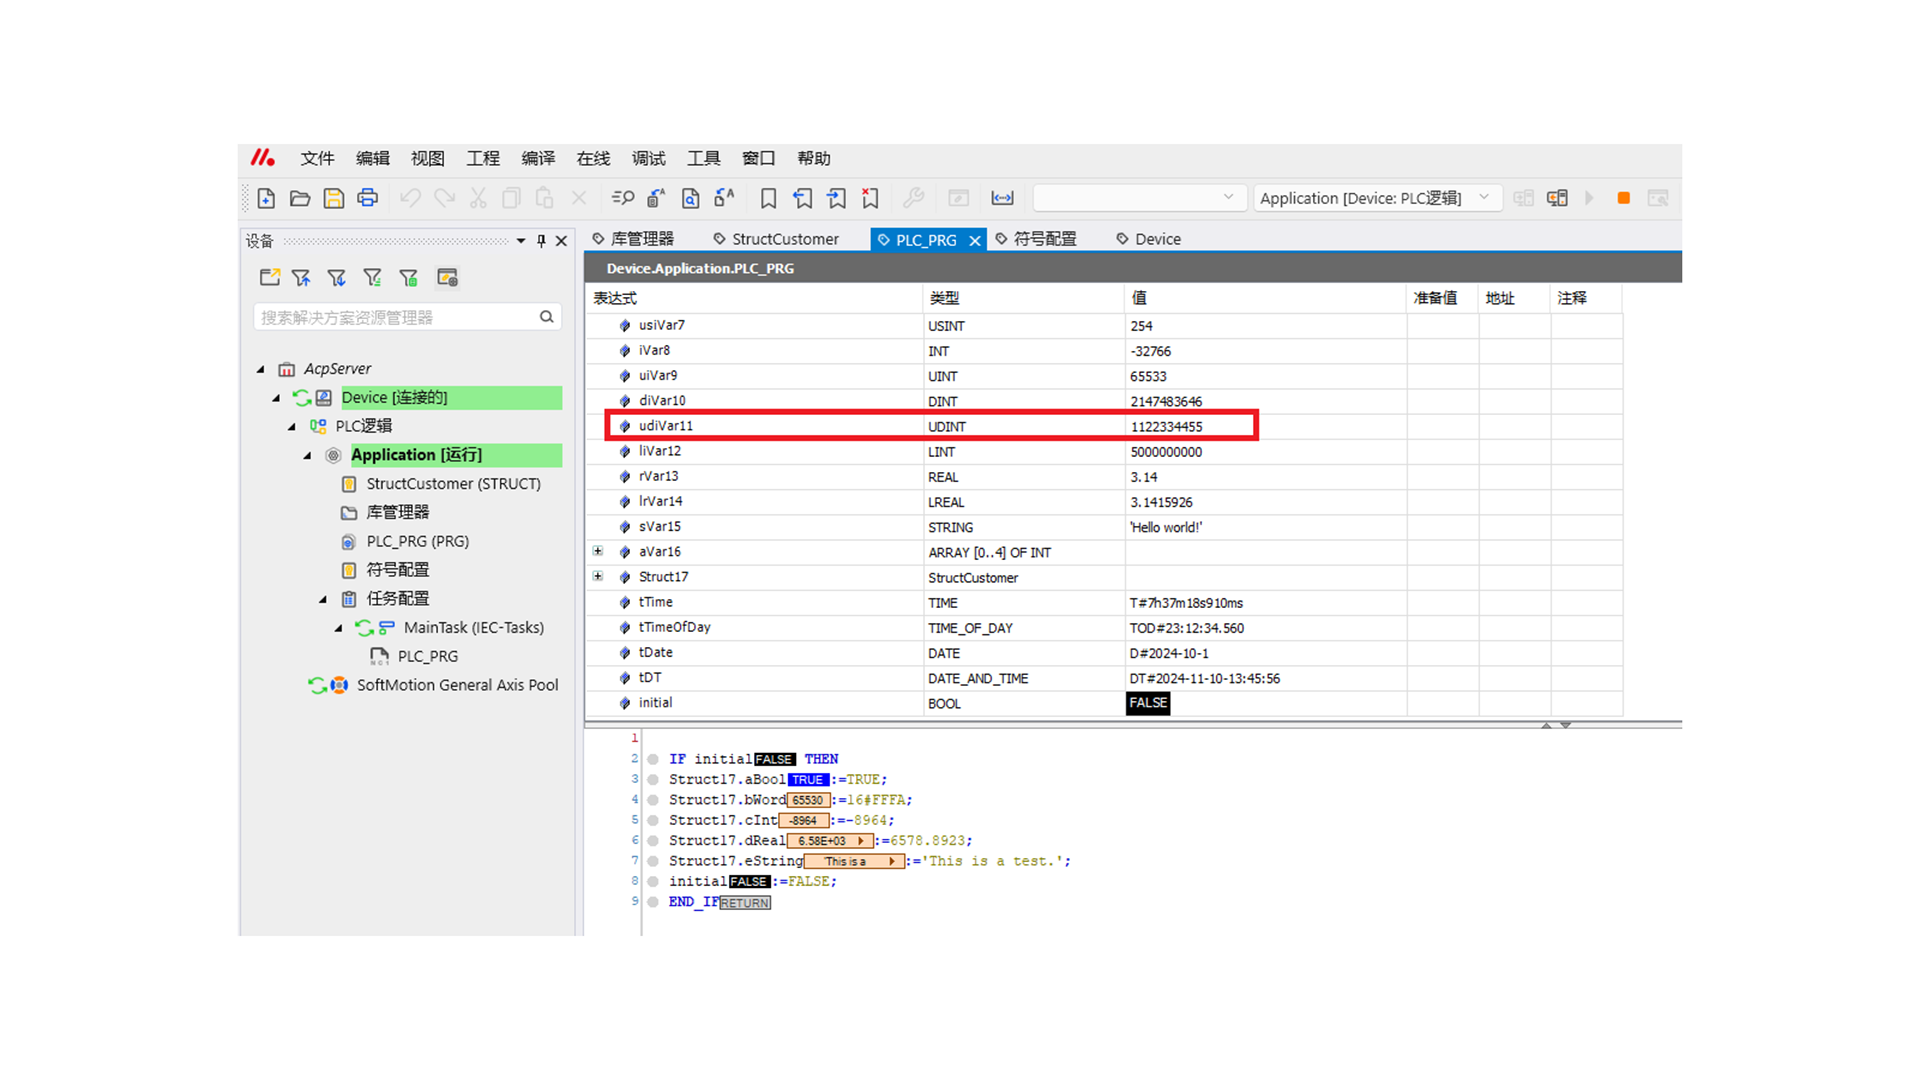
Check udiVar11 of the server PLC; 1122334455 is successfully written.
f. Set xRead to False again and then to True; ReadData will read the newly modified value.
II. Example
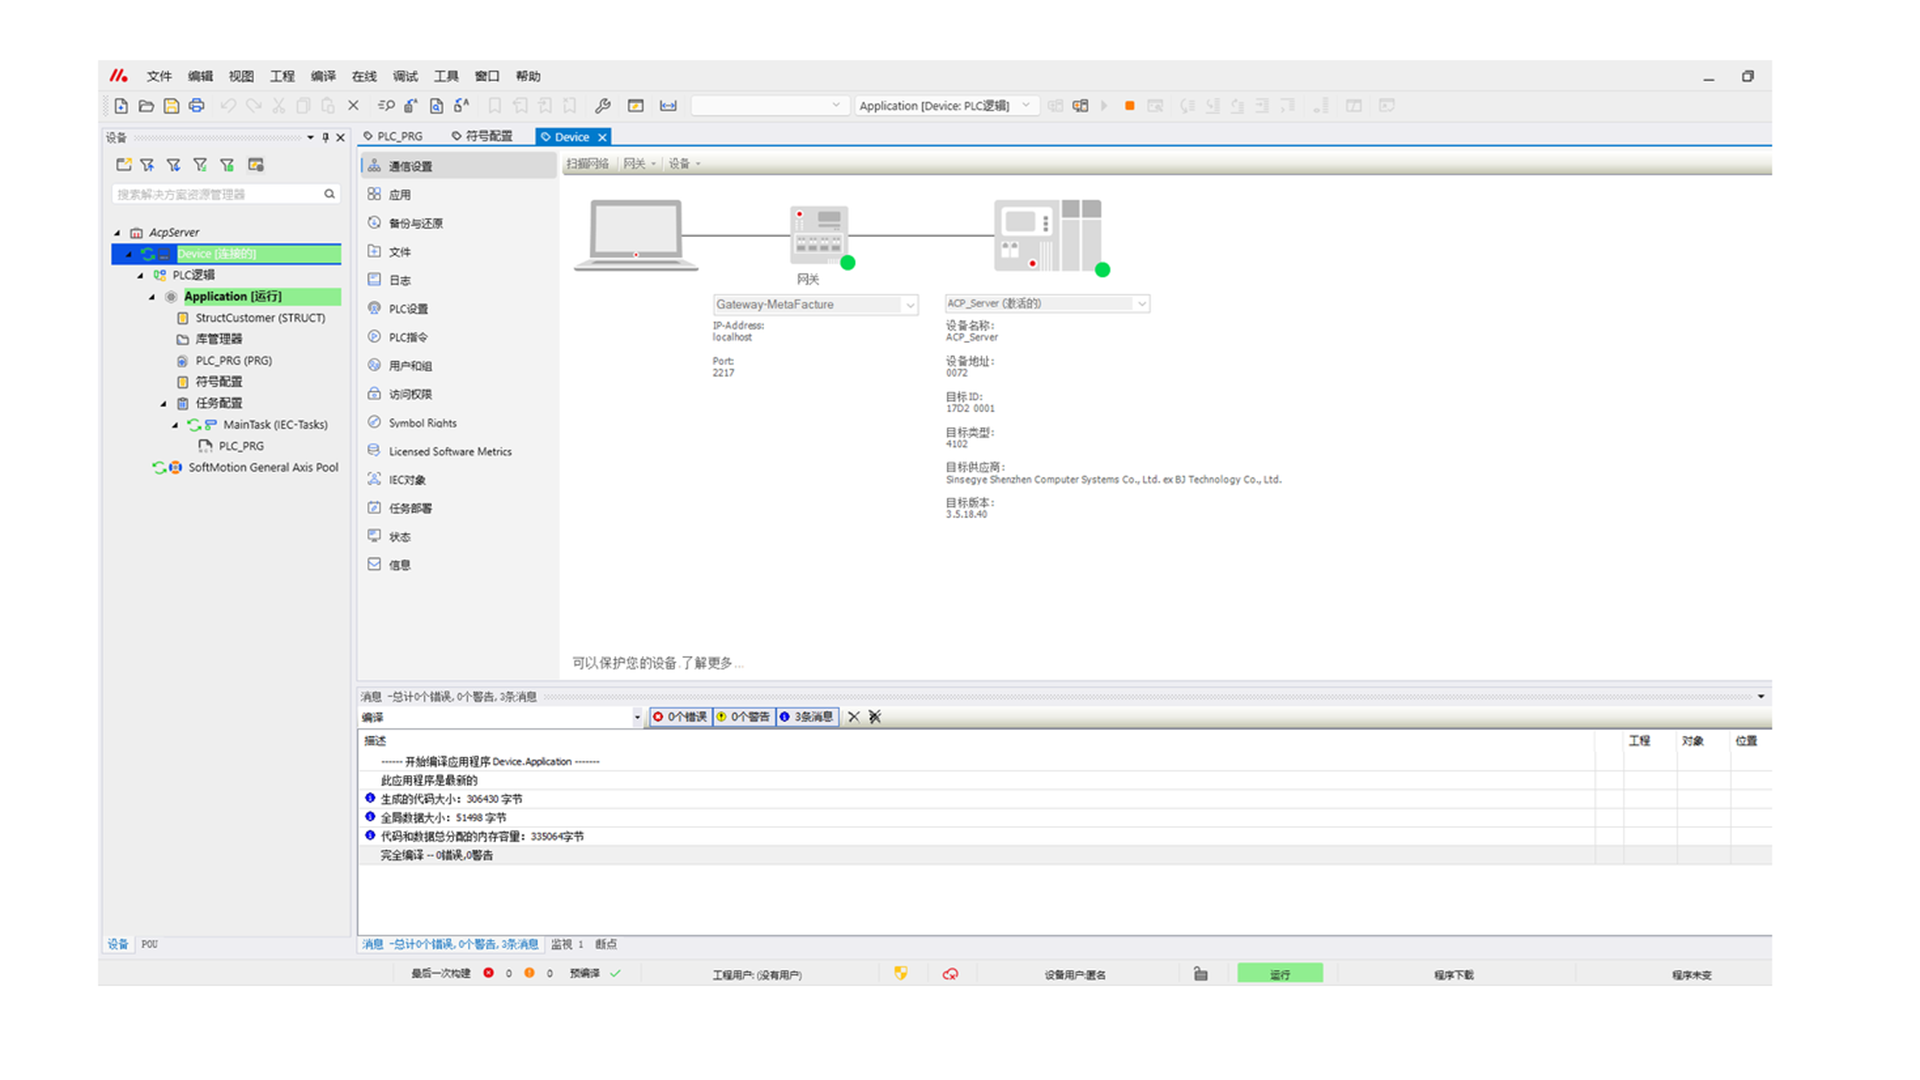
-
Download the example AcpServer project from the official website to the server icomputer.
The example AcpServer project includes a structure:
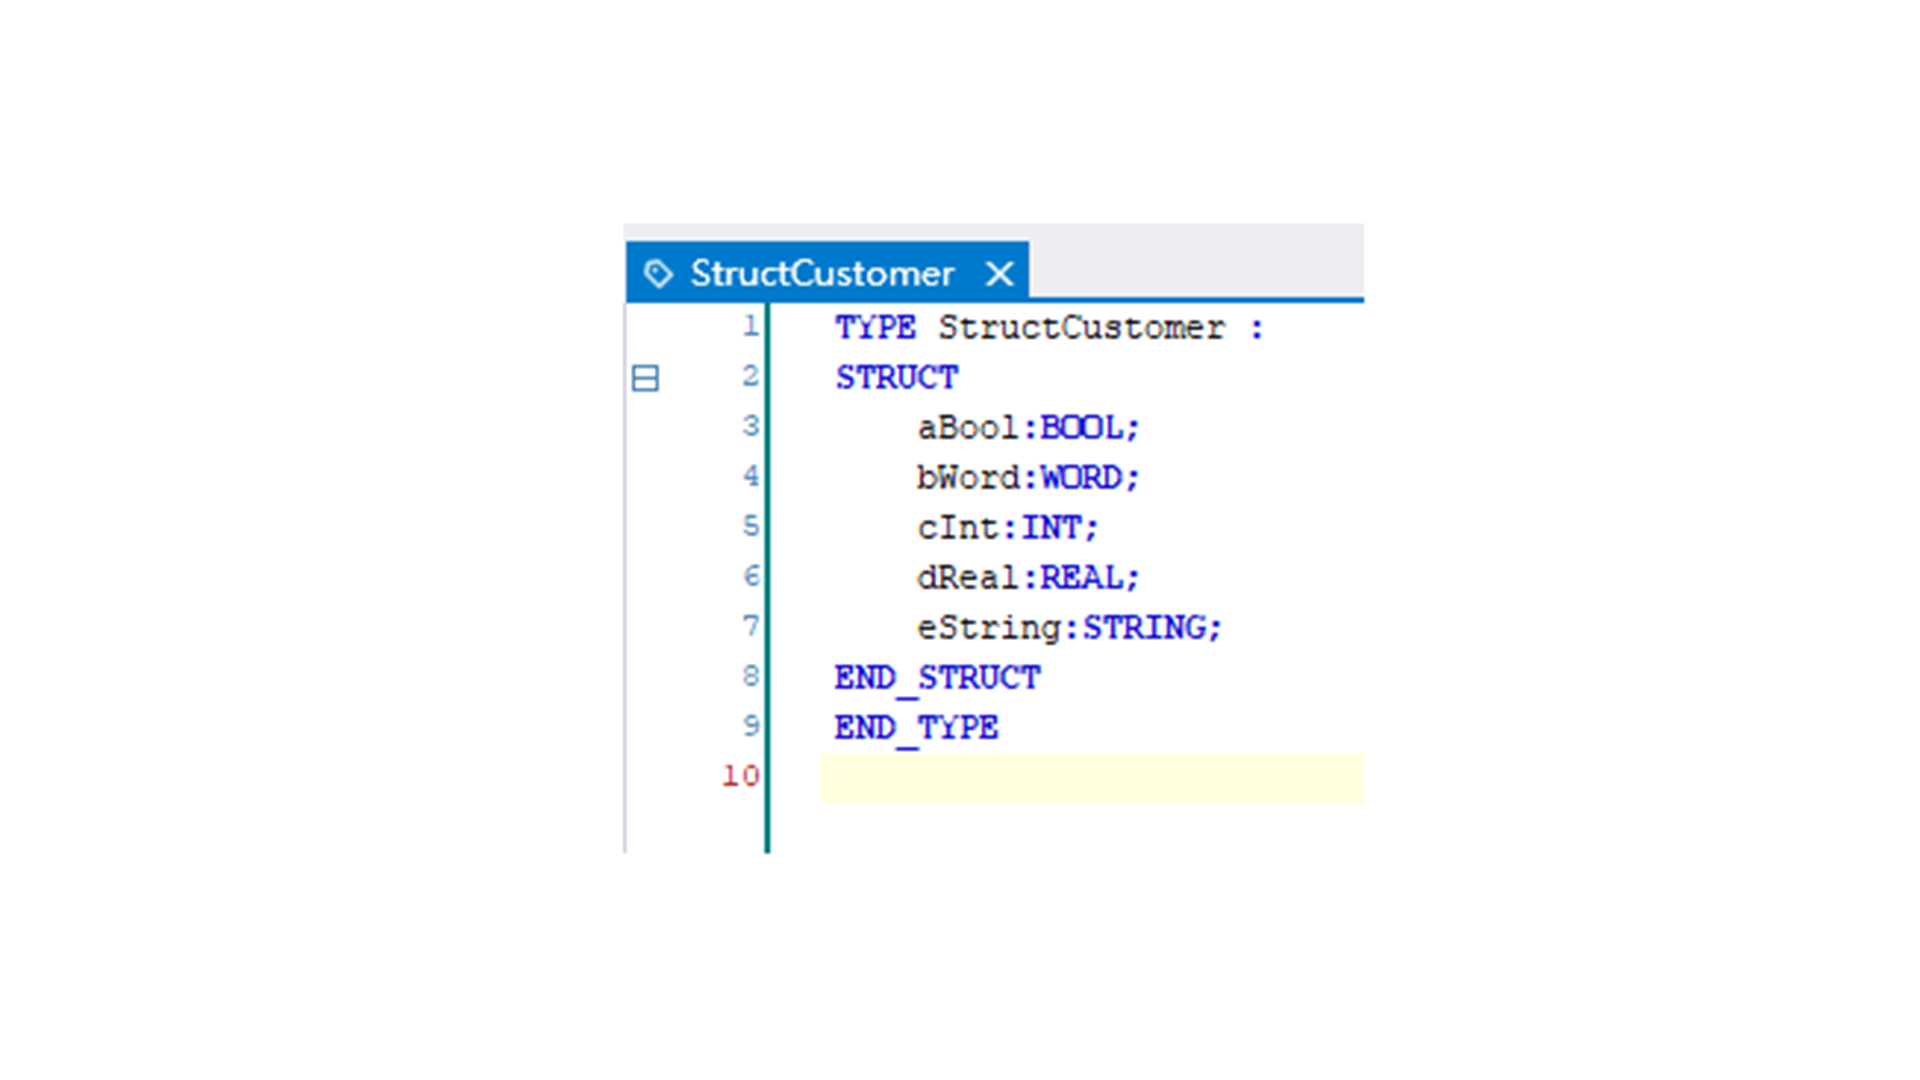
Variables of various types with initial values assigned:

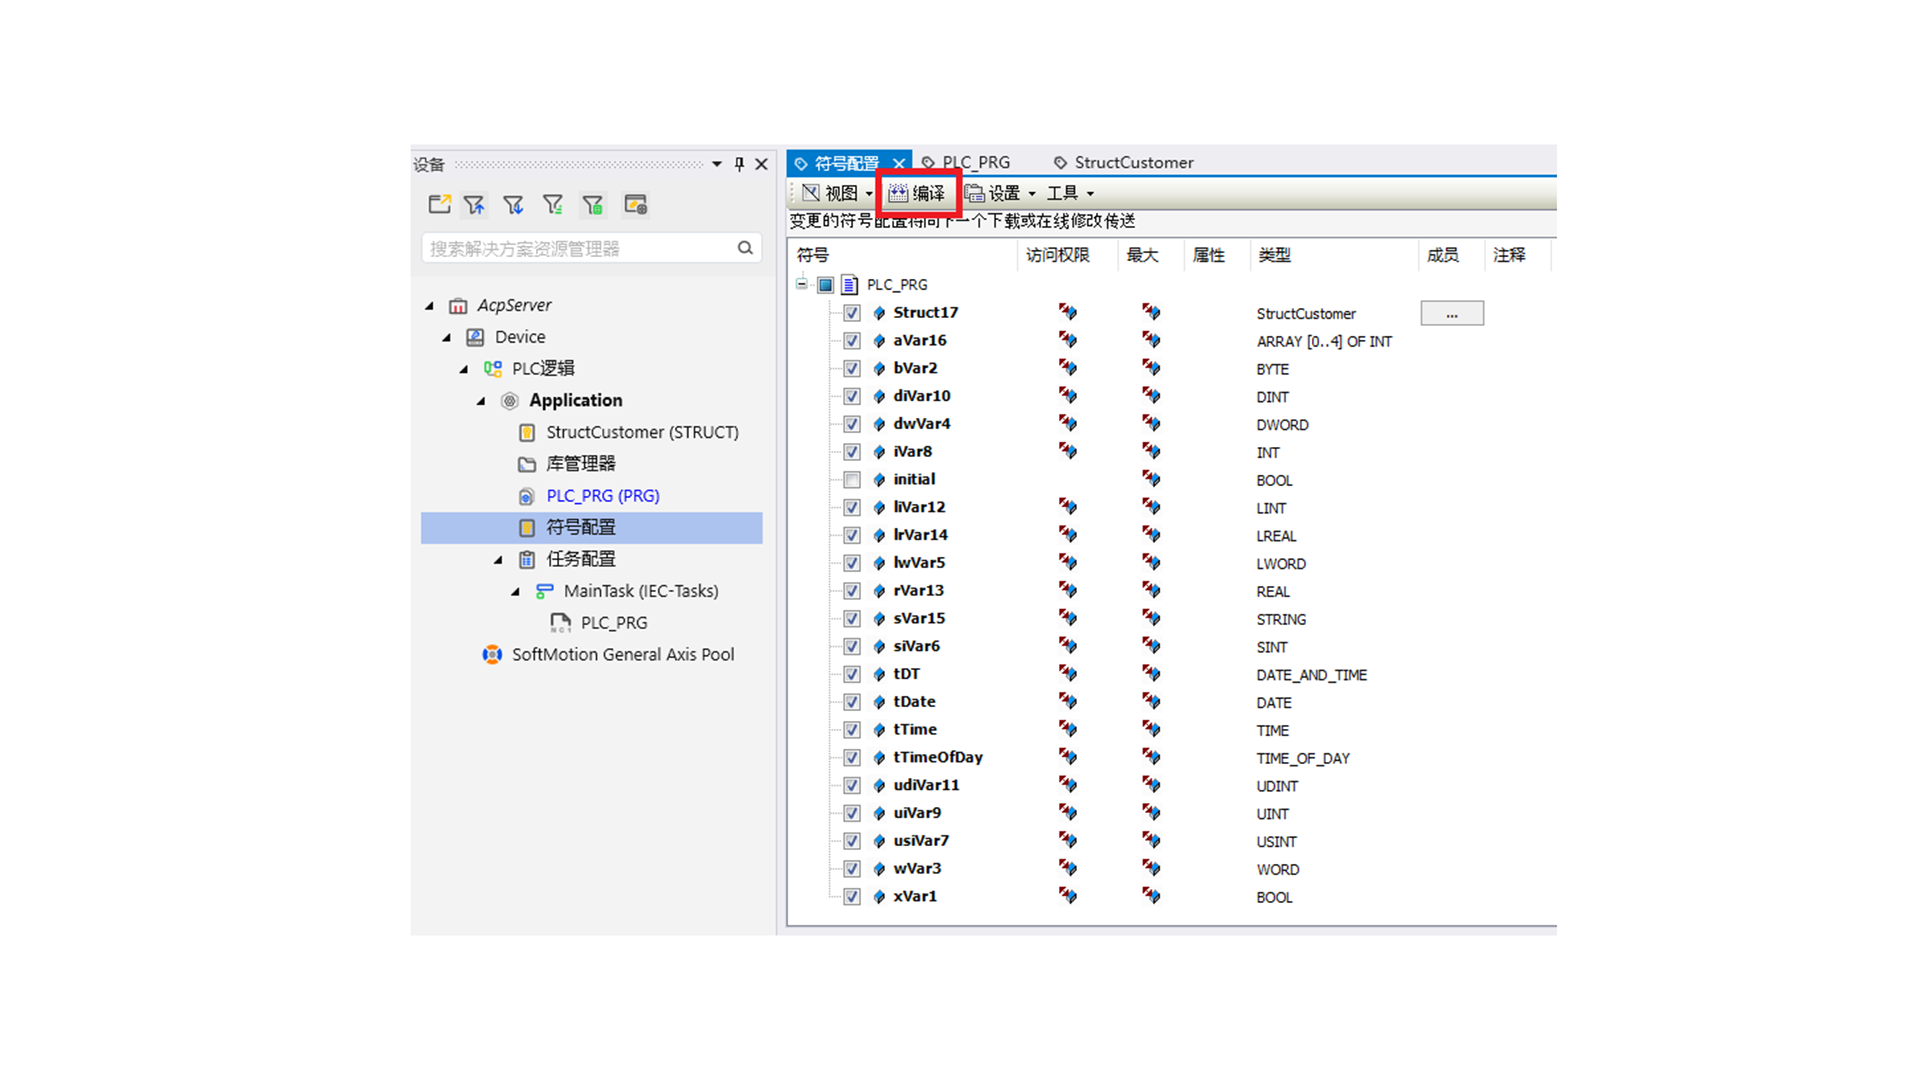
Compiled symbol configuration:
-
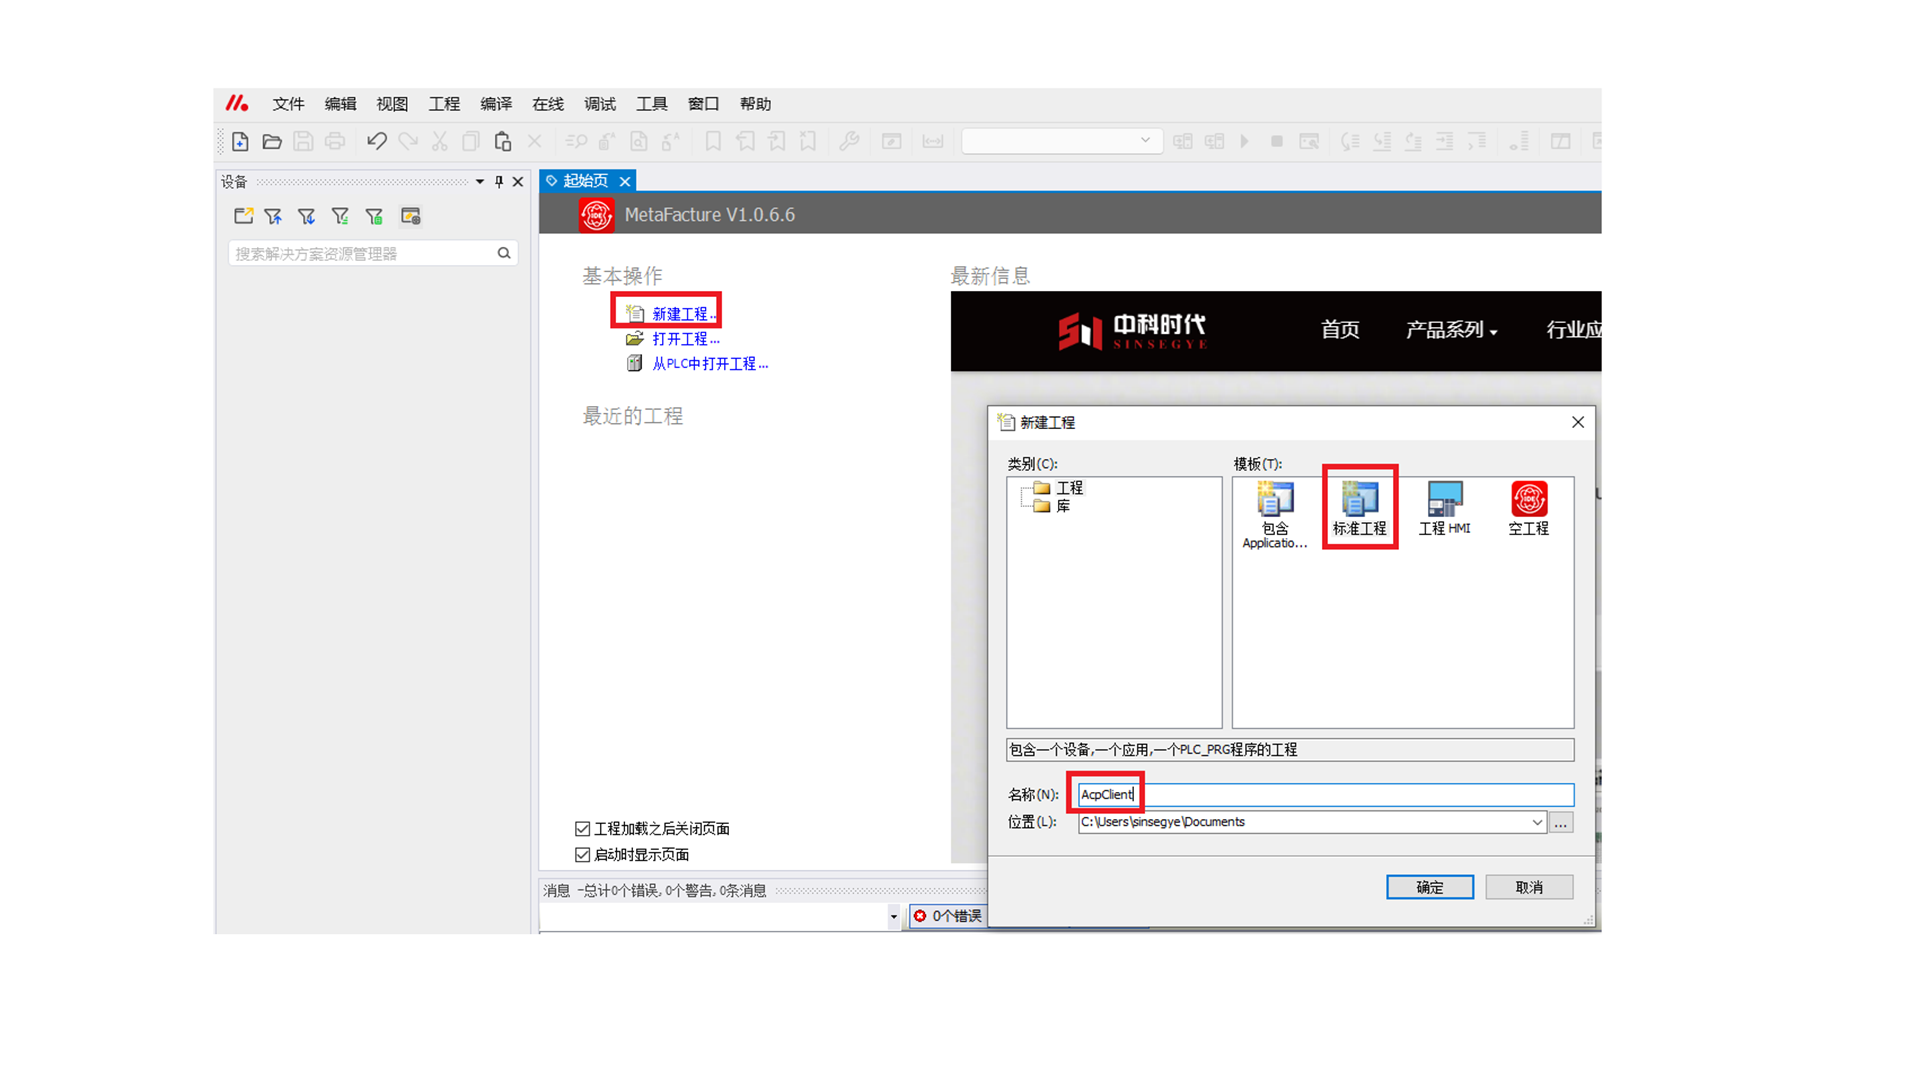
Create a new example project on the personal computer and name it AcpClient.
-
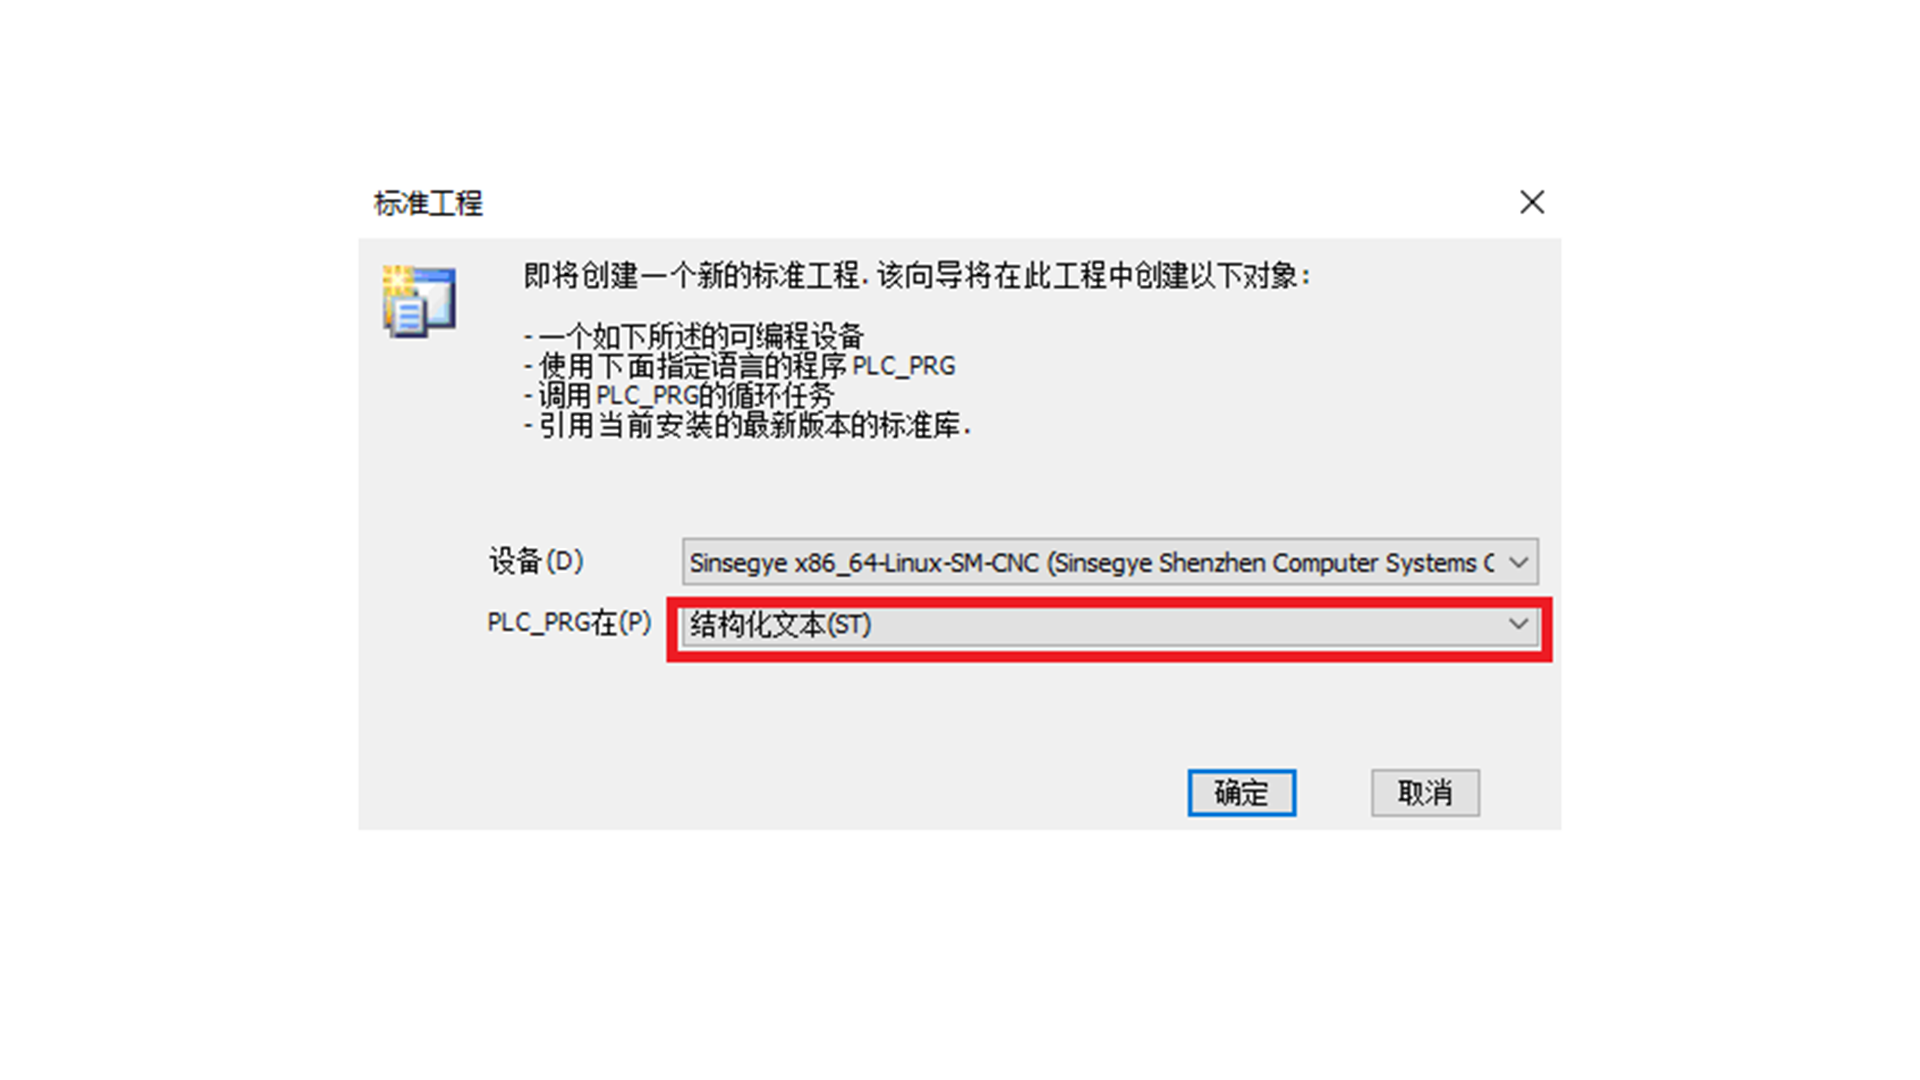
Select a programming language suitable for you and click "OK".
-
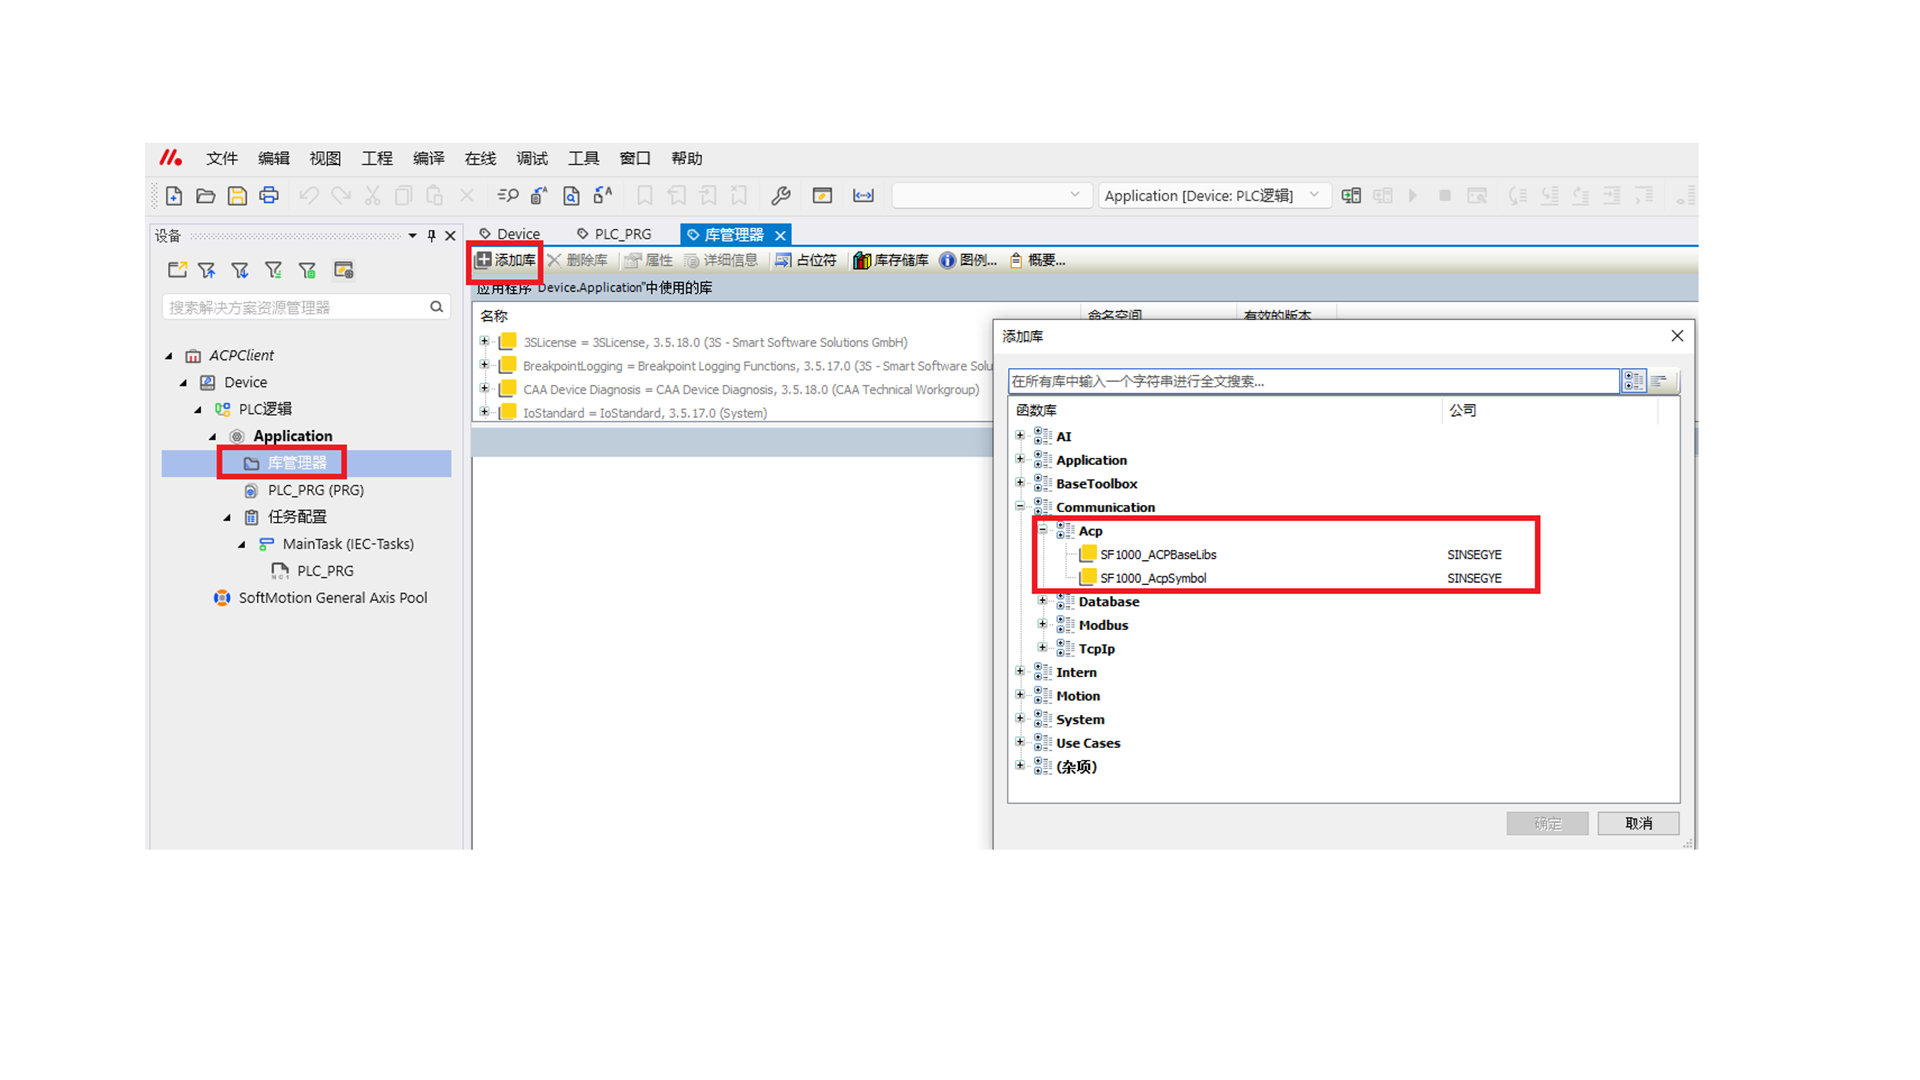
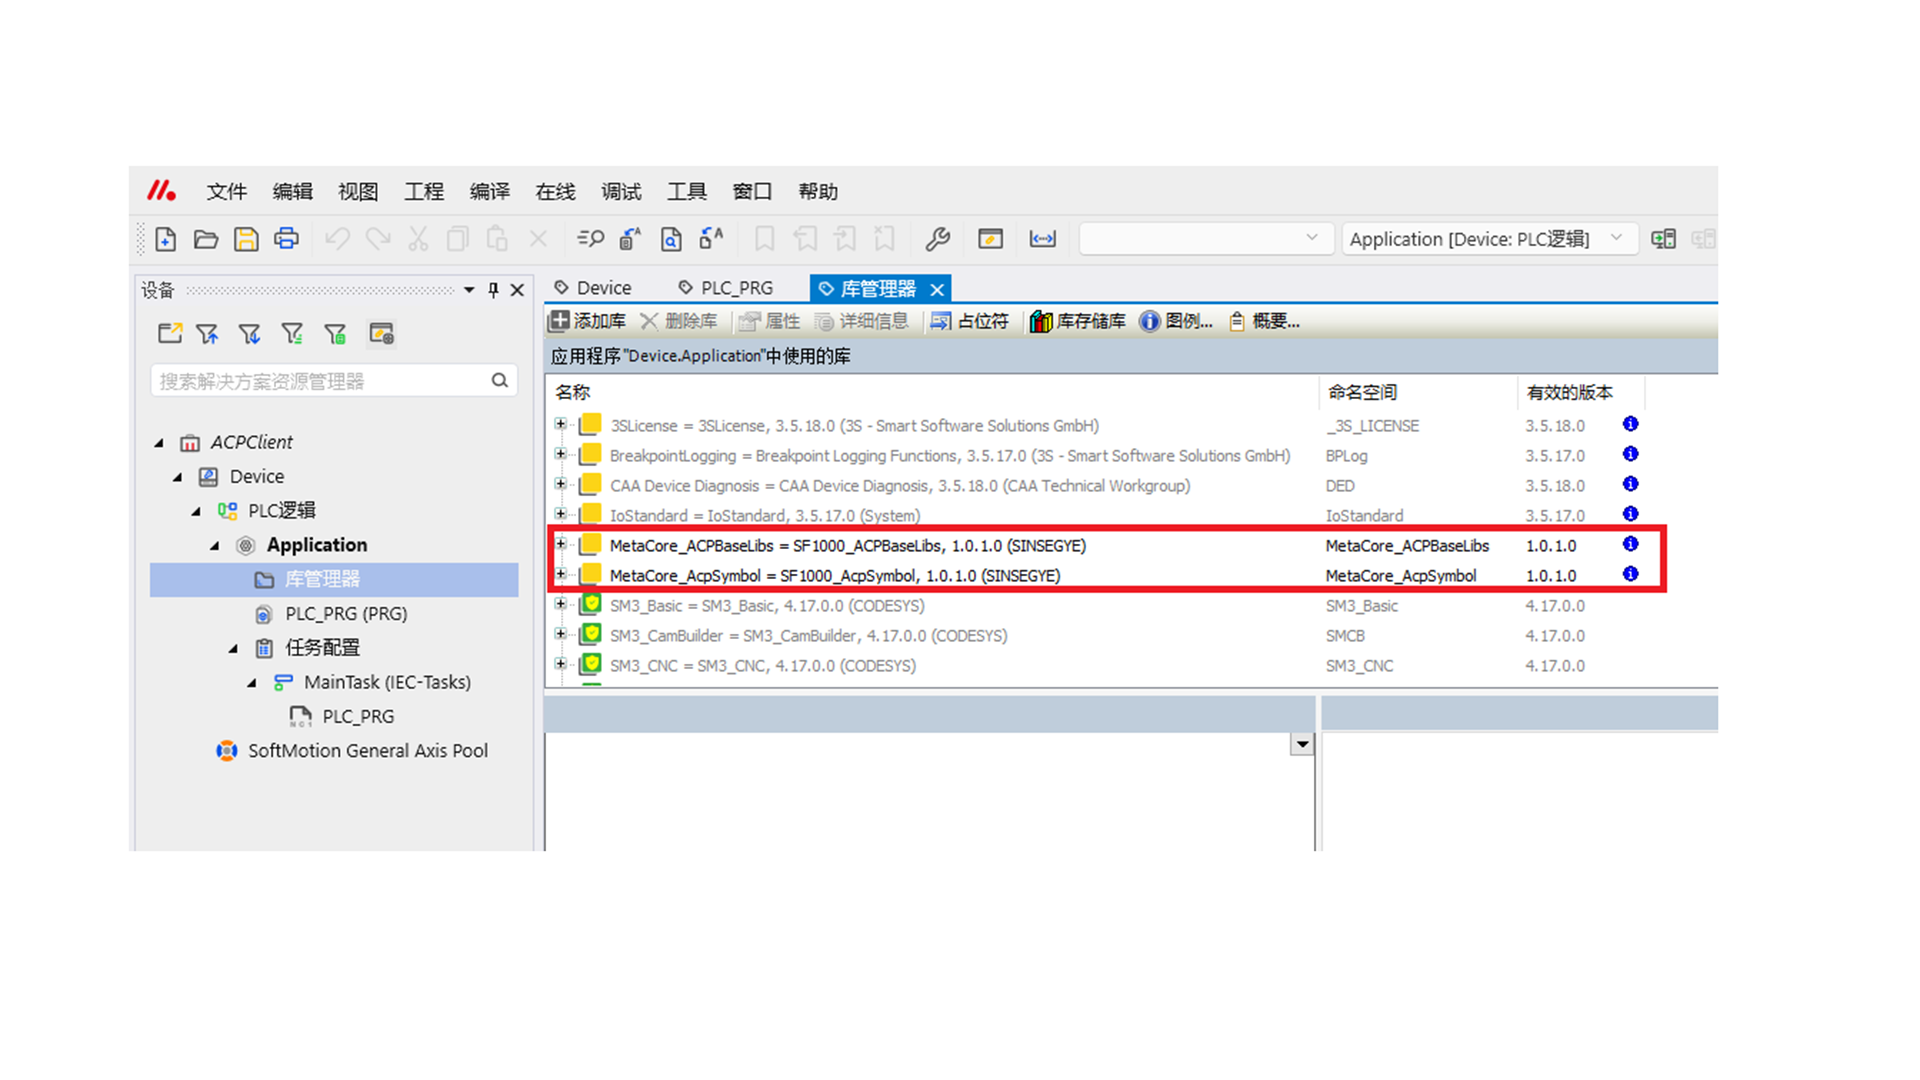
Click "Library Manager" -- "Add Library" to add the two library files SF1000_ACPBaseLibs and SF1000_AcpSymbol.
-
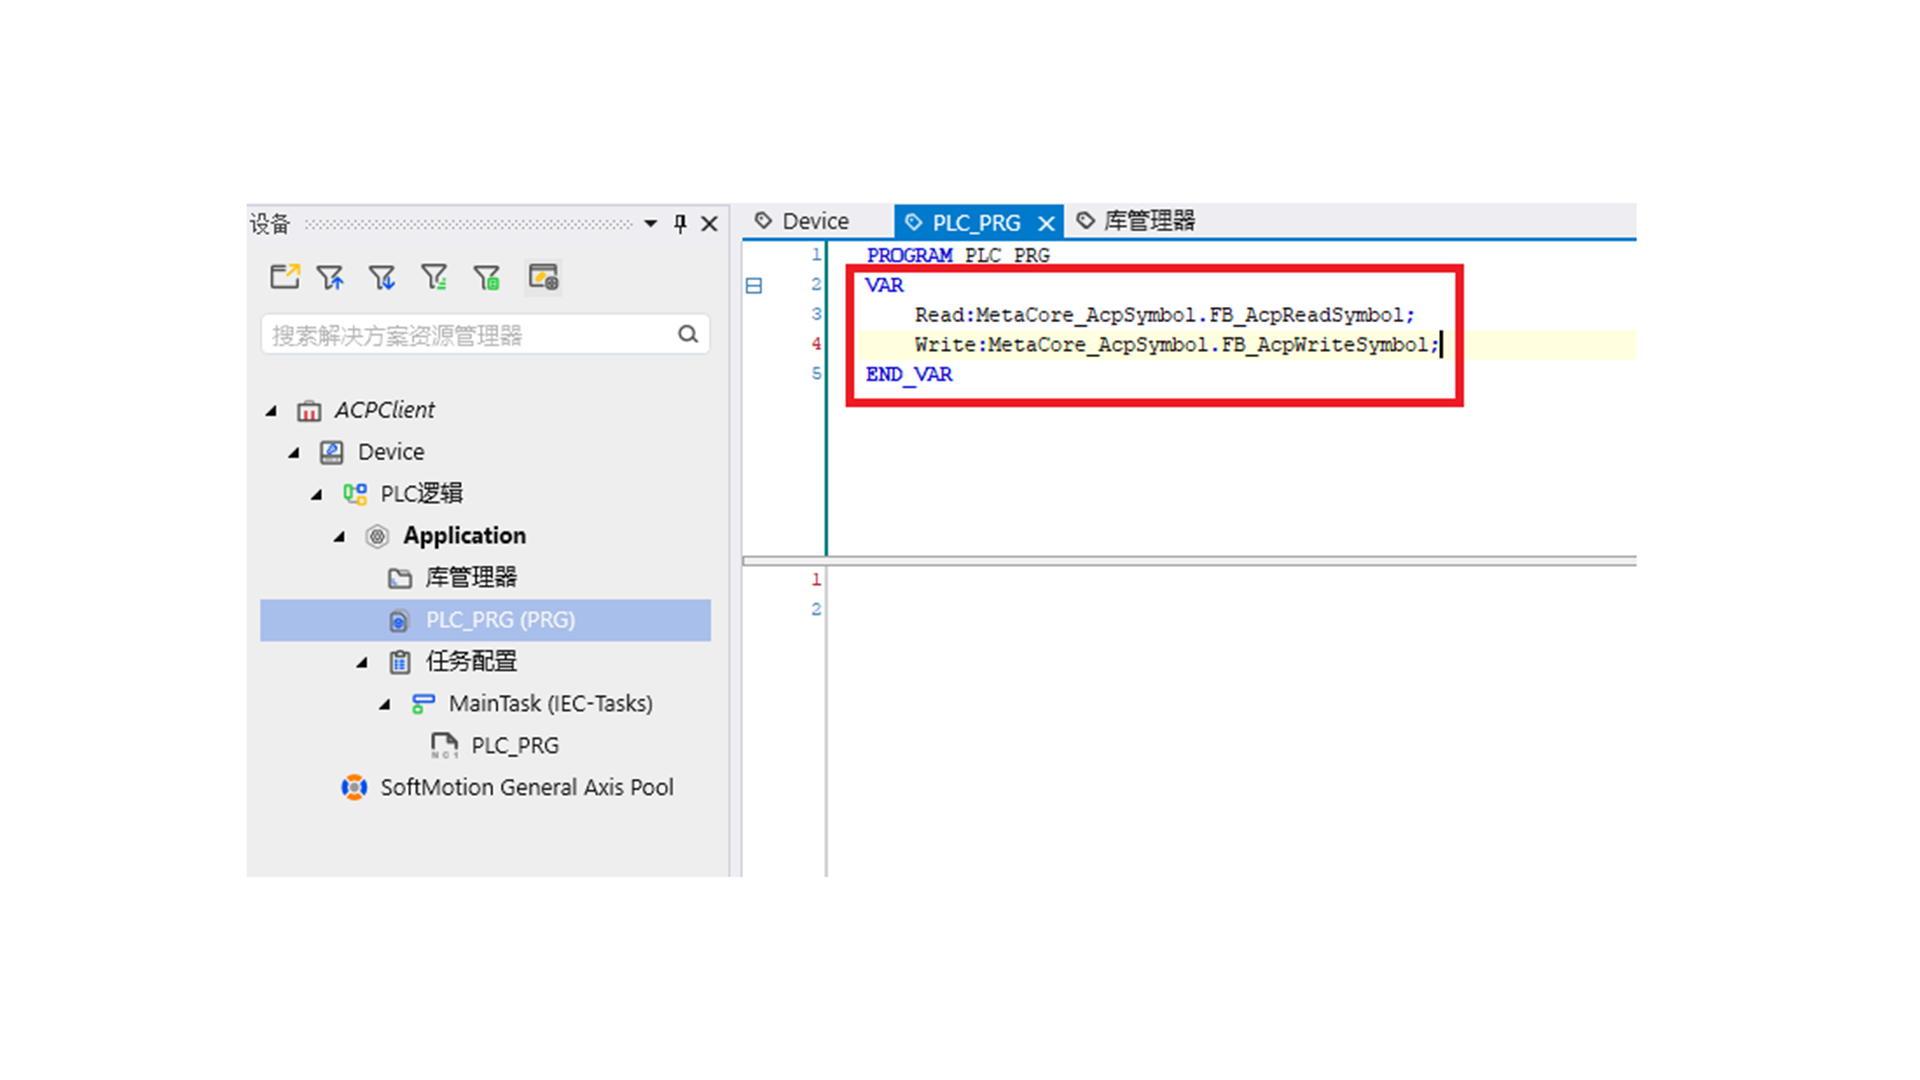
In the PLC program declaration, instantiate the function blocks MetaCore_AcpSymbol.FB_AcpReadSymbol and MetaCore_AcpSymbol.FB_AcpWriteSymbol.
-
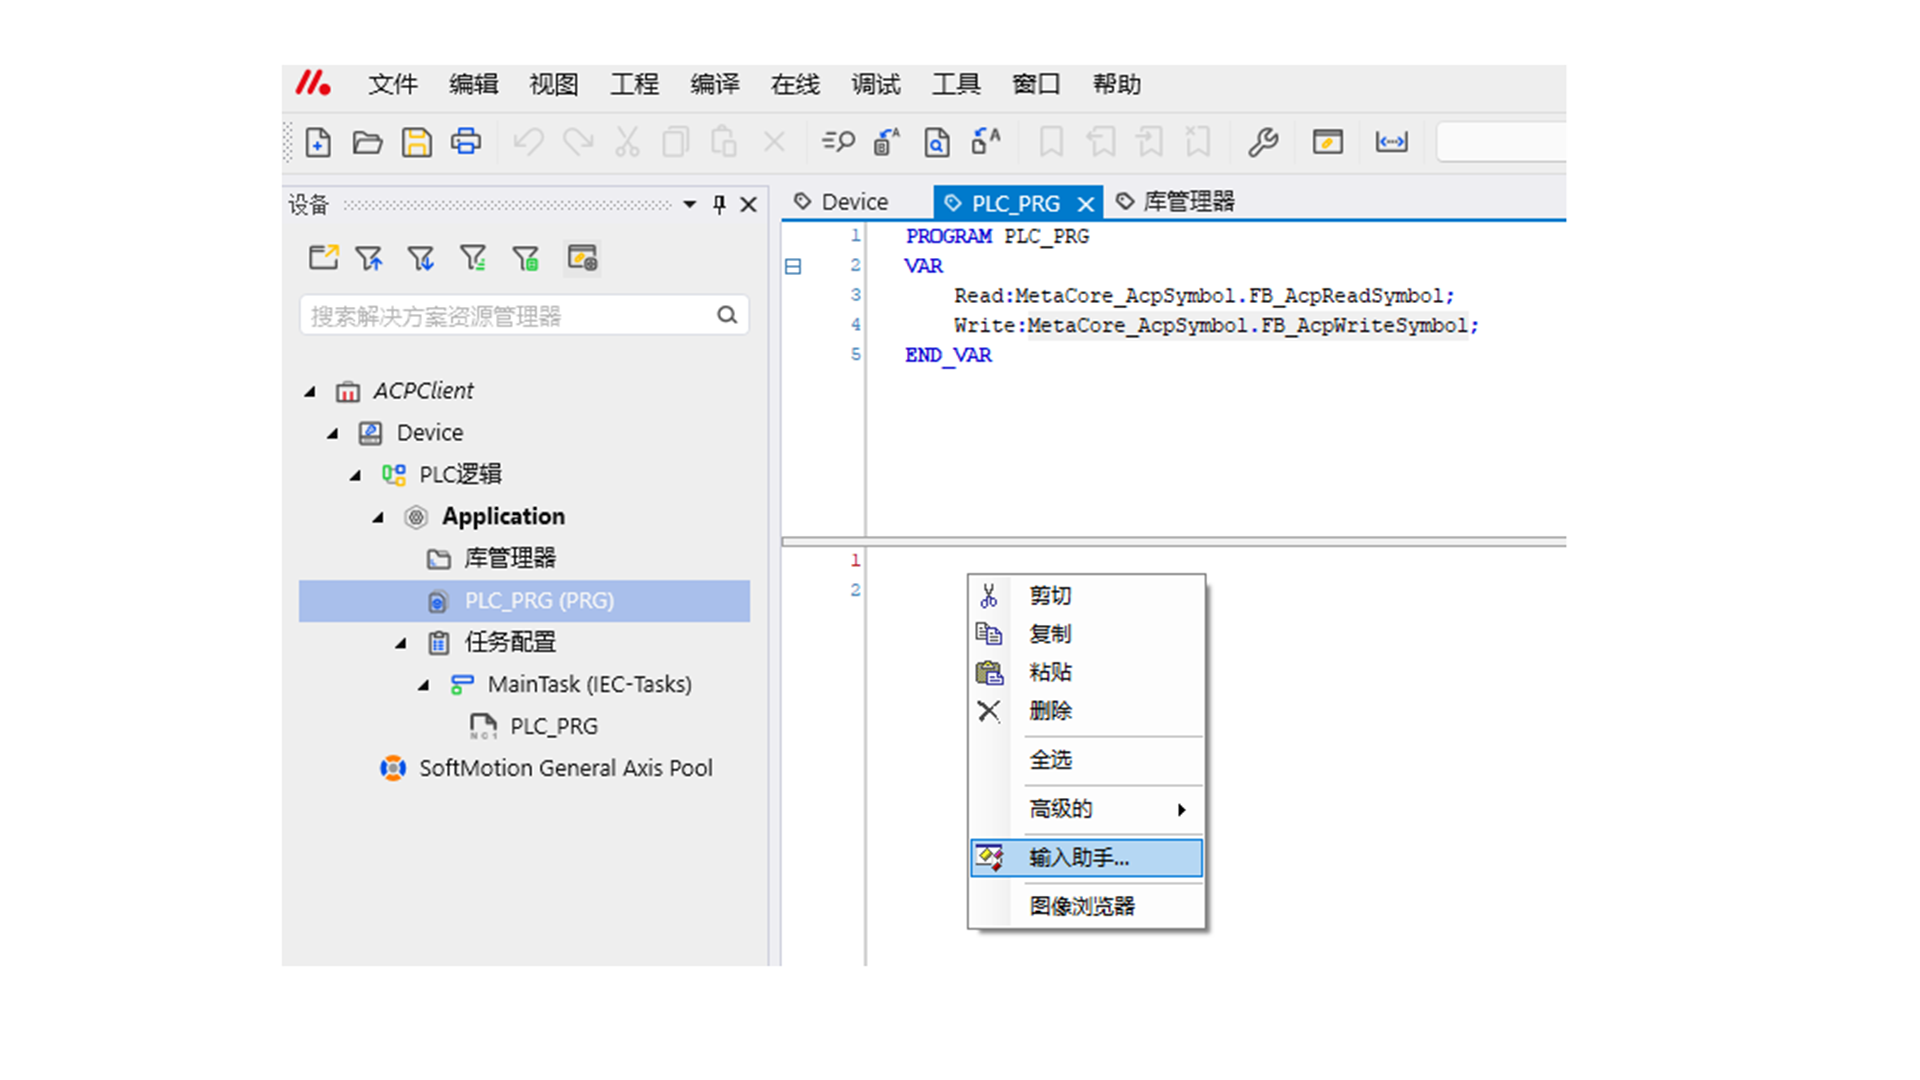
In the PLC program, right-click -- select "Input Assistant".
-
Select "Instance Call" -- select the "Read" function block and click "OK".
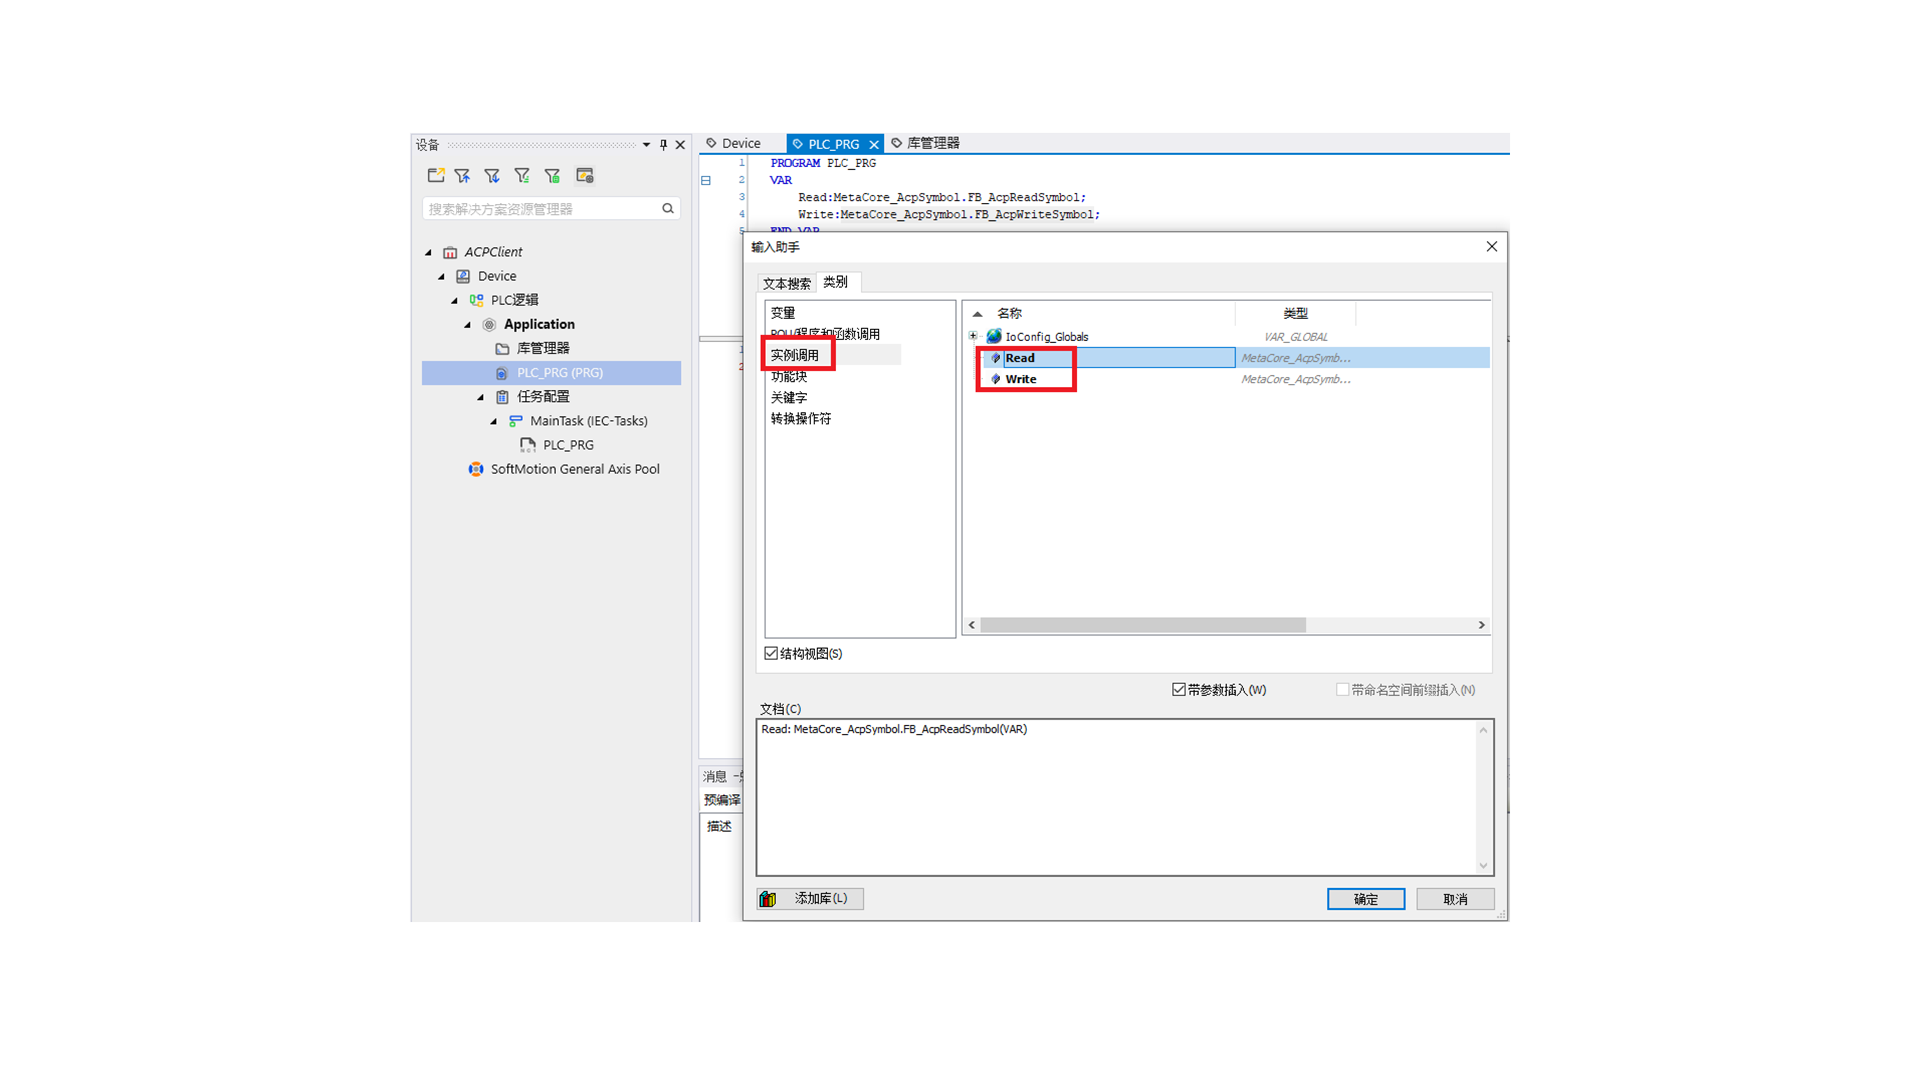
-
The PLC program will automatically add the Read function block.
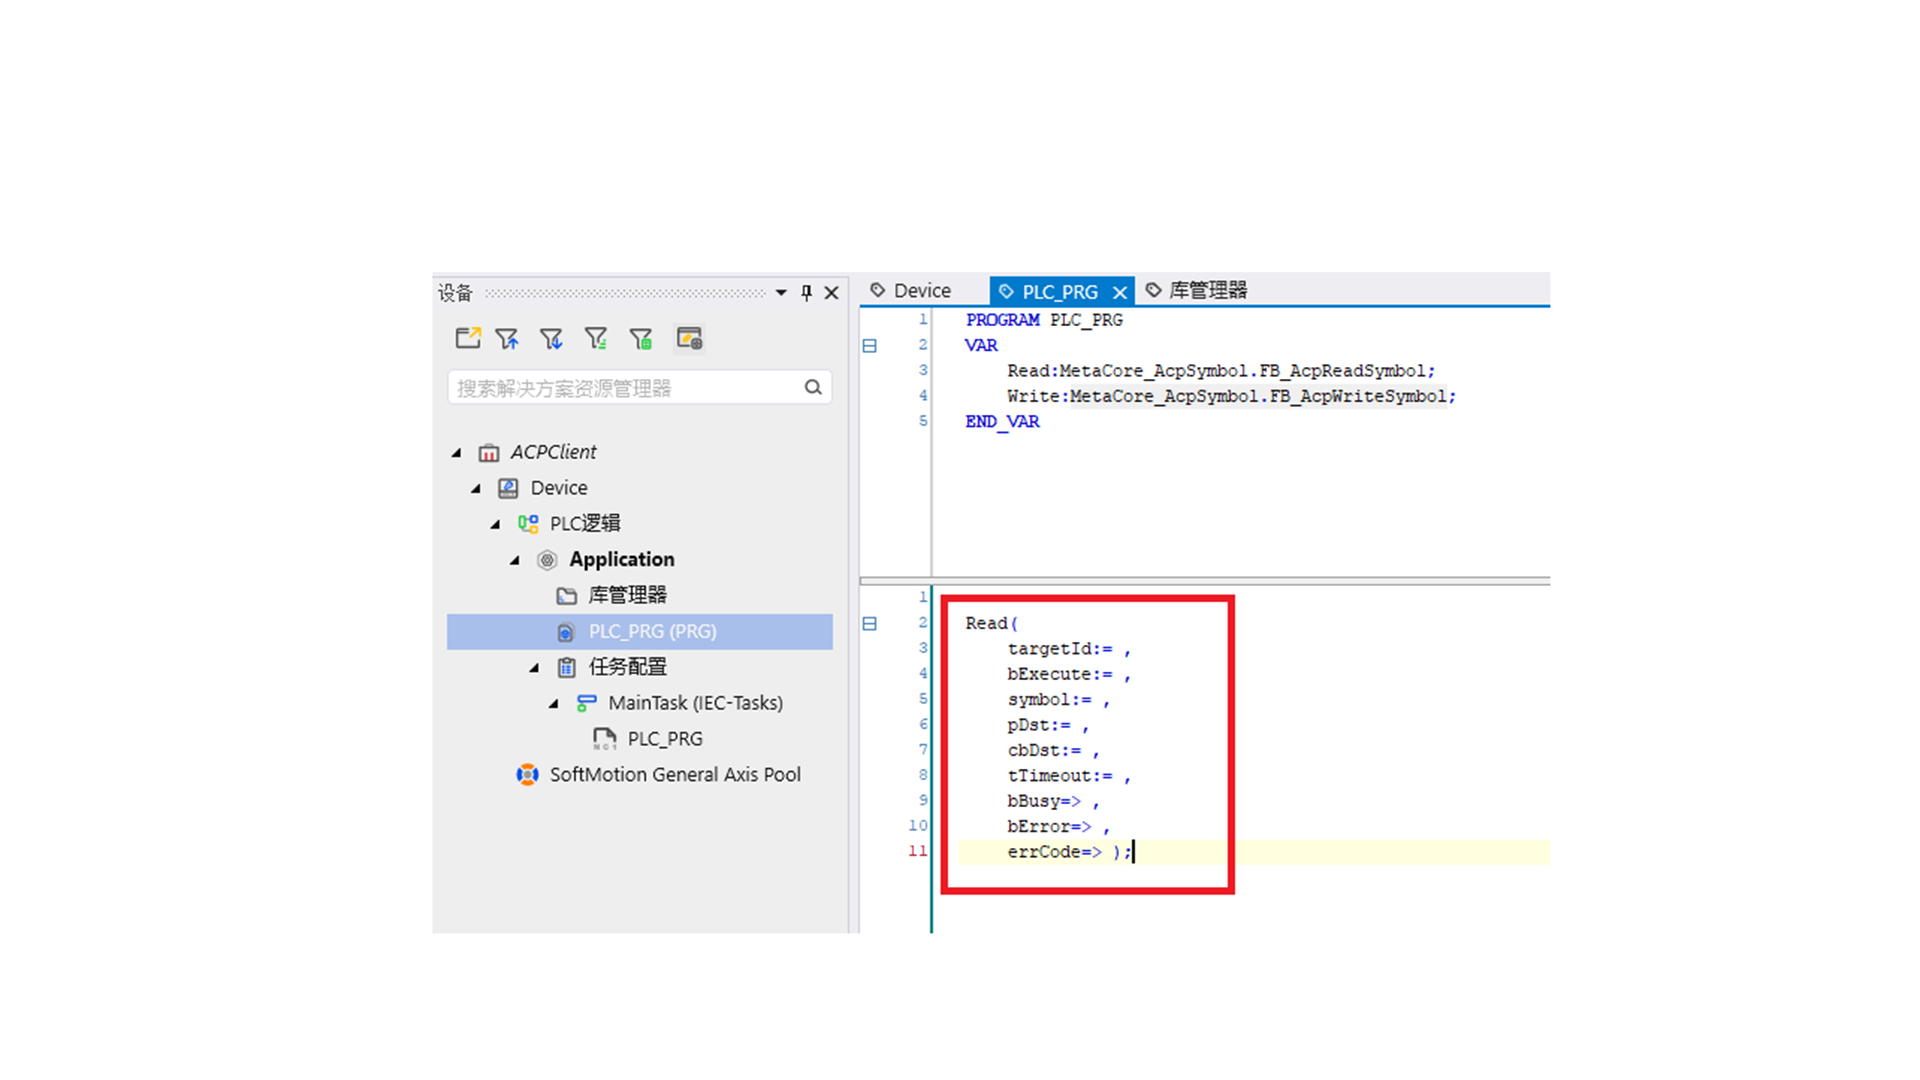
-
Declare variables. In this example, the variable read from the client is Application.PLC_PRG.udiVar11 of type UDINT. The read data is stored in the ReadData variable.
Parameter Name Parameter Type Description targetId ARRAY\[0..5] OF USINT IP address of the connected server (array type, the last two digits are fixed as 1) bExecute BOOL Rising edge starts the function block for ACP variable reading symbol String Variable address of the server to read, e.g., 'Application.PLC_PRG.udiVar11' pDst Pointer to BYTE Variable data read from the server, stored as BYTE at the address pointed to by the pointer cbDst UDINT Length of variable data read from the server, obtained using SIZEOF() tTimeout TIME Read timeout, default 5s 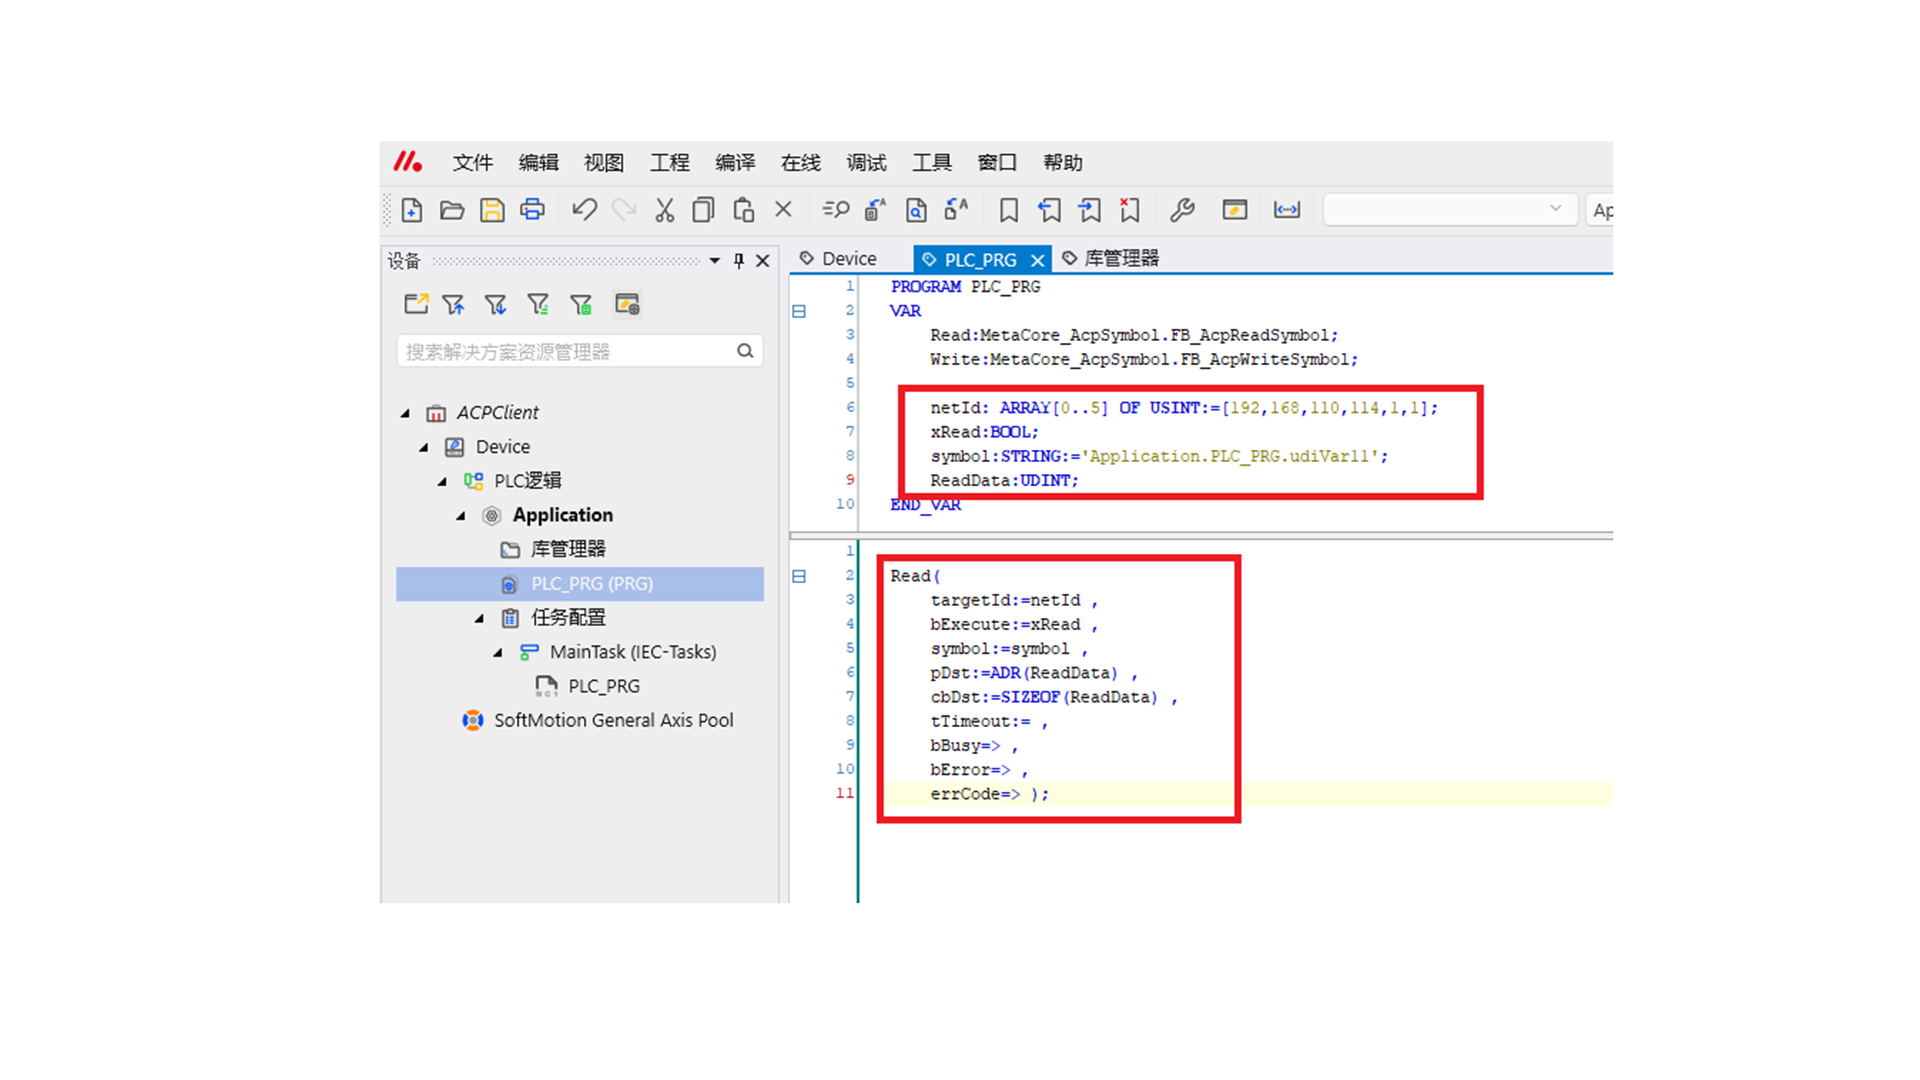
-
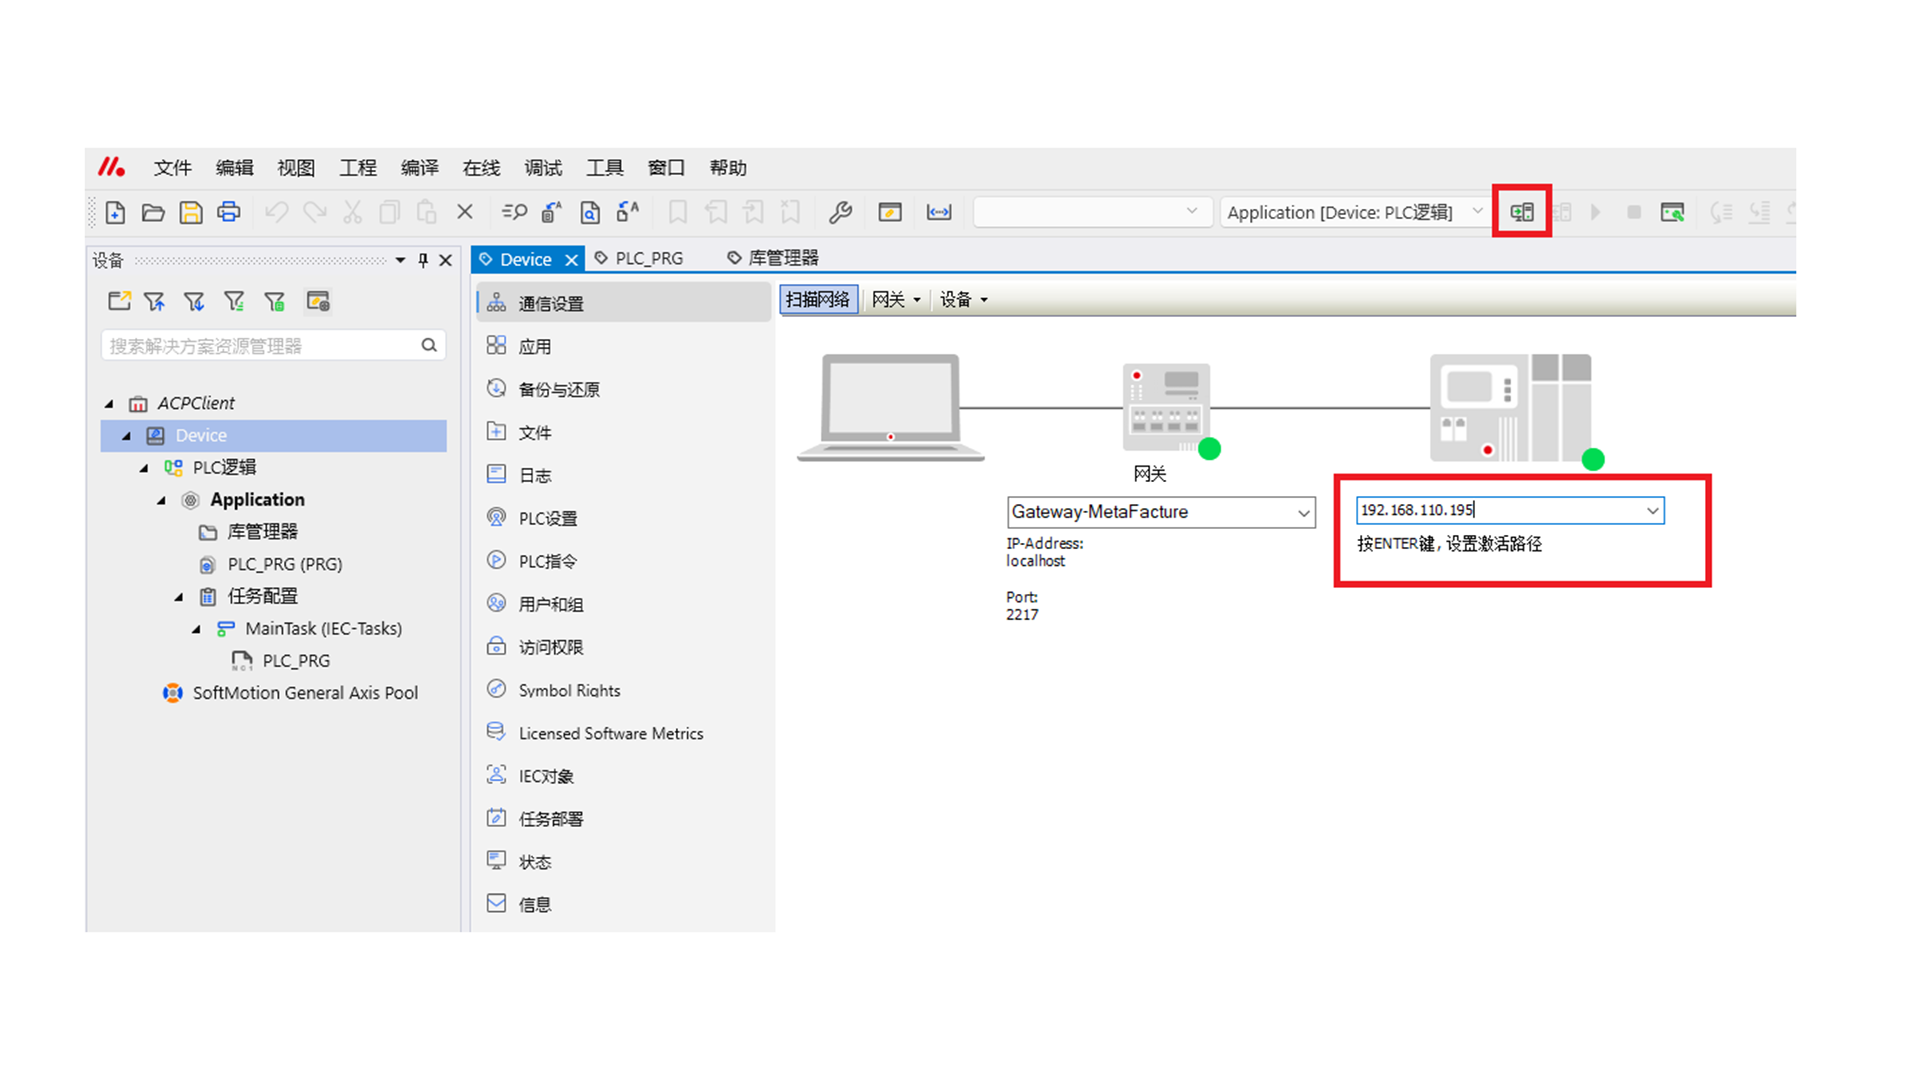
Log in to the client 192.168.110.195 and download the running program.
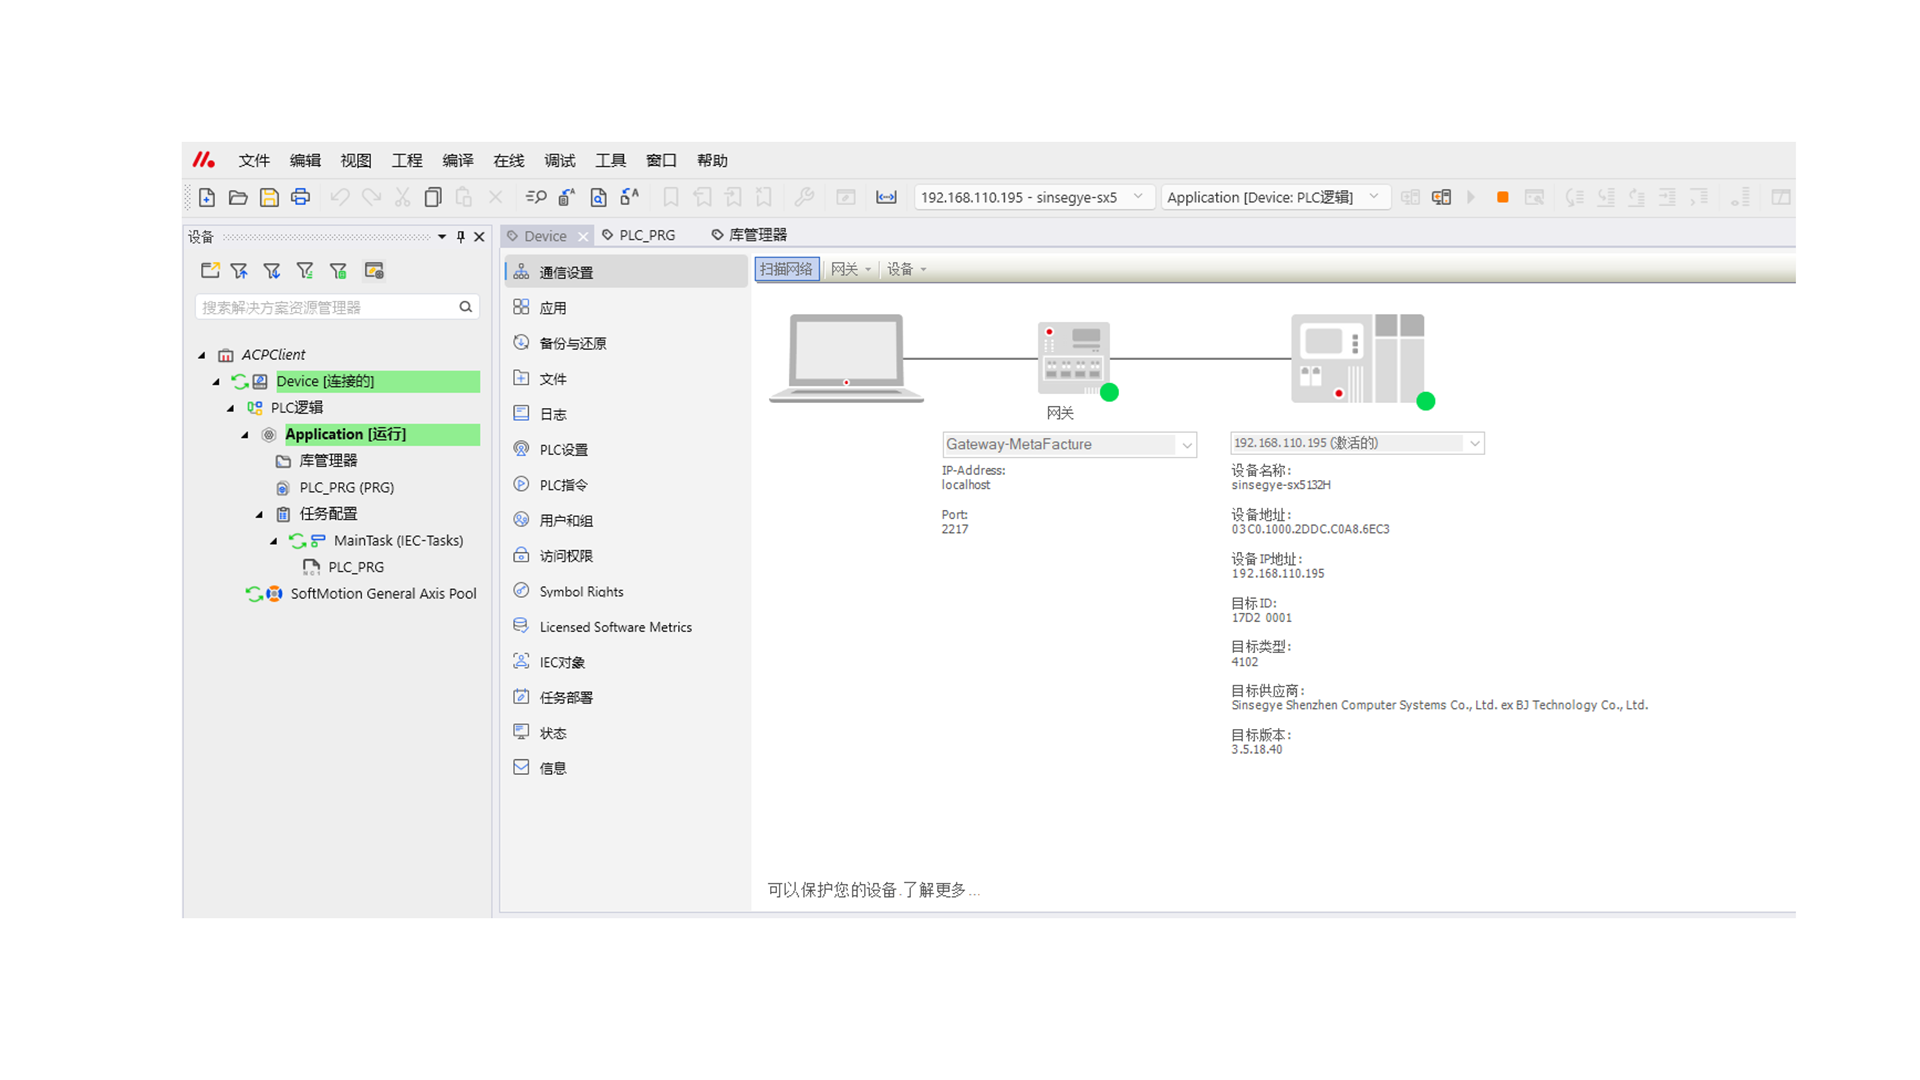
Set the xRead variable to True; ReadData successfully obtains the value 4294967295.
-
Use the input assistant to add an instance of the Write function block, and declare the xWrite variable as the write start variable and WriteData as the write data. In this example, write to the server variable Application.PLC_PRG.udiVar11 with the value 1122334455.
-
Log in to the client device and set xWrite to TRUE. The writing is completed.
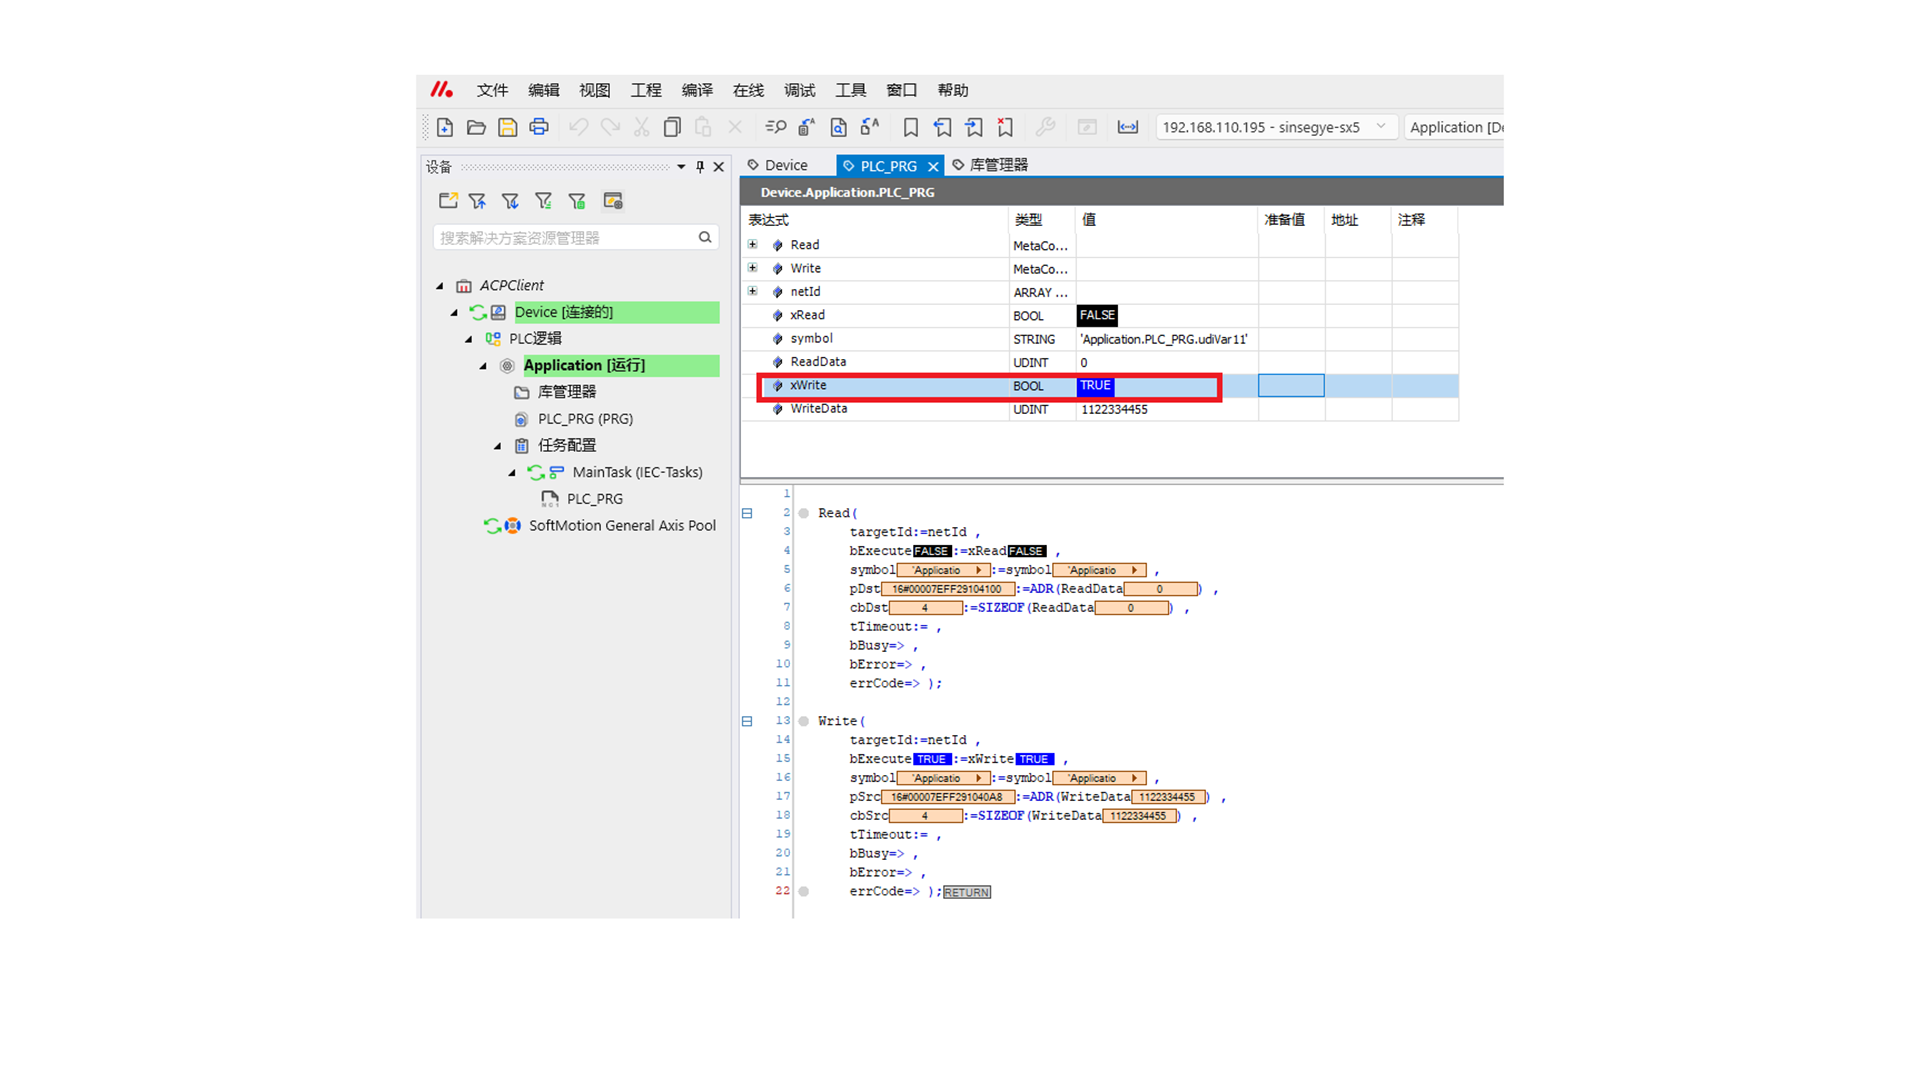
Check the server PLC; the value of udiVar11 has been modified to 1122334455.
-
To verify successful writing, set xRead to TRUE again to read udiVar11. The read value is the same as the written value, indicating successful writing.

III. Experimental Notes
1. Unable to read variable values
Solution: Check whether the variable path in the client symbol is consistent with that in the server.
2. Incorrect variable values read
Solution: Check whether the type of the variable read by the client is consistent with that in the server. Use the ADR() and SIZEOF() commands to obtain the pointer and data size.
Function Introduction
1. Introduction to function block FB_AcpReadSymbol

-
Input parameters
Parameter Name Parameter Type Description targetId ARRAY\[0..5] OF USINT IP address of the connected server (the last two digits of the array are fixed as 1) bExecute BOOL Rising edge starts the function block for ACP variable reading symbol String Variable address of the server to read, e.g., 'Application.PLC_PRG.Var1' pDst Pointer to BYTE Variable data read from the server, stored as BYTE at the address pointed to by the pointer cbDst UDINT Length of variable data read from the server, obtained using SIZEOF() tTimeout TIME Read timeout, default 5s -
Output parameters
Parameter Name Parameter Type Description bBusy Bool Function block running status: True (running), False (idle) bError Bool Error status: True (with error), False (normal) errInfo String Error information
2. Introduction to function block FB_AcpWriteSymbol

-
Input parameters
Parameter Name Parameter Type Description targetId ARRAY\[0..5] OF USINT IP address of the connected server (the last two digits of the array are fixed as 1) bExecute BOOL Rising edge starts the function block for ACP variable writing symbol String Variable address of the server to write, e.g., 'Application.PLC_PRG.Var1' pSrc Pointer to BYTE Variable data to write to the server; use ADR() to obtain the address of the variable to write cbSrc UDINT Length of variable data written to the server, obtained using SIZEOF() tTimeout TIME Read timeout, default 5s -
Output parameters
Parameter Name Parameter Type Description bBusy Bool Function block running status: True (running), False (idle) bError Bool Error status: True (with error), False (normal) errInfo String Error information
Appendix
I. Method for manually installing deb components on icomputer
It is recommended to use Device Manager to install and uninstall plugins. If manual installation of deb components is required, follow these steps:
-
Connect the personal computer to the switch and set its IP address to be in the same network segment as the icomputer.

-
Download the required components to the personal computer and place them in the same folder.

-
Right-click on the blank area of the folder and select "Open in Terminal".

-
Transfer the acpplcaccess_0.1.5-rc.3_amd64.deb file to the client icomputer using the scp command.
sqlscp -P 2224 acpplcaccess_0.1.5-rc.3_amd64.deb sinsegye@192.168.110.175:~
The password is 1.

Remotely connect to the icomputer command line via ssh:sqlssh -p 2224 sinsegye@192.168.110.175
Install the acpplcaccess_0.1.5-rc.3_amd64.deb file using the dpkg command:shellsudo dpkg -i acpplcaccess_0.1.5-rc.3_amd64.debIf an error occurs, use the forced installation command:
shellsudo dpkg -i --force-overwrite acpplcaccess_0.1.5-rc.3_amd64.deb
Open the SinsegyeRTE.cfg file using the nano command:sqlsudo nano /usr/local/etc/SinsegyeRTE/SinsegyeRTE.cfg
Under \[ComponentManager], add Component.0=AcpPlcAccess (the red part is added as appropriate). Press Ctrl+X to exit -- select Y -- press Enter to confirm.

Restart the icomputer:sqlsudo rebootSimilarly, use the following commands to install the libacp_0.1.0-rc.5_amd64.deb component on the client icomputer (the client icomputer IP in this example is 192.168.110.123):
shellscp -P 2224 libacp_0.1.0-rc.5_amd64.deb sinsegye@192.168.110.123:~ ssh -p 2224 sinsegye@192.168.110.123 sudo dpkg -i libacp_0.1.0-rc.5_amd64.debInstall the acpreadwrite_0.0.1-rc.1_amd64.deb component on the client icomputer (the client icomputer IP in this example is 192.168.110.123):
shellscp -P 2224 acpreadwrite_0.0.1-rc.1_amd64.deb sinsegye@192.168.110.123:~ ssh -p 2224 sinsegye@192.168.110.123 sudo dpkg -i acpreadwrite_0.0.1-rc.1_amd64.debOpen the SinsegyeRTE.cfg file using the nano command:
sqlsudo nano /usr/local/etc/SinsegyeRTE/SinsegyeRTE.cfgUnder \[ComponentManager], add Component.0=acpreadwrite (the red part is added as appropriate).

Restart the icomputer:shellsudo reboot
II. Error Diagnosis
The following table outlines possible unexpected operation behaviors and their solutions:
| Unexpected Operation Behavior | Solution |
|---|---|
| The name/path of the read/write variable is different from that of the server | Modify the variable path or name |
| The type of the read/write variable is different from that of the server | Modify the variable type |
| The type of the read/write structure or its sub-members is different from that of the server | Confirm the server structure and modify the type of the read structure and its sub-members |
III. Support and Services
Sinsegye provides comprehensive support and services for its products and solutions, ensuring rapid and professional responses to related issues.
Document Download
Our document download area covers a wealth of file resources, including application cases, technical documents, product introductions, etc., to meet your diverse needs.
Document download address: https://help.sinsegye.com.cn/
Obtain Support
For local support and services for Sinsegye products, please feel free to contact us. You can visit our official website www.sinsegye.com.cn to find the addresses of Sinsegye's branches and get more information about Sinsegye.
In addition, you can contact us through the following methods:
- Hotline: 400-013-2158
- Email address: Sales@sinsegye.com.cn